|
Managing PKCS #11 Providers
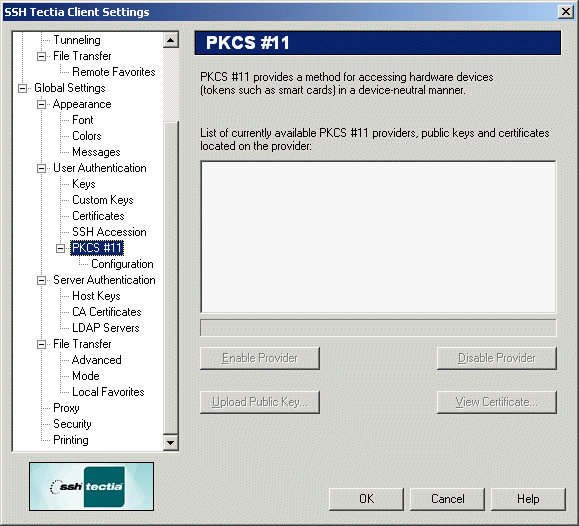
The PKCS #11 page contains a list showing the configured
PKCS #11 providers. Under each provider there is a list of the
available keys and certificates. Note that the list view does not get
updated automatically, only when you close and reopen it.
A new provider can be added to the list on the Configuration
page of the Settings dialog. For more information, see Section Configuration.

Figure : The PKCS #11 providers list
You can open the PKCS #11 page by double-clicking the card
reader icon on the right-hand side of the terminal window status bar at
the bottom of the window.
Hardware tokens and PKCS #11 software keys can be used with or
without PKI. The standard public-key authentication can be used with
PKCS #11 providers.
The following buttons can be used to manage the PKCS #11 providers:
- Enable Provider
Select a PKCS #11 provider from the list and click Enable
Provider to allow the use of the selected provider.
- Disable Provider
Select a PKCS #11 provider from the list and click Disable
Provider to disable the use of the selected provider.
- Upload Public Key...
Select a key from the list and click Upload Public Key... to
upload one of the public keys from the token to the server. This allows
you to use a hardware token for your personal authentication. In order
to do this, you have to be already connected to a server.
Please note that an RSA token requires RSA support to be compiled in the
server software. See Section Uploading Your Public Key for
information on how to upload a software public key to the server.
- View Certificate...
Click View Certificate... to display the contents of the
selected certificate.
Configuration Page
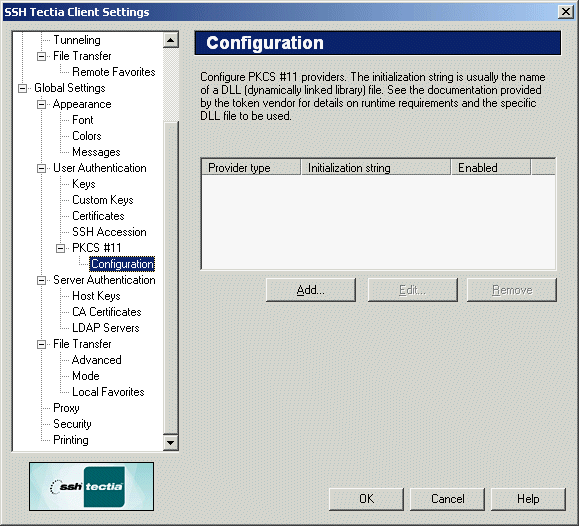
The Configuration page of the Settings dialog can be
used to manually configure PKCS #11 providers.

Figure : Configuring PKCS #11 providers
The following fields are visible in the provider list, displayed at the
top of the Configuration page:
- Provider Type
The Provider Type field displays the type of the provider.
- Initialization String
The Initialization String field displays the string of
characters used for initialization.
- Enabled
The Enabled field displays whether the use of the provider is
currently allowed or not. To change the Enabled status, click
Edit....
The following buttons can be used to control the provider settings:
- Add...
Click Add... to add a new PKCS #11 provider. The PKCS
#11 Provider dialog opens.
- Edit...
Click Edit... to change the details of the PKCS #11
provider. The PKCS #11 Provider dialog opens.
- Remove
Click Remove to delete the PKCS #11 provider definition.
PKCS #11 Provider Dialog
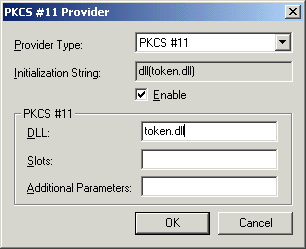
The PKCS #11 Provider dialog allows you to view and modify
the provider definition.

Figure : The details of the PKCS #11 provider
The following options are available:
- Provider Type
Select the provider type from the drop-down menu.
- Initialization String
This field displays the character string used for initialization.
- Enabled
Leave the Enabled check box selected, except if you have
trouble accessing the token from another application that is running
simultaneously. The usability of a PKCS #11 for several simultaneous
applications depends on the specific third-party PKCS #11 driver.
PKCS #11
Fill in the following text fields to pass other parameters to the PKCS
#11 provider:
- DLL
Consult the token manufacturer documentation to determine the file name
of the PKCS #11 DLL. Type this file name in the DLL field.
- Slots
The Slots parameter is not required, but if you have problems accessing
a specific key on a hardware token, you may need to modify this
parameter accordingly. Consult the third-party documentation for the
exact requirements of this parameter.
For example: to use PKCS #11 slots 0 through 10, use the value
0-10, and to use slots 1 through 5 except 3, use the value
1-5,!3.
- Additional Parameters
Additional parameters can be defined, if specified in the third-party
documentation.
When you save the settings (by selecting File -> Save
Settings) and then restart SSH Tectia Client, you should see a small
card reader icon on the status bar at the bottom of the terminal window.
When a token is inserted, a smart card appears in the card reader in the
icon. When a key is acquired from the token, a key symbol appears on top
of the card reader icon.
If you do not see the card reader icon, check that the DLL name has been
entered correctly. If you cannot get the keys from the token, make sure
that the token has been personalized correctly. Please note that
hardware tokens are usually shipped uninitialized, so you are required
to personalize the token yourself. To do this, you need to consult the
third-party documentation included with the token.


 [Contents]
[Index]
[ Contact Information | Support | Feedback | SSH Home Page | SSH Products ]
Copyright © 2010 SSH Communications Security Corp.
This software is protected by international copyright laws. All rights reserved.
Copyright Notice
|