|
Uploading Your Public Key
If you want to use public-key authentication when connecting to the
remote host computer, you have to upload your public key to the host. If
you have not yet generated your own public key, see Section Generating Keys.
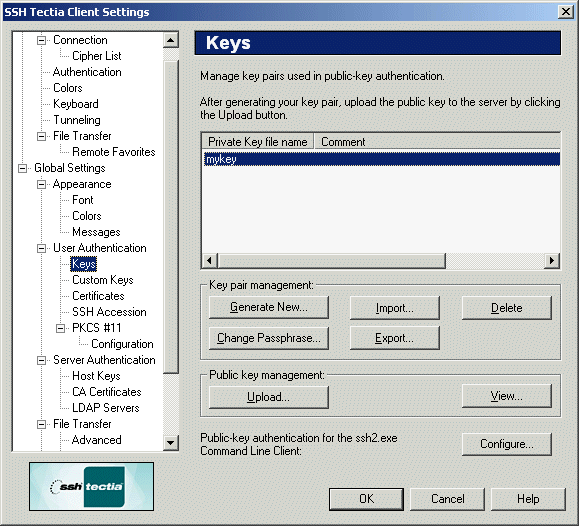
Public keys can be uploaded automatically to a server. After a
connection has been made to the server, a key pair can be selected on
the Keys page of the Settings dialog. See Section Managing Keys.

Figure : The Keys page of the Settings dialog
Click Upload... to open the Upload Public Key dialog that allows
you to automatically upload the public key to the specified directory, and
automatically add an entry for the key to the authorization file.
Note: The automatic key uploading process uses the SFTP
protocol. The administrator of the remote host computer may have
restricted user access so that users are not able to configure
public-key authentication for themselves even if public-key
authentication is allowed in the server configuration. If you do not
have the proper file permissions to the key directory, the automatic
upload will fail.
Even if the automatic upload succeeds, it is possible that the server
administrator has configured the system to store keys elsewhere than in
the default .ssh2 directory. In this case the keys and the
authorization file additions have to be moved manually to the proper
directory.
If you do not use the automatic upload facility, you will need to place
your public key file in the .ssh2 subdirectory in your home
directory on the remote host computer. The default location for Unix
servers is $HOME/.ssh2 and for Windows servers the
.ssh2 directory under the user profile directory. The
authorization file residing in the .ssh2 directory
must be edited to take the newly transferred key into use.
See Sections Manually Copying the Key File and
Manually Editing the Authorization File.

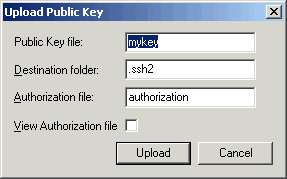
Figure : The Upload Public Key dialog
- Destination Folder
This is the subdirectory on the server to which the public key file will
be uploaded. If this directory does not exist, it will be created
under your home directory on the server (for example
/home/username/.ssh2/ or C:\Documents and Settings\username\.ssh2\). The default value is
.ssh2
- Authorization File
This is the file on the server that contains details of your public
keys. If this file does not exist, it will be created. The default value
is authorization.
- View Authorization File
Selecting this box allows you to view and edit the
authorization file before it is uploaded to the server.


 [Contents]
[Index]
[ Contact Information | Support | Feedback | SSH Home Page | SSH Products ]
Copyright © 2010 SSH Communications Security Corp.
This software is protected by international copyright laws. All rights reserved.
Copyright Notice
|