|
     |
The easiest way to configure the server is to use the Tectia Server
Configuration tool. Start the program by clicking the Tectia Server
Configuration icon in the Tectia Server program group (or by running
the ssh-server-gui.exe program located in the installation directory on Windows).
The Tectia Server Configuration tool displays the settings in a tree structure. Select the desired configuration page by clicking the list displayed on the left. The order of settings in the Tectia Server Configuration tool follows the same logic that is used in setting up a Secure Shell connection:
The settings related to the server's own configuration are made with the following configuration pages:
Tectia Server (see Tectia Server)
General (see General)
Proxy Rules (see Proxy Rules)
Domain Policy (see Domain Policy)
Password Cache (see Password Cache)
Identity (see Identity)
Network (see Network)
Logging (see Logging)
Certificate Validation (see Certificate Validation).
After the client has initiated a connection to the server, the server checks whether connections from the client address are allowed. The client and server perform key exchange where the server authenticates itself to the client, and ciphers, KEXs and MACs are selected for the connection. The related configuration settings are made with the Connections and Encryption configuration page (see Connections and Encryption).
The server requests the user to authenticate itself to the server. The server may offer a selection of authentication methods or require several authentication methods to be passed in succession. The configuration settings related to authentication are made with the Authentication configuration page (see Authentication).
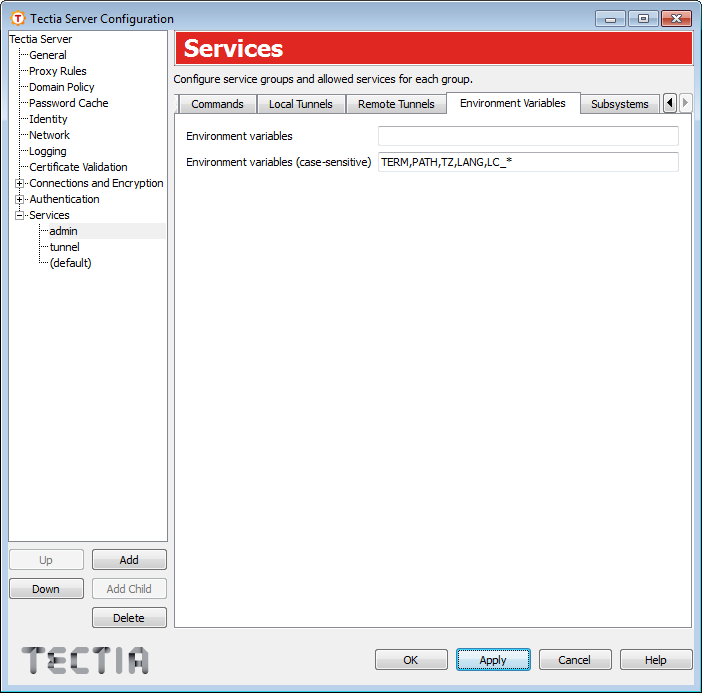
The server determines the services the client is allowed to use. The related configuration settings are made with the Services configuration page (see Services).
For troubleshooting instructions, see also Chapter 9.
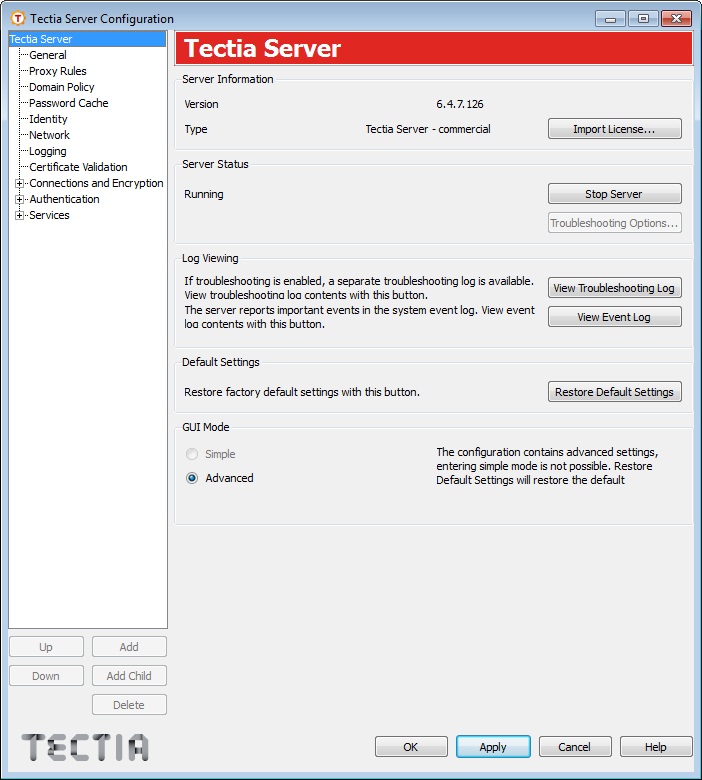
The Tectia Server page allows you to start and stop the server, adjust troubleshooting settings, view the event log, restore the settings to their default values, and select the GUI mode (simple or advanced).
The server version and the license type (commercial or evaluation) are shown at the top of the page.
If a valid license file cannot be found, the text "License not available" is shown in place of the server and license type. The server will not start without a license file. For more information, see Licensing.
The server status is displayed on the left. The status can be either Stopped, Starting, Running, Stopping, Paused, Pausing, Continuing, or Failure. To start or stop the server, click the Start Server/Stop Server button.
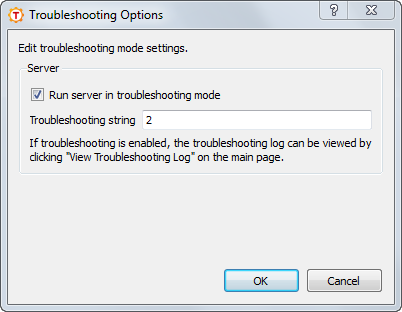
When the server is stopped, clicking the Troubleshooting Options button opens a dialog box where you can set the server to run in troubleshooting mode.
To run the server in troubleshooting mode, select the check box and enter a
troubleshooting string. The string can be a number from 1 to 99 (the default is
2). The higher the number, the more detailed
troubleshooting output is generated.
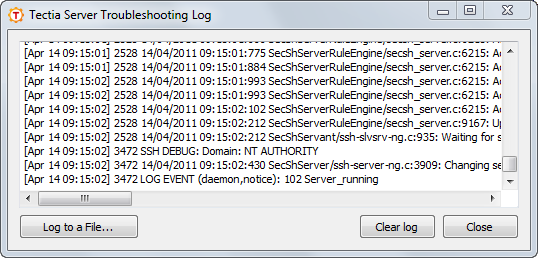
When the server is started again, the troubleshooting log can be viewed by clicking View Troubleshooting Log.
When the server is running in troubleshooting mode, the log can be viewed by clicking View Troubleshooting Log. This opens a separate window where the log is displayed. The log is displayed from the moment the window is opened.
In the log window, you can select the text normally and copy it to clipboard. If you want the whole log saved to a file, click Log to a File, and define the file name and location. To clear the log window, click Clear log. To close the window, click Close.
Note that closing the window does not affect the mode the server is running in. Reopening the window will again display the log from the moment of opening.
Important events are logged in the system event log. Click the View Event Log button to launch the Event Viewer program that allows you to examine the log contents. For more information, see Auditing.
To discard any changes you have made to the configuration settings and restore the factory default values, click the Restore Default Settings button and click OK in the confirmation dialog.
Note that the settings will not revert back to the previously saved values, but to the initial values that are built into the program.
The Tectia Server Configuration tool can be run in two GUI modes: Simple and Advanced.
In the simple GUI mode, you cannot add multiple rules under the Connections and Encryption, Authentication, and Services pages, and the Selector tabs are not available. The same connection, authentication, and service rules are applied to all users. If you have already defined selectors or added several rules, you cannot enter simple mode. Clicking Restore Default Settings will restore the default configuration and allow entering simple mode again.
In the advanced mode, all settings in the GUI are available. You can add several rules under Connections and Encryption, Authentication, and Services pages and define selectors for them. See Connections and Encryption, Authentication, and Services,.
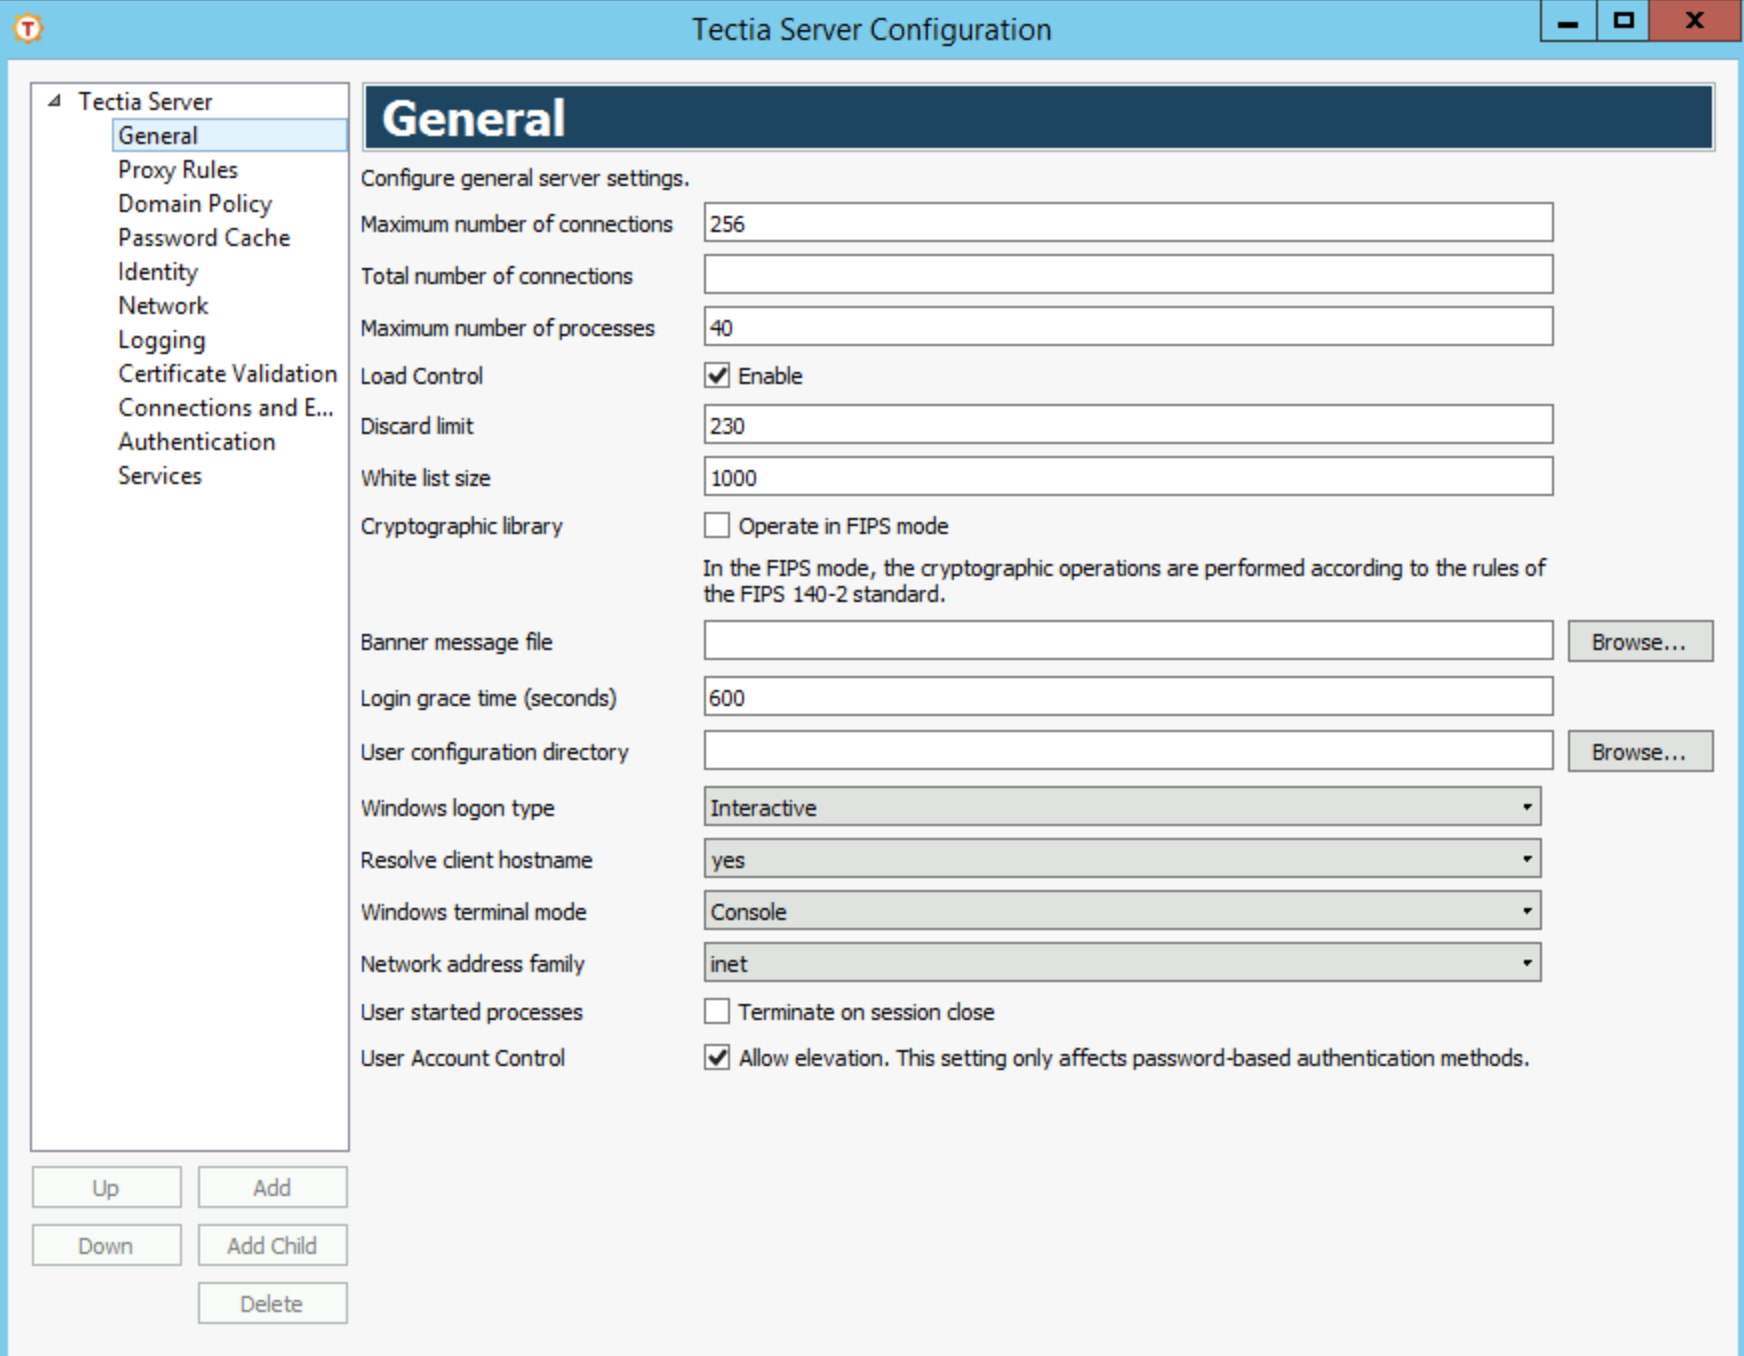
The General page contains the general server settings, for example, the maximum number of connections and processes, settings for load control, FIPS mode, and banner message.
Tectia Server uses a distributed architecture where the master server process launches several servant processes that handle the actual client connections. The server's total number of connections is the number of connections multiplied by the number of processes.
Limiting the maximum number of connections is useful in systems where system overload may be caused by a high load in the server program when opening new connections.
Maximum number of connections defines the maximum number of client connections allowed per servant. The default (and recommended) value is 256.
Total number of connections
defines the maximum number of connections that a servant will handle
before the server should start a new servant in its place. The allowed value range is
1-4,000,000,000. If no value is given (default), the servant-lifetime functionality
will be disabled and the servants are never retired. This corresponds to the
servant-lifetime element in the server configuration file (see
servant-lifetime
).
Maximum number of processes defines the maximum number of servant processes the master server will launch. The value range is 1 to 2048. The default (and recommended) value is 40.
The maximum number of connections a server can handle depends on system resources, including the maximum number of open file descriptors, the maximum number of processes available to a single user, the maximum number of available PIDs, and the amount of memory available.
Load Control defines settings for keeping Tectia Server working when the load is high, that is, the number of current connections is near the maximum allowed number of connections. High load might be caused by a connection flood denial-of-service attack that tries to make the server unavailable to its intended users by using so much of its resources that normal service is disrupted. Load control is enabled by default. To disable load control, clear the Enable check box.
![[Note]](images/note.gif) | Note |
|---|---|
If Maximum number of connections is set to 1, load control will be disabled. |
Load control is implemented by keeping a "white list" of the IP addresses of connections that have had a successful authentication. When Tectia Server starts, the white list is empty. When the server's load is high, connections from IP addresses that are not on the white list (that is, connections that have not recently had a successful authentication) are discarded.
When the number of a servant's concurrent connections is not higher than the value of Discard limit, the servant accepts connections from any IP address. When the number of a servant's concurrent connections exceeds the Discard limit, only connections from IP addresses that are on the server's white list are accepted. If existing servants cannot accept any more connections, but the Maximum number of processes (that is, the maximum number of servant processes the master server will launch) limit has not been reached, the server launches a new servant process which will accept new connections.
The allowed value range for Discard limit is 1 to Maximum number of connections - 1. The default value is 90 percent of the value of Maximum number of connections.
White list size specifies the number of IP addresses on the server's white list. The allowed value range is 1 to 10000. The default value is 1000.
Tectia products can be operated in FIPS mode, using a version of the cryptographic library that has been certified according to the Federal Information Processing Standard (FIPS) 140-2.
The full OpenSSL cryptographic library is distributed with Tectia Server. This OpenSSL FIPS-certified cryptographic library is used to provide the classes of functions listed in the following tables.
The functions from the OpenSSL 3.0.12 24 Oct 2023 (FIPS provider: 3.0.9) used on Linux, Windows, and Solaris are listed in Table 4.1.
Table 4.1. APIs used from the OpenSSL cryptographic library version 3.0
| API | Description | Functions from OpenSSL |
|---|---|---|
| Random numbers | AES/CTR DRBG based on NIST SP800-90A is used from the OpenSSL library. | RAND_bytes, RAND_add |
| Ciphers | aes-ecb, aes-cbc, aes-ofb, aes-ctx, aes-gcm 3des-(ecb,cbc,cfb,ofb) | EVP_CIPHER_CTX_*, EVP_Cipher* |
| Math library | Bignum math library used by OpenSSL. | BN_* |
| Diffie Hellman | DH, ECDH, curve25519, curve448 | EVP_PKEY_*, DH_* |
| Hash functions | Variants: sha1[verify only], sha224, sha256, sha384, sha512 | EVP_MD_*, EVP_sha*, EVP_Digest* |
| Public Key | Variants: RSA, DSA, ECDSA, Ed25519 | EVP_PKEY_*, i2d_DSA_SIG, d2i_DSA_SIG, i2d_ECDSA_SIG, d2i_ECDSA_SIG, EVP_MD_*, ECDSA_SIG_*, DSA_SIG_*, EC_GROUP_*, EC_POINT_* |
| Misc | ERR_error_string_n, ERR_get_error, OpenSSL_version OSSL_PARAM_*, OSSL_PROVIDER_*, CRYPTO_free, CONF_modules_load_file_ex, EVP_default_properties_enable_fips |
No certificate functions are used from the OpenSSL library. Tectia provides its own certificate libraries.
Select the Operate in FIPS Mode check box to use the FIPS-certified version of the SSH cryptographic library. Clear the check box to use the standard (default) SSH cryptographic library.
| Note |
|---|---|
Tectia Server has to be restarted after changing the FIPS-mode setting. Extra checks are done when starting Tectia Server and Connection Broker in the FIPS mode due to the OpenSSL FIPS crypto library health check. This will lead to a noticeable delay in the start of the process on slow machines. |
To define a banner message file, click the Browse button on the right-hand side of the text field. The Select File dialog appears, allowing you to specify the desired file. You can also type the path and file name directly into the text field.
The message file is sent to the client before authentication. Note, however, that the client is not obliged to show this message.
Specify a time after which the server disconnects if the user has not successfully
logged in. If the value is set to 0, there is no time limit. The default
is 600 seconds.
Specify a path to a directory from where Tectia Server looks for user-specific authorized public keys, if they are not stored to the default location. With this setting the administrator can control options that are usually controlled by the user. If no setting is given, the default setting will be used.
The default setting is %D/.ssh2, which expands to
%USERPROFILE%\.ssh2 (usually "C:\Documents and
Settings\<username>\.ssh2").
Enter the path as a pattern string which will be expanded by Tectia Server. The following pattern strings can be used:
%D or %homedir% is the user's home directory
%U or %username% is the user's login name
For Windows domain users:
%U is expanded to domain.username
%username% is expanded to
domain\username
For local server machine users:
%U is expanded to username
%username% is expanded to username
(without the domain prefix)
%username-without-domain% is the user's login name without the
domain part.
%installdir% is the installation directory.
| Note |
|---|---|
The User configuration directory setting will be read only if the Authentication view does NOT have anything set in the following settings under Public-Key Authentication:
For reference, see Parameters |
Specify what kind of user logon methods for the local host are accepted by Tectia Server. The defined logon type affects password authentication. Select a suitable value from the drop-down list: Batch, Interactive, Network, or Network-Cleartext. The default value is Interactive. Note that this setting only affects password-based authentication methods.
For example, to enable accounts that do not have the access right to log on locally, select Network.
For information on the attribute values, refer to Microsoft documentation on Windows logon types.
Define whether Tectia Server should try to resolve the client host name from the client IP address during connection setup. By default, yes is selected and DNS lookups are used to resolve the client host name at connection time.
If you select no, client host name resolution is not attempted, but the IP address is used as the returned client host name. This is useful when you know that the DNS cannot be reached, and the query would cause just additional delay in logging in.
| Note |
|---|---|
This attribute does not affect the resolution of TCP tunnel endpoints and Tectia Server will try to resolve the client host name when creating a TCP tunnel. |
Define the mode of operation of a terminal session on the server side. The available values are Console, Console-UTF8 and Stream.
If set to Console (default), the server reads the screen buffer in a loop and detects modifications based on current cursor location. In Console-UTF8 mode the console is handed in Unicode mode and data is converted to and from UTF-8 for the client. If set to Stream, the server reads the stdout and stderr of cmd.exe as a stream of data, while providing basic facilities for command-line editing.
Define the address family Tectia Server will use for incoming connections.
If set to inet (default), the server will accept only IPv4 incoming connections. If set to inet6, the server will accept only IPv6 incoming connections. If set to Any, the server will accept both IPv4 and IPv6 incoming connections, will resolve addresses of both families, and opens both IPv4 and IPv6 listeners for remote port forwarding.
Select the Terminate on session close check box to have all processes started by the user on the SSH terminal session terminated when the user logs off from the session. By default this is not enabled.
If Allow elevation is selected, users logging in with password authentication may retain any admin privileges associated with their accounts.
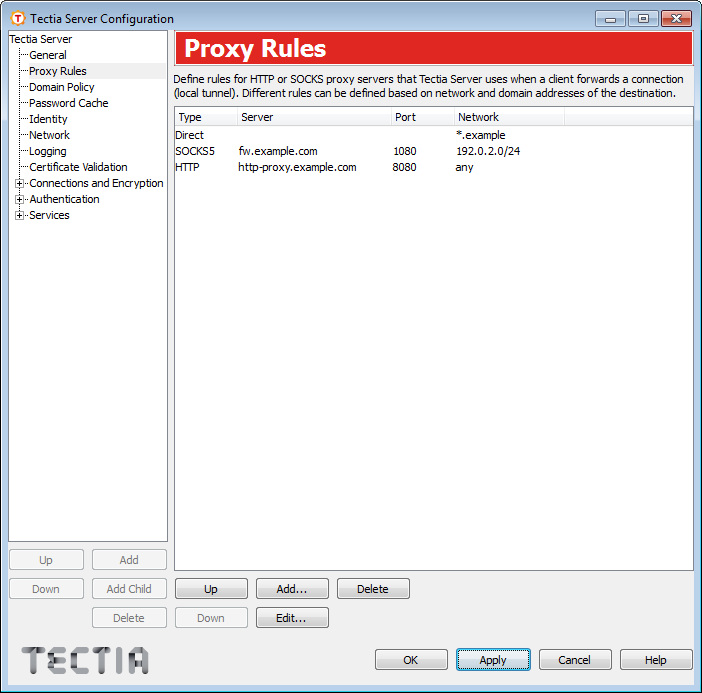
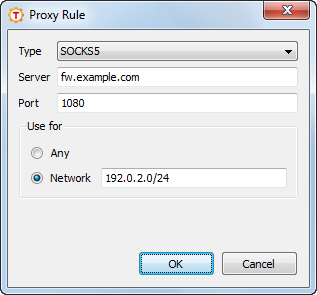
On the Proxy Rules page, you can define rules for HTTP or SOCKS proxy servers that Tectia Server uses when a client requests local port forwarding (local tunnel) to a third host.
To add a new proxy rule:
Click Add. The Proxy Rule dialog box opens.
Select the Type of the rule. The type can be Direct (no proxy), SOCKS4, SOCKS5, or HTTP.
For other types than direct, enter the proxy Server address and Port.
Select also whether the proxy rules applies to Any connection or
only to connections to the specified Network. In the
Network field, you can enter one or more conditions delimited by
commas (,). The conditions can specify IP addresses or DNS names.
The IP address/port conditions have an address pattern and an optional port range
(ip_pattern[:port_range]).
The ip_pattern may have one of the following forms:
a single IP address x.x.x.x
an IP address range of the form x.x.x.x-y.y.y.y
an IP sub-network mask of the form x.x.x.x/y
The DNS name conditions consist of a host name which may be a regular expression
containing the characters "*" and "?" and a port range
(name_pattern[:port_range]).
Click OK.
To edit a proxy rule, select a rule from the list and click Edit.
To delete a proxy rule, select a rule from the list and click Delete.
The rules are read from top down. Use the Up and Down buttons to change the order of the rules.
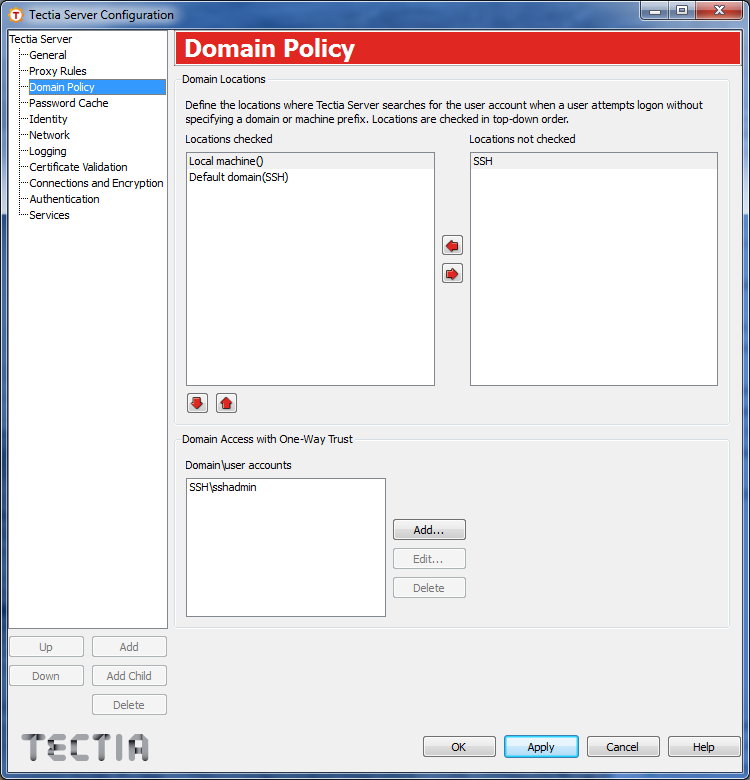
On the Domain Policy page you can define how Tectia Server handles the user name when a client user tries to log in without specifying the prefix (indicating a local or domain user account). This setting defines where the server will look for the user account, and how it will fill in the missing prefix part.
On this page you can also define domain user accounts for domain access with one-way trust.
Tectia Server automatically lists all domains the local machine is part of, and places them in the Locations not checked field.
Move the relevant domains to the Locations checked field and arrange them to an order of preference. When a user logs in without a prefix, the user name is searched under the listed domains from top down. When a match is found, the rest of the domains are discarded. If no matching user accounts are found, authentication fails.
Option Default domain means that a user without a specified
prefix will be treated as a domain user, and the default domain name of the local
machine is added to the user name (username →
defaultdomain_name\username).
Option Local machine means that a user without a specified prefix
will be treated as a local user (username →
localmachine_name\username).
You can move unwanted domains to the Locations not checked list. These domains are not checked when searching for the user account.
If nothing is defined in the Locations checked list, Tectia Server first checks if the user name is valid in the default domain, and if no match is found, the user will be treated as a local user with the local machine name as the prefix.
In Windows domains, you can configure Tectia Server for domain access with one-way trust. A one-way trust is a single, non-transitive trust relationship between two domains. In a one-way trust configuration between Tectia Server and a domain controller, the domain controller does not trust the Tectia Server process. The domain controller therefore refuses to give Tectia Server any information about the user that is trying to log on. Because Tectia Server does not know enough about the user, it refuses the logon procedure. You can use a domain user account to get this information from the domain controller.
Note that you can only define one domain user account per domain.
To add a new domain user account for domain access with one-way trust:
To edit an account, select the account from the Domain\user accounts list and click Edit.
To remove an account, select the account from the Domain\user accounts list and click Delete.
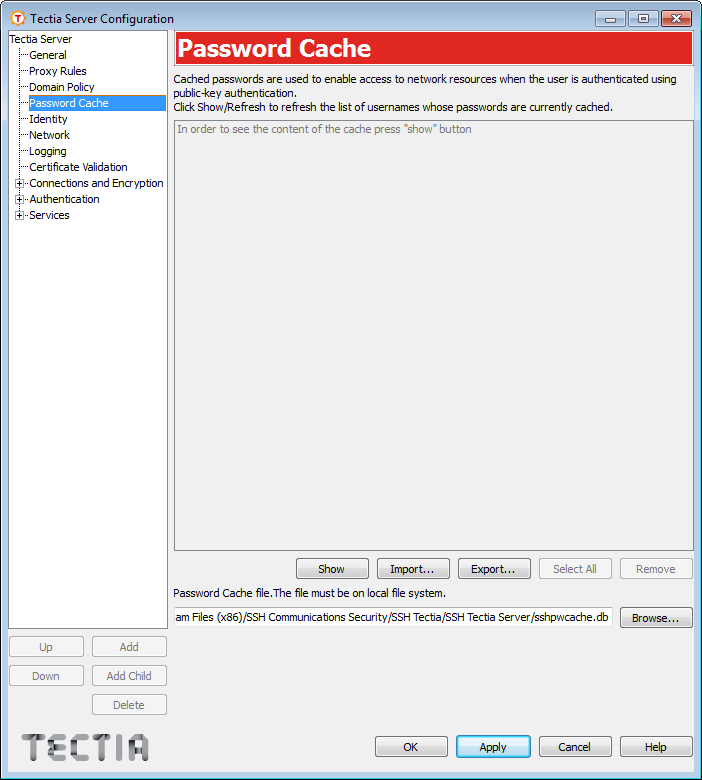
The Password Cache feature is for users who use public-key authentication to log on to Tectia Server on Windows and want to access network resources, for example, shared folders.
When enabled, the password cache stores users' passwords every time they log on to Tectia Server on Windows using password or keyboard-interactive password authentication.
When a user whose password is stored in the cache, logs on using public-key authentication, the password is taken from the cache and used for the logon. The password authentication is performed after the public-key authentication has been successfully completed. From operating system point of view, the user has been logged on using password, and this allows the user to access network resources.
The passwords are stored in encrypted format.
To view a list of user names whose passwords are stored in the cache, on the Password Cache page, click Show. To update the list, click Refresh.
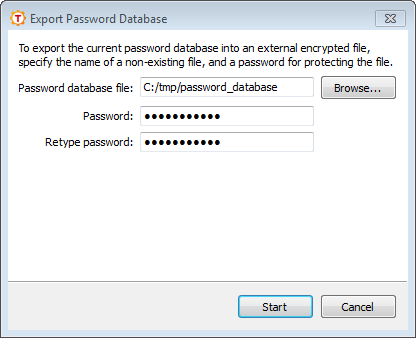
To export the current password cache into an external encrypted file:
Click Export. The Export Password Database dialog box opens.
Enter the path to the Password database file you want to export the password cache to. The file must reside on a local drive. Existing files will not be overwritten, so if you enter the name of an existing file, the export will fail.
Enter the Password that will be used to protect the exported password database file. Tectia enforces the use of strong passwords for the password cache export and import functions. Instead of explicit password requirements, we use a "password class" system. For example, a password that consists of eight unique characters from three different character classes or a password of eleven unique characters from two character classes are deemed strong enough. The character classes are: digits, lower-case letters, upper-case letters, and other characters. When calculating the number of different character classes, upper-case letters used as the first character and digits used as the last character of a password are ignored.
Retype password: Type the password again to ensure you have not made a typing error.
Click Start. The export operation starts. You will see a notification once the operation has completed.
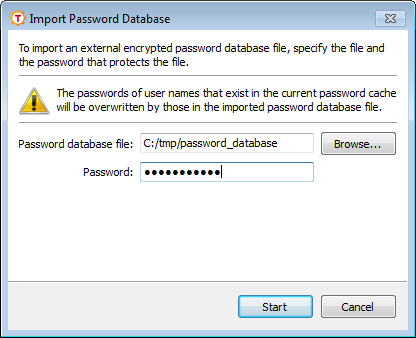
To import a previously exported password database from an external encrypted file:
Click Import. The Import Password Database dialog box opens.
Enter the path to the Password database file you want to import. The file must reside on a local drive.
![[Caution]](images/caution.gif) | Caution |
|---|---|
The passwords of user names that already exist in the current password cache will be overwritten by those in the imported password database file. |
Enter the Password that protects the password database file you want to import.
Click Start. The import operation starts.
To remove passwords from the cache, select the user name(s) from the list and click Remove. The removal cannot be undone (but the password can be cached again by logging on using password authentication).
The password cache must be on local file system since the Tectia Server process must have
access to it. The default cache file location is <INSTALLDIR>\SSH
Tectia Server\sshpwcache.db. You can freely choose any other file location and
name.
You can enable or disable the password cache for each authentication rule separately. By default, the password cache is disabled. For more information, see Parameters.
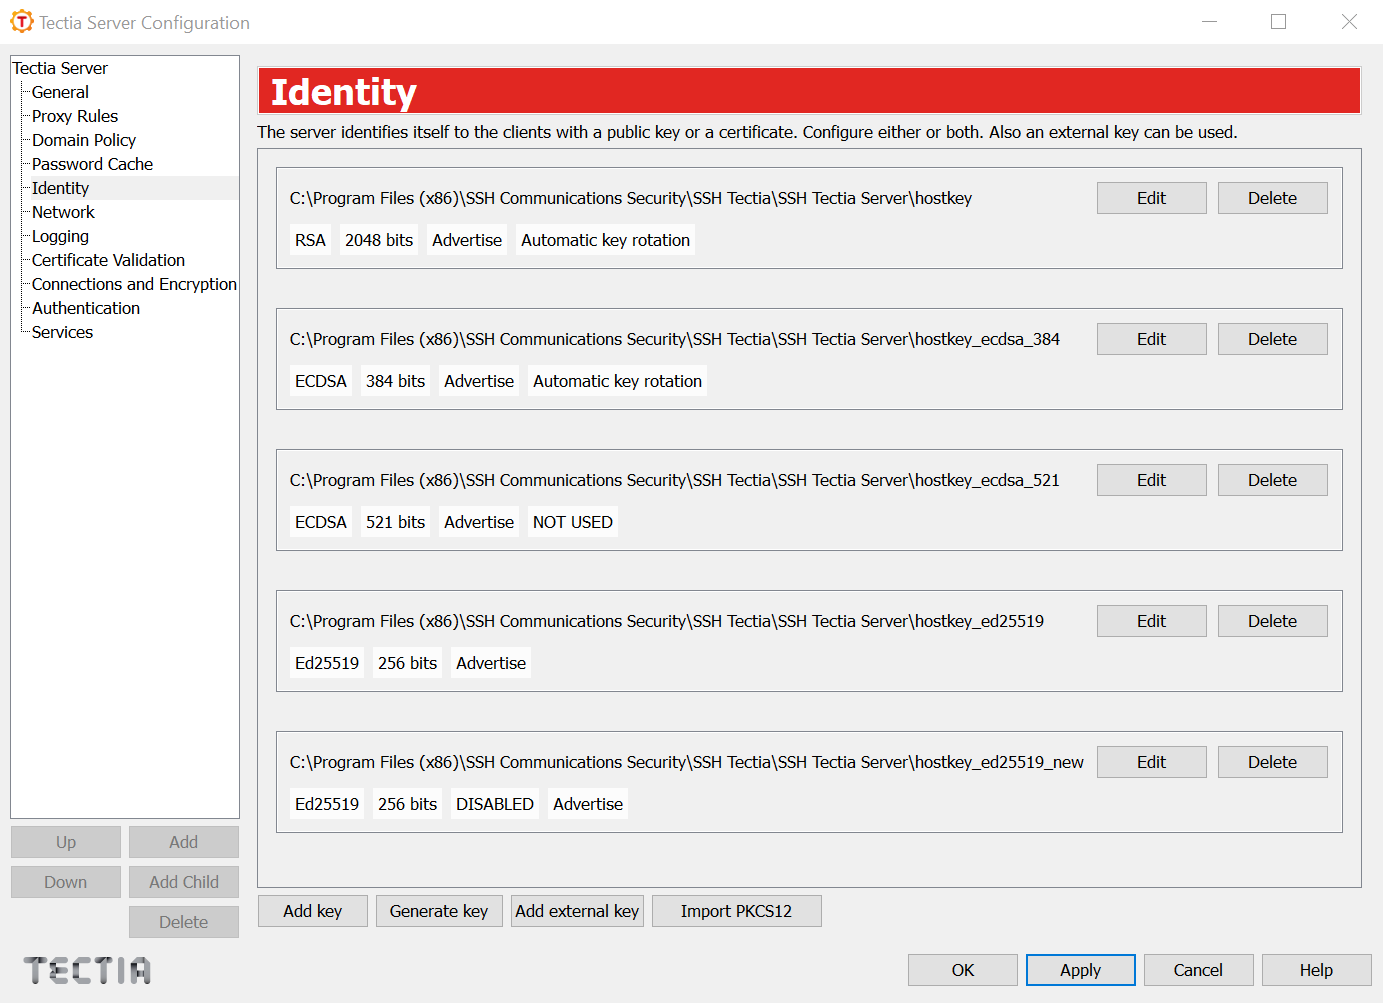
The Identity page is used to specify the host keys and host certificates that identify the server to the clients.
Configured keys are listed here with tags to show some of their features, along with controls to edit or delete them.
Edit
This opens the same host key dialog screen as the Add key button. For more information about the dialog, see the Add key section below.
Delete
Remove the selected host-key files from configuration.
Add key
Opens a dialog in which you can add a host key. The same dialog screen opens when you click on the Edit key next to a listed key.
You can add a private and/or public host-key file by clicking the Browse button next to the associated text field. The Select File dialog appears, allowing you to find and specify the desired file. You can also type the path and file name directly into the text field.
The default private-key file is hostkey, located in the
installation directory ("<INSTALLDIR>\SSH Tectia Server", see Directory Paths). The private-key file and directory should have full
permissions for the Administrators group and the
SYSTEM account and no other permissions.
If the public key is not specified, it will be derived from the private key. However, specifying the public key will decrease the start-up time for the software, as deriving the public key is a fairly slow operation. If the public key is a certificate, the dialog will display a View certificate button.
The dialog will display the key fingerprints in SHA-256, Babble, and RFC 4716 formats.
Under the attributes you can set options for server host-key rotation. Filling in the automatic key-rotation period will enable key rotation for the selected key; once the key-rotation time is reached, the key will be rotated according to standard key-rotation rules. The key-rotation margin will specify for how long the new key will be advertised to the clients before the key is rotated. To learn more about key rotation, see Key rotation.
Generate key
Click the Generate key button to generate a new RSA/ECDSA/Ed25519 host key pair. This launches the ssh-keygen-g3.exe command-line tool and generates an RSA/ECDSA/Ed25519 key pair. The default length of the generated key pair is 3072 bits for RSA, 384 bits for ECDSA, and 256 bits for Ed25519 keys.
You can generate the key pairs, including deprecated DSA host key if needed, also manually with a command line tool. See instruction in ssh-keygen-g3(1).
| Note |
|---|---|
Note that the server will only use the first key of a given type as a host key. Different key types can be used as host keys at the same time, but the server only uses the first key of each type as a host key. |
Add external key
Opens a dialog in which you can specify an external host key to be used. The
fields are Provider Type and Init string. You can also use Test Scan to attempt adding a
software or a pkcs11 provider and scanning it for keys.
For more information on the different external keys and their initialization strings, see externalkey in ssh-server-config(5).
Import PKCS12
Click the Import PKCS12 button to import a private key stored in the Personal Information Exchange (PFX) format. The Select File dialog appears, allowing you to specify the desired file.
| Note |
|---|---|
Notice that all key and certificate files should be located on a local drive. Network or mapped drives should not be used, as the server program may not have proper access rights for them. See also Server Authentication with Public Keys, Server Authentication with Certificates, and Server Authentication Using External Host Keys. |
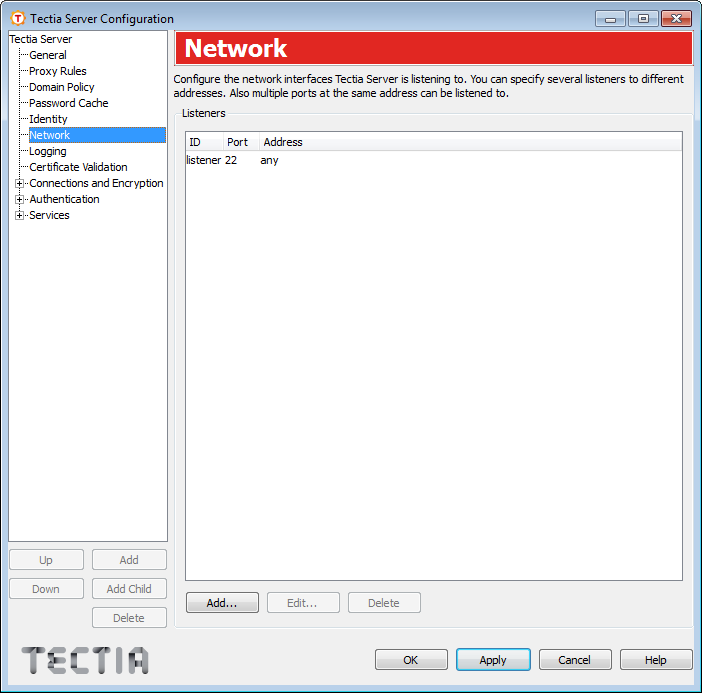
The Network page allows you to specify the network interfaces the server is listening for connections.
The list shows the interfaces Tectia Server is listening on. You can specify several listeners to different addresses. Also multiple ports at the same address can be listened to.
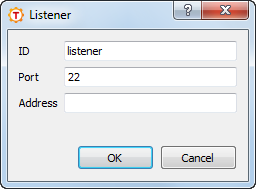
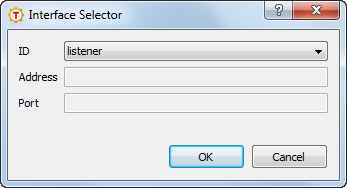
To add a new network listener:
Click Add. The Listener dialog box opens.
Enter the ID of the listener. The ID must be unique.
Enter also the Port number that the server listens on (allowed values are 1 - 65535). The default port is 22.
Optionally you can also specify the IP Address of the network interface card where the Secure Shell server socket is bound. If the address is not specified, the server will listen to the given port on all interfaces.
Click OK when finished.
To edit a listener, select the listener from the list and click Edit.
To remove a listener, select the listener from the list and click Delete.
| Note |
|---|---|
The server has to be restarted to use the new listener settings. |
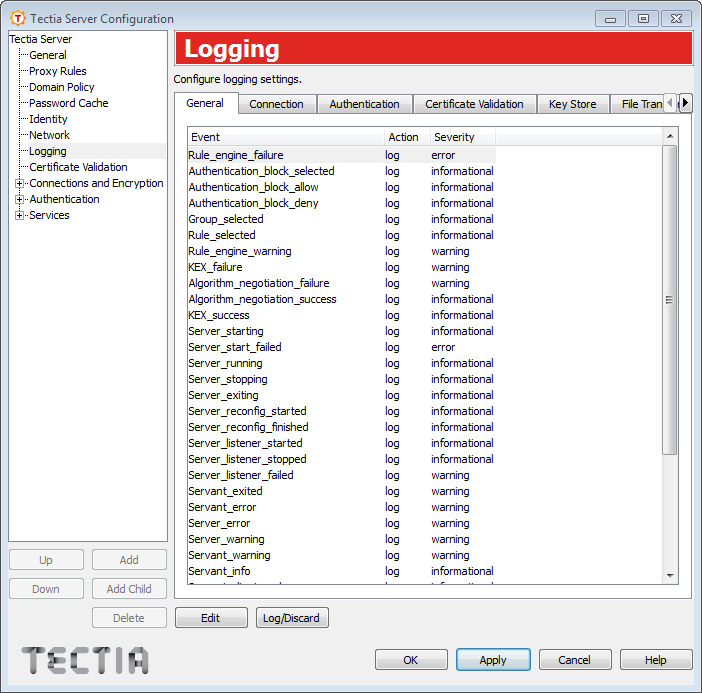
The Logging page allows you to customize the information that is logged in the event log.
On this page, you can see a list of log events generated by Tectia Server. The events are grouped under tabs according to the event categories. Each event has an associated Action and Severity. They have reasonable default values, which are used if no explicit logging settings are made.
The action can be either Log or Discard. Setting the action to Discard causes the server to ignore the log event.
| Note |
|---|---|
If the server fails to start before the server configuration has been read, or because
of an error in reading the configuration (for example because of incorrect access
permissions or invalid content of the configuration file), the event
|
On Windows, the following event severities are used:
Informational
Warning
Error
Security success
Security failure
For more information on the event types, see Auditing.
For a description of the log events, see Appendix D.
To change whether the event is logged or not, select an event from the list and click Log/Discard. You can select multiple events by holding down the SHIFT or CTRL key while clicking.
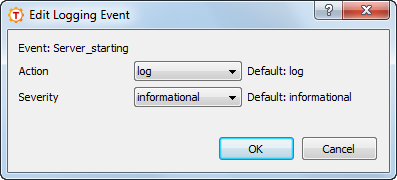
To customize the event action and severity:
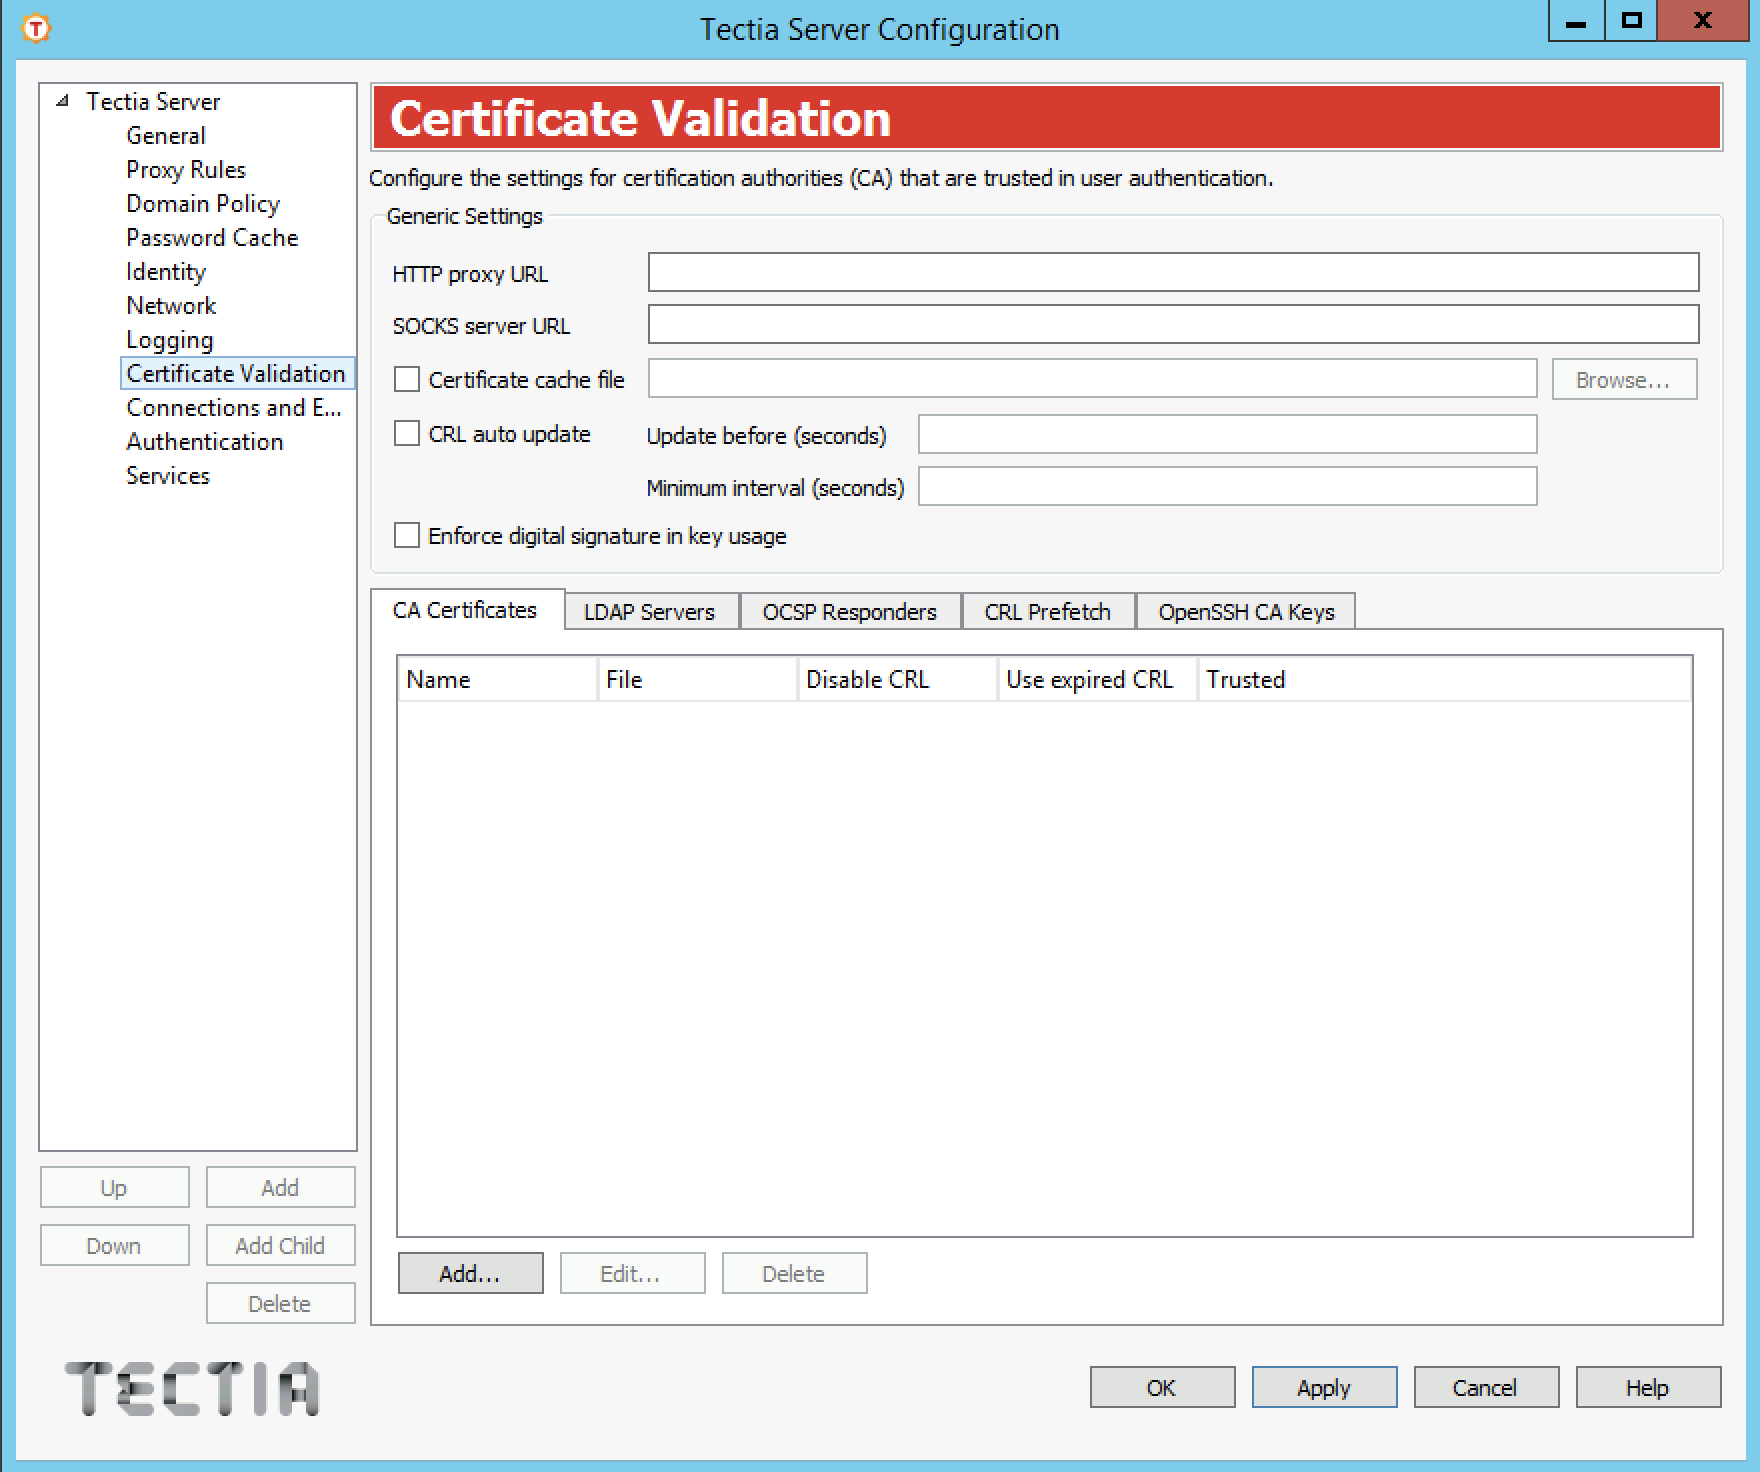
On the Certificate Validation page, you can configure certification authorities (CA) that are trusted in user authentication.
Generic settings apply to all CA certificates and CRL fetching.
Define a HTTP proxy URL if one is required for making LDAP or OCSP queries for certificate validity.
The format of the URL is as follows:
http://username@proxy_server:port/network/netmask,network/netmask ...
The HTTP proxy address is given first and after it the networks that are connected directly (without the proxy).
Define a SOCKS server URL if one is required for making LDAP or OCSP queries for certificate validity.
The format of the URL is as follows:
socks://username@socks_server:port/network/netmask,network/netmask ...
The SOCKS server address is given first and after it the networks that are connected directly (without the SOCKS server).
Select the check box to enable certificate caching.
Click the Browse button to select the cache file where the certificates and CRLs are stored when the Tectia Server service is stopped, and read back in when the service is restarted. The Select File dialog appears, allowing you to specify the desired file. You can also type the path and file name directly into the text field.
Select the check box to enable automatic updating of certificate revocation lists.
When auto update is on, Tectia Server periodically tries to download the new CRL
before the old one has expired. The Update before field
specifies how many seconds before the expiration the update takes place. The
Minimum interval field sets a limit for the maximum update
frequency. The default minimum interval is 30 seconds.
One of the compliance requirements of the US Department of Defense Public-Key Infrastructure (DoD PKI) is to have the Digital Signature bit set in the Key Usage of the certificate. To fulfill the compliance requirement by enforcing digital signature in key usage, select this check box.
On the LDAP Servers tab, you can define LDAP servers that are used for fetching certificate revocation lists (CRLs) and/or subordinate CA certificates based on the issuer name of the certificate being validated.
If a CRL distribution point is defined in the certificate, the CRL is automatically retrieved from that address.
To add an LDAP server, click Add. The LDAP
Server dialog box opens. Enter the Address and
Port of the server and click OK. The default
port is 389.
To edit an LDAP server, select the server from the list and click Edit.
To delete an LDAP server, select the server from the list and click Delete.
On the OCSP Responders tab, you can define OCSP responder servers that are used for Online Certificate Status Protocol queries.
For the OCSP validation to succeed, both the end-entity certificate and the OCSP responder certificate must be issued by the same CA unless the optional Responder certificate is configured to enable trusted mode OCSP. For more information, see ocsp-responder .
If the certificate has an
Authority Info Access extension with an OCSP Responder URL, it is only
used if there are no configured OCSP responders. It is not used if any OCSP responders
have been configured.
To add an OCSP responder, click Add. The OCSP Responder dialog box opens. Enter the HTTP URL of the server. Optionally, you can also configure a Responder certificate to enable trusted mode OSCP or a Validity period in seconds for the OCSP data. During this time, new OCSP queries for the same certificate are not made but the old result is used. Click OK when finished.
If an OCSP responder is defined in the configuration file or in the certificate, it is tried first; only if it fails, traditional CRL checking is tried, and if that fails, the certificate validation returns a failure.
To edit an OCSP responder, select the responder from the list and click Edit.
To delete an OCSP responder, select the responder from the list and click Delete.
On the CRL Prefetch tab, you can define addresses from which CRLs are periodically downloaded.
To add a CRL prefetch address, click Add. The CRL
Prefetch dialog box opens. Enter the Interval how often
the CRL is downloaded and the URL of the CRL distribution point and
click OK. The default download interval is 3600
(seconds).
The URL can be either a standard format LDAP or HTTP URL, or it can refer to a file. The file format must be either binary DER or base64, PEM is not supported. Enter the file URL in this format:
file:///absolute/path/name
To edit a CRL prefetch address, select the address from the list and click Edit.
To delete a CRL prefetch address, select the address from the list and click Delete.
On the CA Certificates tab, you can define the CA certificates that are trusted for user authentication, as well as intermediate CA certificates.
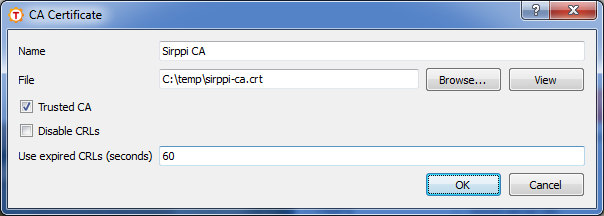
To add a CA certificate:
Click Add. The CA Certificate dialog box opens.
Enter the Name of the CA. The CA Name can be referred to in the selectors on the Authentication page. See Authentication.
Click the Browse button on the right-hand side of the text field to locate a CA certificate file. The Select File dialog appears, allowing you to specify the desired file. You can also type the path and file name directly in the text field.
Click the View button to display the currently selected CA certificate.
If the Trusted CA check box is selected (it is by default), the CA certificate is set as a trust anchor and it is trusted explicitly. No revocation checks are performed on the CA certificate (only the validity period will be checked), and it will be the end point of the validation path, meaning that no CA above it in the PKI hierarchy will affect the validation.
If the Trusted CA check box is cleared, the CA will be considered an intermediate CA. At least one trusted CA certificate is required for a working PKI setting.
You can optionally select the Disable CRLs check box to stop using the certificate revocation list. This option should be used for testing purposes only!
Under Use expired CRLs, you can specify in seconds how long expired CRLs are used.
Click OK when finished.
To edit a CA, select the CA from the CA Certificates list and click Edit.
To remove a CA from the CA Certificates list, select the CA and click Delete.
On the OpenSSH CA Keys tab, you can define the OpenSSH CA keys that are trusted for user authentication.
To add an OpenSSH CA key, click the Add button, and provide a name for the list entry, and the key file.
To edit an OpenSSH CA key entry, select an entry from the list, and click the Edit button.
To delete an OpenSSH CA key entry, select an entry from the list, and click the Delete button.
When the Tectia Server Configuration tool is run in the advanced GUI mode, the Connections and Encryption, Authentication, and Services pages can contain several sub-pages, each of which defines its own set of access rules. The rule to be used in each case is chosen using selectors.
Selectors define the access rules for users based on the user parameters such as user name or location. Users can be divided to groups dynamically, for example, based on the authentication method they used for logging in. On the Services page, each group can then be allowed or denied services such as tunneling, file transfer, or terminal access.
Use the Add and Delete buttons below the tree view to add and delete rules. Each rule will have a sub-page with two or more tabs. On the Selectors tab, you can edit the selectors of the rule, and on the other tab(s), you can configure the settings for the rule.
Under Authentication, you can also add child authentication methods using the Add Child button.
Whenever a user is attempting login to the server, the connections, authentication, and services rules are processed in top-down order. In each case, the first rule that matches the user is used. Use the Up and Down buttons to change the order of the rules. See Using Selectors in Configuration File for more information on selector processing.
The commands for adding, deleting, and moving rules are also available from a shortcut menu (right-click on a rule in the tree view).
The selectors can be edited on the Selectors tab of the Connections and Encryption, Authentication, and Services sub-pages.
The Selectors tab shows a list of all selectors and attributes that apply to the rule (connection, authentication, or service group rule, depending on the page you are on).
The selector elements are numbered. If any of the selectors match, the rule will match and is used.
Each selector element can have one or more attributes. All attributes of the selector must match for the selector to match, except with the attributes of the same type, of which only one has to match.
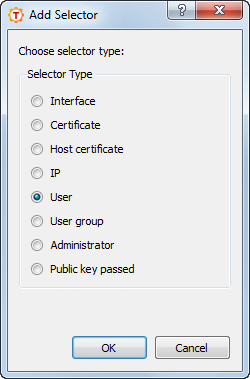
To add a new selector to the rule, click Add Selector. The new selector will contain automatically at least one attribute. To add a new attribute to a selector, choose a selector from the list and click Add Attribute. In both cases, the Add Selector dialog box opens allowing you to specify the selector type. See Figure 4.19.
Select the selector type and click OK.
The attributes of the selector depend on the type. The different selector types are described below.
The Interface selector is matched to the listener interface ID or Address and/or Port. At least one attribute must be given. If the ID is defined, the others MUST NOT be given. If the ID is not defined, either or both of Address and Port may be given.
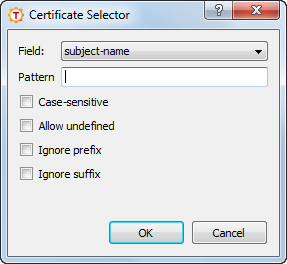
This selector matches a Pattern in a specified Field of the user certificate. Using this selector requires that the parent rule in the authentication chain enables public-key authentication.
The field can be either ca-list, issuer-name, subject-name, serial-number, altname-email, altname-upn, altname-ip, or altname-fqdn.
The format of the pattern depends on the type of the field. The
ca-list field contains a list of CA names separated by commas.
The names that are defined in the ca-certificate element in
ssh-server-config.xml are used. The
issuer-name and subject-name fields contain
distinguished names, serial-number a positive integer. The
altname-fqdn field contains a host name and
altname-ip an IP address or a range. The
altname-email field contains an email address and
altname-upn the principal name.
The altname-fqdn, altname-upn,
altname-email, subject-name, and
issuer-name selectors may contain the %username%
keyword which is replaced with the user's login name before comparing with the
actual certificate data. For domain accounts, the
%username-without-domain% keyword can be used and it is replaced by
the user's login name without the domain part. The %hostname% keyword
can be used in the same way and it is replaced by the client's FQDN. These patterns
may also contain "*" and "?" globbing characters.
Patterns are normally matched case-insensitively. Select the Case-sensitive check box to match the pattern case-sensitively.
For the issuer-name and subject-name selectors, you can also define if the pattern has to match the subject name completely or only partly. Select the ignore-prefix check box to match only the end of the subject name. Select the ignore-suffix check box to match only the beginning of the subject name. By default, the ignore options are unselected.
You can also select both of the ignore options simultaneously in which case the
pattern has to match with some point in the subject name. For example: when both
ignore settings are selected, pattern O=SSH,OU=*,CN=example matches
with:
C=FI, O=SSH, OU=RandD, CN=example, CN=UID12345
Normally if the certificate field to be matched is not available, the selector matching process ends in error. However, if the Allow undefined check box is selected, the undefined field is treated as non-matched and the matching continues to other selectors. For more information, see Selectors and Undefined Data.
| Caution |
|---|---|
When creating the certificate selectors, make sure that every selector element
ties the user name to the certificate, either by including a
User selector attribute, or by putting the special
substitution string Failing to do this may cause unintended consequences, for example authentication succeeding with many different user names with a single certificate. |
This selector matches a Pattern in a specified Field of the client host certificate. Using this selector requires that the parent rule in the authentication chain enables host-based authentication.
The field can be either ca-list, issuer-name, subject-name, serial-number, altname-email, altname-upn, altname-ip, or altname-fqdn.
Patterns are normally matched case-insensitively. Select the Case-sensitive check box to match the pattern case-sensitively.
For the subject-name selector, you can also define if the pattern has to match the subject name completely or only partly. Select the ignore-prefix check box to match only the end of the subject name. Select the ignore-suffix check box to match only the beginning of the subject name. You can also select both of the ignore options simultaneously in which case the pattern has to match with some point in the subject name. By default, the ignore options are unselected.
Normally if the certificate field to be matched is not available, the selector matching process ends in error. However, if the Allow undefined check box is selected, the undefined field is treated as non-matched and the matching continues to other selectors. See Selectors and Undefined Data for more information.
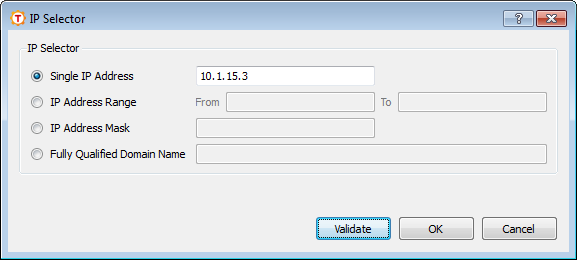
The IP selector matches an IP Address or fully qualified domain name (FQDN) of the client.
The IP address can be in one of the following formats:
a single IP address x.x.x.x
an IP address range of the form x.x.x.x-y.y.y.y
an IP sub-network mask of the form x.x.x.x/y
The fully qualified domain name is matched to an FQDN pattern (case-insensitive). The attribute can include a comma-separated list of allowed FQDN patterns. These patterns may also contain "*" and "?" globbing characters. The form of the pattern is not checked.
After entering the IP address, you can click the Validate button to check whether the format of the address is valid. The validate feature is available only for single IP addresses and IP address ranges.
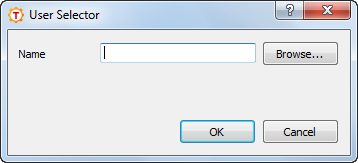
This selector matches a user Name. A list of user names can be given as a comma-separated list.
Names are matched case-insensitively.
| Note |
|---|---|
We recommend using the object picker dialog in the GUI when defining the selectors, because it returns the correct form of user names and host names. To open the object picker, click the Browse button in the User Selector dialog. |
If the original user name is longer than 20 characters, Windows stores the name in both full format and in short format with max 20 characters. Similarly, long host names are cut to 15 characters.
When Tectia Server is running in domain environment on Windows, the user names and host
names must be used in the short format in the selectors. For example, user name
longusername1234567890123 (25 chars) cannot be used as such in the
Tectia Server selectors, instead the user name is used in the short form as follows:
domain\longusername12345678
Note that Tectia Server supports only the following user name format in selectors:
domain\username
The UPN format username@domain.com is not
supported.
To browse for Windows domain user names directly from an Active Directory server, follow these instructions:
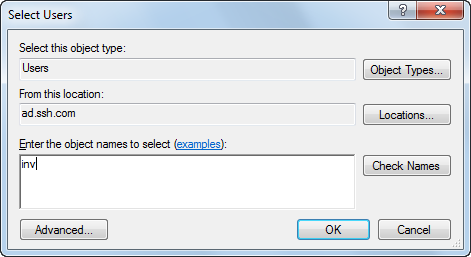
Click Browse. This opens a standard Windows Select Users dialog box that allows you to search for user names from a directory server.
Click Locations to select the Active Directory server you want to use. Select the server from the list and click OK.
Enter the user name or a part of it in the text field. You can enter several names and separate them with semicolons. Click Check Names to check the names from the Active Directory server.
To use advanced search options, click Advanced. This opens an advanced search dialog.
After you have found the user name(s), click OK to return to the User Selector dialog box. The selected domain user accounts are now shown in the Name field.
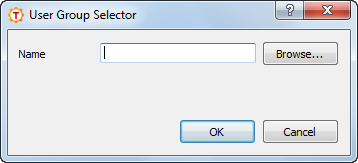
This selector matches a user group Name. A list of user-group names can be given as a comma-separated list.
Names are matched case-insensitively.
On Windows domain environment, the user and user-group
selectors have a length limitation. For more information, see the description of
option
User
above.
To browse for Windows domain user groups directly from an Active Directory server, follow these instructions:
Click Browse. This opens a standard Windows Select Groups dialog box that allows you to search for user group names from a directory server.
Click Locations to select the Active Directory server you want to use. Select the server from the list and click OK.
Enter the group name or a part of it in the text field. You can enter several names and separate them with semicolons. Click Check Names to check the names from the Active Directory server.
To use advanced search options, click Advanced. This opens an advanced search dialog.
After you have found the user group name(s), click OK to return to the User Group Selector dialog box. The selected domain user groups are now shown in the Name field.
This selector matches a privileged user (administrator) or a non-privileged user.
Select the Is Administrator check box to match the selector to a privileged user or clear the checkbox to match it to a normal user.
If this selector is used in an authentication rule and the user is logging in using a domain account and does not yet have an access token allocated, the selector matching process ends in error. However, if the Allow undefined check box is selected, the selector is treated as non-matched and the matching continues to other selectors. For more information, see Selectors and Undefined Data.
| Note |
|---|---|
The user-privilege level is not available during the authentication phase when the user is logging in using a domain account and does not yet have an access token allocated. To get the user-privilege status for domain users, the user should first pass password or GSSAPI authentication. If the privilege level needs to be checked for local accounts, the Allow undefined check box should be selected or else connection fails for users logging in using domain accounts. However, this means that the user-privilege status will not be verified for Windows domain users. To check the privilege level of domain accounts on a Windows server in the authentication phase, the Administrator selector should be used in a nested authentication rule when password or GSSAPI authentication has already been passed. |
This selector matches if authentication is passed using a normal public key (without a certificate).
Optionally, the Length range of the public key can be given,
for example 2048-4096.
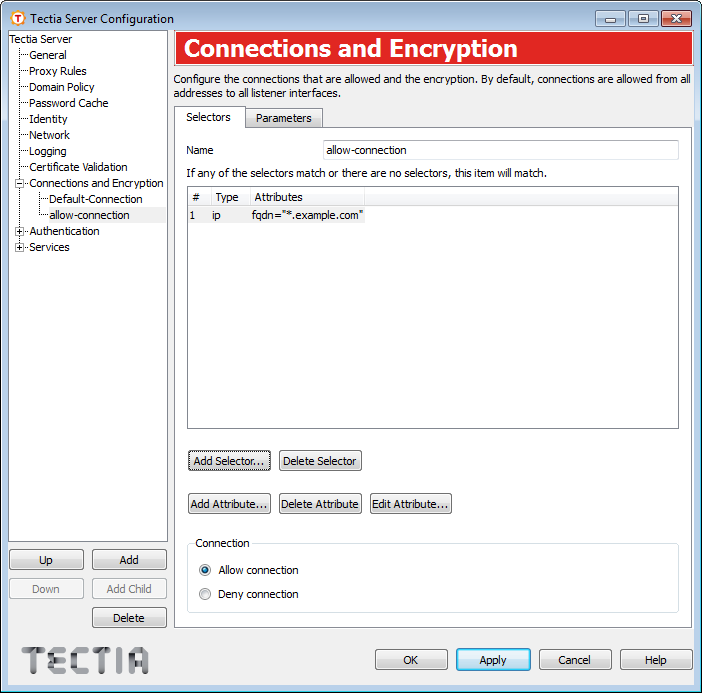
On the Connections and Encryption page, you can create connection rules that restrict connections based on various selectors. You can also set the ciphers, MACs and KEXs used for the connections.
The selectors define which connections a connection rule applies to. The order of the rules is important. The first matching rule is used and the remaining rules are ignored.
If no selectors (or only empty selectors) are specified in a connection rule, the rule matches all connections. In the simple GUI mode, there is only one connection rule that is used for all connections.
If a user does not match any selectors in the connection rules, the connection is allowed with server default connection settings.
To add a new connection rule, click the Add button below the tree view. Each rule will have a sub-page with two tabs. On the Selectors tab, you can edit the selectors of the rule and define whether the connection is allowed or denied, and on the Parameters tab, you can configure the settings for the rule.
To edit a connection rule, select a connection item on the tree view. For more information, see Editing Connection Rules.
To change the order of the rules, select a connection item on the tree view and use the Up and Down buttons. The rules are read in order, and the first matching connection rule on the list is used.
To delete a connection rule, select a connection item and click Delete.
Each item under Connections and Encryption has two tabs, Selectors and Parameters. The Selectors tab is shown only in the advanced GUI mode.
On the Selectors tab, you can configure the selectors that apply to the connection rule and define whether the connection is allowed or denied.
Enter a name for the connection rule.
The selector list view shows the selectors that apply to the rule.
To add a new selector to the rule, click Add Selector. The new selector will contain automatically at least one attribute. The Add Selector dialog box opens allowing you to specify the selector type. For more information on the different selector attributes, see Editing Selectors.
Only the Interface and IP selector attributes are relevant for connection rules. For example, the user name is not yet available when the connection rules are processed. For more information, see Using Selectors in Configuration File.
To remove a selector, choose the selector from the list view on the Selectors tab and click Delete Selector. This will delete the selector and all its attributes.
To add a new attribute to a selector, choose a selector from the list and click Add Attribute. The Add Selector dialog box opens. For more information on the different selector attributes, see Editing Selectors.
To edit a selector attribute, choose the attribute from the list and click Edit Attribute. The relevant selector dialog box opens. For more information on the different selector attributes, see Editing Selectors .
To remove a selector attribute, choose the attribute from the list and click Delete Attribute. Note that a selector with no attributes will match everything.
Select whether the connection is allowed or denied.
If you select to deny the connection, the Parameters tab is disabled.
On the Parameters tab, you can configure the allowed ciphers, MACs, host key algorithms and KEXs for the connection.
Select this check box to send keep alive messages to the other side. If they are sent, a broken connection or crash of one of the machines will be properly noticed. This also means that connections will die if the route is down temporarily.
Specify the number of Seconds or transferred Bytes after which the key exchange is done again.
If a value for both Seconds and Bytes is specified, rekeying is done whenever one of the values is reached, after which the counters are reset.
The defaults are 3600 seconds (1 hour) and
1000000000 bytes (~1 GB). The value 0 (zero) turns
rekey requests off. This does not prevent the client from requesting
rekeys.
Under Encryption, select the Ciphers, MACs, Host key algorithms and KEXs allowed for the connection from the list. To deselect an already selected algorithm, click on it again.
The default ciphers, MACs, host key algorithms and KEXs are marked in the list initially with a gray background.
Tectia proprietary algorithms are marked with (Tectia) and are
operable with Tectia products only. They correspond to the algorithms that end with
@ssh.com in the server configuration file.
The list of supported ciphers can be found in Ciphers.
The list of supported MACs can be found in Message-Authentication Codes
The list of supported host key algorithms can be found in Host-Key and Public Key Signature Algorithms.
The list of supported KEX methods can be found in Key-Exchange Algorithms.
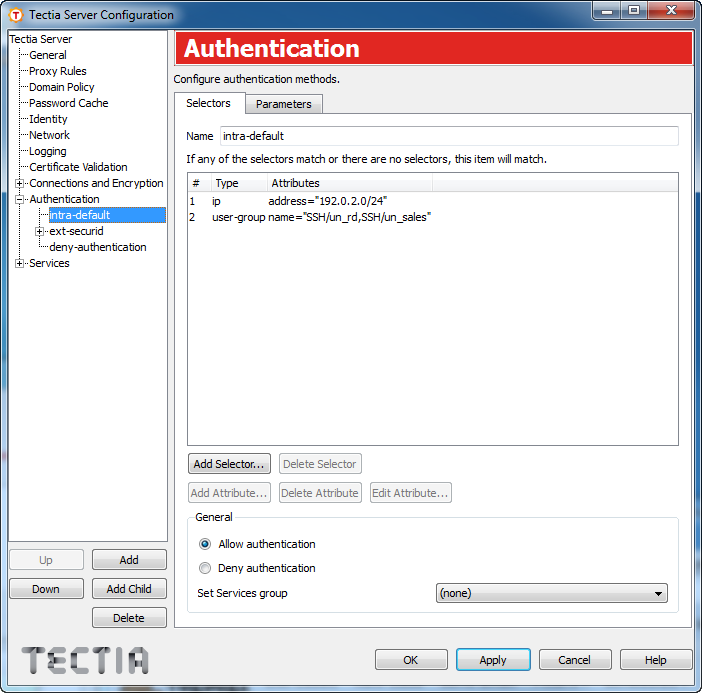
On the Authentication page you can configure the allowed and required user authentication methods.
Authentication options are specified as chains of authentication rules. In the Simple GUI mode, there is only one authentication rule that is used for all connections. In the Advanced GUI mode, the view always contains the Default-Authentication rule, but the administrator can define more rules according to need.
An authentication rule can include one or more selectors and different authentication methods. The selectors define to which users an authentication rule applies. If no selectors (or only empty selectors) are specified in an authentication rule, the rule matches all users.
An authentication rule may also include other authentication rules, forming an authentication chain. When authentication rules are nested within each other, the child rules are interpreted as required (all must be passed for the authentication to succeed). You can set multiple authentication methods in the same authentication rule, and the methods are interpreted as optional (one of the methods must be passed for the authentication to succeed).
The order of the rules is important. Out of the rules on the same level, the first matching rule is used and the remaining rules are ignored. If the rule has nested child rules, they are matched next using the same procedure.
For more information on authentication chains, see Configuring User Authentication Chains.
To add a new authentication rule, click the Add button below the tree view. Each rule will have a sub-page with two tabs. On the Selectors tab, you can edit the selectors of the rule and define whether the authentication is allowed or denied, and on the Parameters tab, you can configure the settings for the rule.
To edit an authentication rule, select an authentication item on the tree view. For more information, see Editing Authentication Items.
To change the order of the rules, select an authentication item on the tree view and use the Up and Down buttons.
To add a child authentication rule, select an authentication item on the tree view and click the Add Child button.
To delete an authentication rule, select an authentication item and click Delete.
Each item under Authentication has two tabs, Selectors and Parameters. The Selectors tab is shown only in the advanced GUI mode.
On the Selectors tab, you can configure the selectors that apply to the authentication rule and define whether the result of the rule is allow or deny.
Enter a name for the authentication rule.
The selector list view shows the selectors that apply to the rule.
To add a new selector to the rule, click Add Selector. The new selector will contain automatically at least one attribute. The Add Selector dialog box opens allowing you to specify the selector type. For more information on the different selector attributes, see Editing Selectors.
To remove a selector, choose the selector from the list view on the Selectors tab and click Delete Selector. This will delete the selector and all its attributes.
To add a new attribute to a selector, choose a selector from the list and click Add Attribute. The Add Selector dialog box opens. For more information on the different selector attributes, see Editing Selectors.
To edit a selector attribute, choose the attribute from the list and click Edit Attribute. The relevant selector dialog box opens. For more information on the different selector attributes, see Editing Selectors.
To remove a selector attribute, choose the attribute from the list and click Delete Attribute. Note that a selector with no attributes will match everything.
Select whether authentication is allowed or denied.
If an authentication chain ends in a deny action, or if the user does not match any selectors in the authentication rules, the user is not allowed to log in.
In a nested chain of authentication rules, it is possible, for example, to set the parent rule to deny authentication and a child rule with a selector to allow authentication. If the user name matches the selector and successfully completes the authentication method(s), login is allowed.
For more information on the authentication chains, see Configuring User Authentication Chains .
You can optionally select a group name in the Set Services group field. This sets a group for the users that pass the particular authentication chain. The group definition is later used when defining the allowed services for the user.
If the group is set here, it overrides any group selectors on the Services page. See Services.
On the Parameters tab, you can configure which authentication methods are allowed, and how they are used.
Select the Allow password authentication check box if you want to allow password authentication. For more information, see User Authentication with Passwords.
Set a delay (in seconds) between a failed attempt and a retry. The default delay is 2 seconds.
Set the maximum number of authentication attempts. By default, 3 attempts are allowed.
Select the Allow public-key authentication check box when you want to allow public-key authentication. For more information, see User Authentication with Public Keys and User Authentication with Certificates.
This option can be used when the authentication rule contains a child rule with certificate selectors.
Select the Try all offered public keys check box when you expect the user to have several certificates of which only some allow logon (that is, match the selectors in the child authentication rule).
If the check box is not selected, Tectia Server will try to match only the first certificate offered by the client. If the check box is selected, Tectia Server will try all offered certificates until a match is found.
Select the check box to require that the host name given by the client
matches the one found in DNS. If the host name does not match, the
authentication fails. This corresponds to the
require-dns-match attribute in the server configuration
file, see
auth-publickey
.
Specify a path to the directory that contains the user public keys that
are authorized for login. As with the Authorization file,
the path can contain a pattern string that is expanded by Tectia Server. See the
options below. The default is %D/.ssh2/authorized_keys.
Specify a path to the file that lists the user public keys that are authorized for login. The path can contain a pattern string that is expanded by Tectia Server.
The following pattern strings can be used:
%D or %homedir% is the user's home
directory
%U or %username% is the user's login
name
For Windows domain users:
%U is expanded to
domain.username
%username% is expanded to
domain\username
For local server machine users:
%U is expanded to
username
%username% is expanded to
username (without the domain prefix)
%username-without-domain% is the user's login name
without the domain part.
The default is %D/.ssh2/authorization.
For more information on the syntax of the authorization file, see the section called “Authorization File Options”.
Optionally specify a path to an OpenSSH-style
authorized_keys file that contains the user public keys that
are authorized for login. As above, the path can contain a pattern string
that is expanded by Tectia Server.
Select the public-key signature algorithms used for user authentication. To deselect an already selected algorithm, click on it again.
The supported and default public-key signature algorithms are the same as those listed for host key algorithms. See Host key algorithms .
These authorization file and public-key directory settings will override the User configuration directory setting made in the General view.
Tectia Server looks for a matching public-key in the following order:
In the file defined in Authorization file
In the directory defined in Authorized-keys directory, if no authorization file is available or reading it fails.
In the filed defined in OpenSSH authorized-keys file, if no matching key was found in the Tectia-related authorization file or key directory.
In the User configuration directory defined in the General view, if none of the above locations produced a matching key.
In the default public-key storage location, if no setting was made in User configuration directory in the General view.
Select the Allow GSSAPI check box to allow GSSAPI authentication. See User Authentication with GSSAPI for more information.
Select the check box to allow forwarding the Kerberos ticket over several connections.
| Note |
|---|---|
| On Microsoft Windows version 5.2 (Server 2003) and newer the possibility to allow Kerberos ticket forwarding is determined by the domain's Kerberos policy. For more information, see "How the Kerberos Version 5 Authentication Protocol Works". |
Select the Allow host-based authentication check box to allow host-based authentication. For more information, see Host-Based User Authentication.
Select the check box to require that the host name given by the client matches the one found in DNS. If the host name does not match, the authentication fails.
Select the Allow keyboard-interactive authentication check box to allow keyboard-interactive authentication. For more information, see User Authentication with Keyboard-Interactive.
Set the delay between failed attempts in seconds (Failure delay) and the maximum number of attempts (Max tries). The default delay is 2 seconds and default maximum is 3 attempts.
For keyboard-interactive authentication, several submethods can be specified.
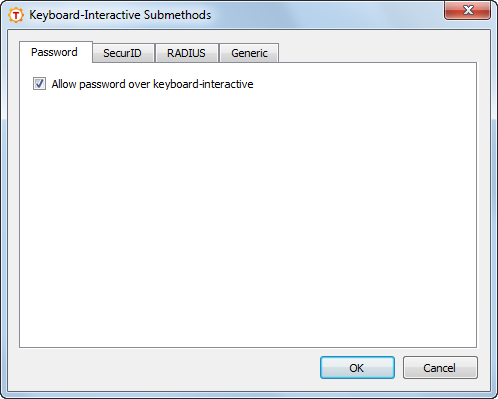
To edit the submethods, click the Submethods button. The Keyboard-Interactive Submethods dialog box opens (Figure 4.32).
Select the Enable Password Cache check box to enable server password cache. For more information, see Password Cache.
In the Keyboard-Interactive Submethods dialog box you can configure the allowed submethods. On Windows, the password, RSA SecurID, RADIUS, and generic submethods are available.
Select the Allow password over keyboard-interactive to allow the password submethod. For more information, see Password Submethod.
Select the Allow SecurID over keyboard-interactive to allow the RSA SecurID submethod. For more information, see RSA SecurID Submethod.
Enter the path to the SecurID DLL.
Select the Allow RADIUS over keyboard-interactive to allow the RADIUS submethod. For more information, see RADIUS Submethod.
Click Add to add a new RADIUS server. The RADIUS Submethod dialog box opens.
For each RADIUS server, define a Shared secret file, server IP Address, Port, Timeout, and Client NAS identifier.
To change the order of the RADIUS servers, select a server from the list, and click Up and Down to move it. The servers are tried in the specified order.
To edit a RADIUS server, select the server from the list and click Edit.
To remove a RADIUS server, select the server from the list and click Delete.
Click Add to add a new generic submethod. The Generic Submethod dialog box opens.
Enter the Name of the method and the initialization Parameters.
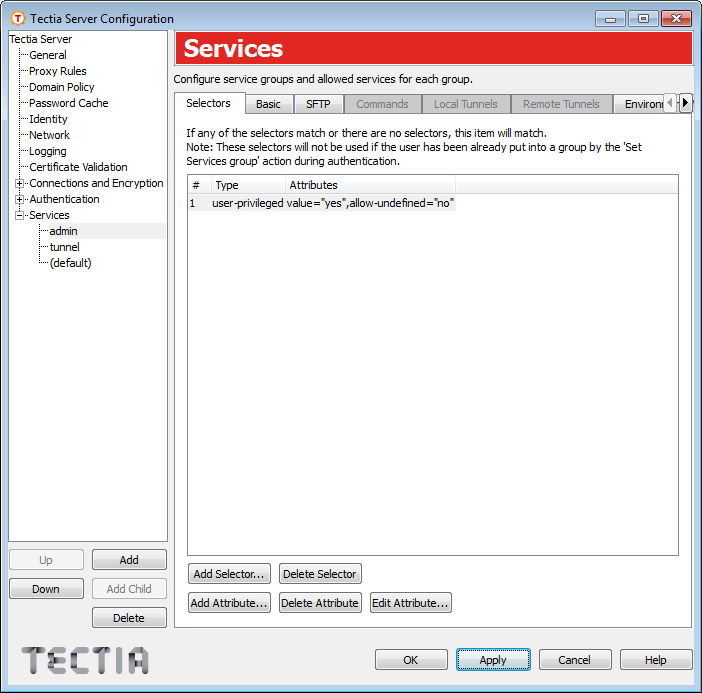
On the Services page you can set restrictions on the services (e.g. terminal, tunneling, SFTP) that the server provides to users.
The selectors define which users a service rule applies to. The order of the rules is important. The first matching rule is used and the remaining rules are ignored.
If no selectors (or only empty selectors) are specified in a service rule, the rule
matches all users. The last rule should always be the (default) rule, with no
selectors. This rule is used for all users that do not match any previous rule. In the
simple GUI mode, there is only the default rule and it is used for all connections.
If the user was already put to a services group during authentication (using Set Services group), the selectors on the Services page are not checked but the corresponding service rule is automatically used.
To add a new service rule, click the Add button below the tree view. Each rule will have a sub-page with eight tabs. On the Selectors tab, you can edit the selectors of the rule, and on the other tabs, you can configure the allowed services for the rule.
To edit a service rule, select a services item on the tree view. For more information, see Editing Services Items.
To change the order of the rules, select a services item on the tree view and use the
Up and Down buttons. The rules are read in order,
and the first matching service rule on the list is used. The last rule should always be the
(default) rule, with no selectors.
To delete a service rule, select a services item and click Delete.
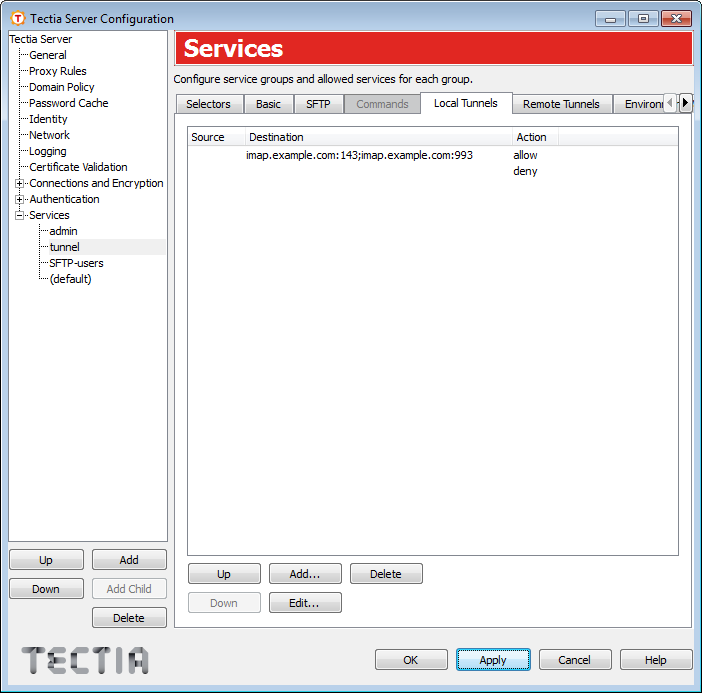
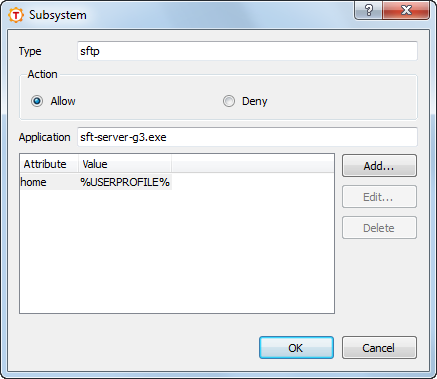
Each item under Services has eight tabs, Selectors, Basic, SFTP, Commands, Local Tunnels, Remote Tunnels, Environment Variables, and Subsystems. Depending on the settings made some of the tabs may be disabled.
On the Selectors tab, you can configure the selectors that apply to the service rule.
The selector list view shows the selectors that apply to the rule.
To add a new selector to the rule, click Add Selector. The new selector will contain automatically at least one attribute. The Add Selector dialog box opens allowing you to specify the selector type. For more information on the different selector attributes, see Editing Selectors.
To remove a selector, choose the selector from the list view on the Selectors tab and click Delete Selector. This will delete the selector and all its attributes.
To add a new attribute to a selector, choose a selector from the list and click Add Attribute. The Add Selector dialog box opens. For more information on the different selector attributes, see Editing Selectors.
To edit a selector attribute, choose the attribute from the list and click Edit Attribute. The relevant selector dialog box opens. For more information on the different selector attributes, see Editing Selectors.
To remove a selector attribute, choose the attribute from the list and click Delete Attribute. Note that a selector with no attributes will match everything.
On the Basic tab, you can control the basic settings of the service rule.
To make the rule the default rule, select the Default check box. Only one of the rules can be the default rule. The default rule does not have selectors or a name.
The initial default rule allows all users access to all services. The default rule should be kept as the last rule, so it will apply to users that are not matched by any other rule. You should edit the rule according to your security policy.
For other rules than the default, enter the Name of the rule.
The Idle timeout field sets the idle timeout limit in seconds. If
the connection (all channels) has been idle this long, the connection is closed. The
default is 0 (zero), which disables idle timeouts.
The Terminal setting defines whether terminal access is allowed or denied for the users.
To allow terminal in all situations, select Allow.
To allow terminal conditionally, select Allow, if forced command is not set. If this option is selected and a forced command is defined in the configuration file or in an authorization file, the forced command is run instead of giving the terminal. However, if no forced commands are defined, the user can get terminal normally. See Commands and the section called “Authorization File Options”.
To deny terminal in all situations, select Deny.
If terminal access is denied, also shell commands are denied, unless commands are explicitly allowed or set as forced under Commands.
This setting defines whether remote commands are allowed.
To allow all remote commands, select Allow all.
To deny all remote commands, select Deny all.
To customize remote commands, select Customize. You can specify the allowed or forced commands on the Commands tab. See Commands.
This setting defines whether local tunnels are allowed.
To allow all local tunnels, select Allow all.
To deny all local tunnels, select Deny all.
To customize local tunnels, select Customize. You can specify the allowed and denied tunnels on the Local Tunnels tab.
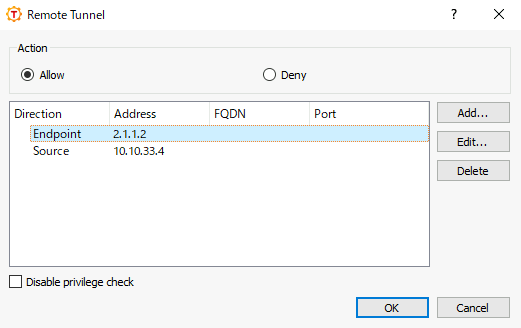
This setting defines whether remote tunnels are allowed.
To allow all remote tunnels, select Allow all.
To deny all remote tunnels, select Deny all.
To customize remote tunnels, select Customize. You can specify the allowed and denied tunnels on the Remote Tunnels tab.
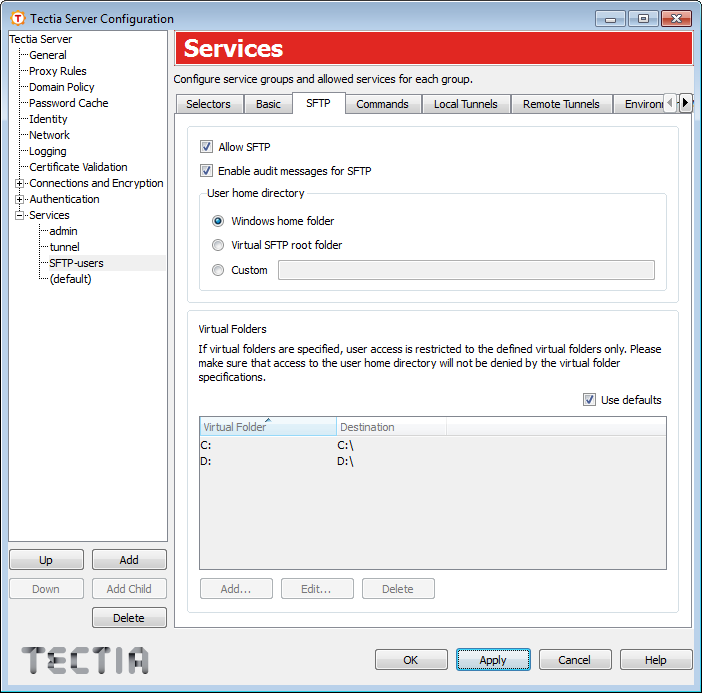
On the SFTP tab, you can allow and deny SFTP for users and set limitations on the folders accessible via SFTP and SCP2.
Select the Allow SFTP check box to allow SFTP for the users. Clear the check box to deny it.
| Note |
|---|---|
Denying SFTP denies both SFTP and SCP2 operations to the server, but it does not deny legacy OpenSSH-style SCP operations. To deny OpenSSH SCP (version 8 or older), you should restrict remote commands. See Basic. |
This setting defines whether all SFTP server's audit messages are recorded in the system log. By default, all audit messages go to the system log.
On a busy Tectia Server, the system log can grow very rapidly if all audit messages are included in the system log; this configuration option makes it possible to reduce the system log growth rate.
If the check box is cleared, no audit messages from the SFTP server are recorded into the system log.
UTF-8 mode is enabled by default for file names in SFTP server.
If the check box is cleared, the system's code page is used instead for file names on the server side.
This setting defines the directory where the user's SFTP session starts and
which is the default target for the SCP2 operations (by default Windows
home folder, %USERPROFILE%). The location of the
home directory must be under one of the defined virtual folders.
If Virtual SFTP root folder is selected (or if a Custom directory that is denied by the virtual folder settings is specified), the session will start in the virtual SFTP root folder. See Defining SFTP Virtual Folders (Windows) for more information.
| Note |
|---|---|
The virtual SFTP root folder is not an actual directory on disk and no files can be written there. |
Virtual folders can be used to restrict the folders the user is able to access via SFTP and SCP2.
If the Use defaults check box is selected, all local drive letters are used as defaults. This means that the user can access all drives via SFTP and SCP2.
If any virtual folders are explicitly defined in the configuration, the default drive letters are not used. If you still want to use the drive letters, they need to be defined separately as virtual folders. For more information, see Defining SFTP Virtual Folders (Windows).
To define a custom virtual folder:
Clear the Use defaults check box.
Click Add. The SFTP Virtual Folder dialog box opens.
Enter the Virtual Folder name.
To browse for the Destination, click the Browse button. A Select Folder dialog appears, allowing you to specify the desired destination folder. You can also type the path directly into the text field and use special strings as part of the path, for example %username-without-domain% (user's login name without the domain part).
Click OK.
| Note |
|---|---|
Some special characters such as a slash "/" and a backslash "\" cannot be
used in the name of the Virtual Folder (for example In case a trailing dollar sign $ is used in the path to the virtual
folder (for example \\server\share$$ |
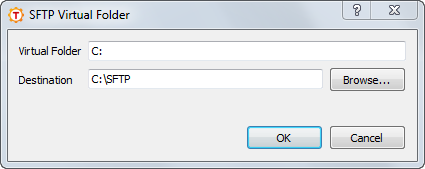
Figure 4.36 shows an example of a virtual
folder setting. The user will see a virtual folder C: under the SFTP
root folder. When the user changes directory to C:, he is actually
directed to C:\SFTP.
To edit a virtual folder, select the folder from the list and click Edit.
To delete a virtual folder, select the folder from the list and click Delete.
| Note |
|---|---|
If you delete all virtual folders, the configuration will revert back to the default settings (local drive letters are available as virtual folders). |
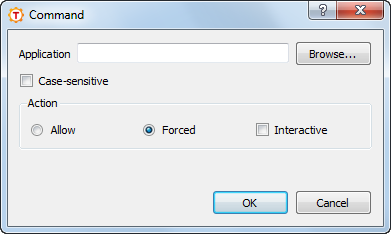
On the Commands tab, you can define specific shell commands as allowed or forced. To deny all commands, select Deny all on the Basic tab.
To add a command rule:
Click Add. The Command dialog box opens.
Select the Application and Action for the rule.
If the Allow action is set, running the specified application(s) is allowed. All other applications are implicitly denied. Allowed command rules do not apply, if user requests terminal.
If no application is given for the Allow action, all commands are allowed. This is equal to selecting Allow all on the Basic tab.
If the Forced action is set, the specified application is run automatically when the user logs in. All other applications are implicitly denied. When you set the Forced action, it is possible to set the Interactive option on. If the application that is run as forced requires user interaction, set the Interactive option on. If the application does not require user interaction, leave the option unchecked. The option is available on Windows only. If you set a forced command, you should also deny terminal. Otherwise, users can request terminal normally, in which case the forced command is not run. Only one forced command per group is allowed. If a forced command is set, no other commands can be added to the service group. If a group contains multiple allowed commands, forced commands can not be added to the group.
Users can also define forced commands for public keys in their
authorization files. However, if a command is defined in the Tectia Server
configuration, it overrides any commands in the authorization files. For more
information, see the section called “Authorization File Options”.
Applications are normally matched case-insensitively. Select the Case-sensitive check box to match the application case-sensitively.
Click OK when finished.
To edit a command rule, select the rule from the list and click Edit.
To delete a command rule, select the rule from the list and click Delete.
| Note |
|---|---|
Support for legacy OpenSSH SCP in Tectia Server is implemented using a command called scp1-compat-srv. When a client uses OpenSSH version 8 or older SCP to connect to Tectia Server, the server invokes this command. Restrictions on remote commands apply also to OpenSSH-style SCP operations to the server. |
On the Local Tunnels tab, you can define rules for local TCP tunnels (port forwarding). You can add several allow and deny rules with different source address and destination address and port attributes. You can also define an external application to be used to set the tunneling constraints. When a user attempts tunneling, the rules are read in order and the first matching rule is used.
For more information on local tunnels, see Local Tunnels.
To add a tunneling rule:
Click Add. The Local Tunnel dialog box opens.
Select the tunneling Action (Allow or Deny).
If you define no other settings, the rule will match all tunneling requests.
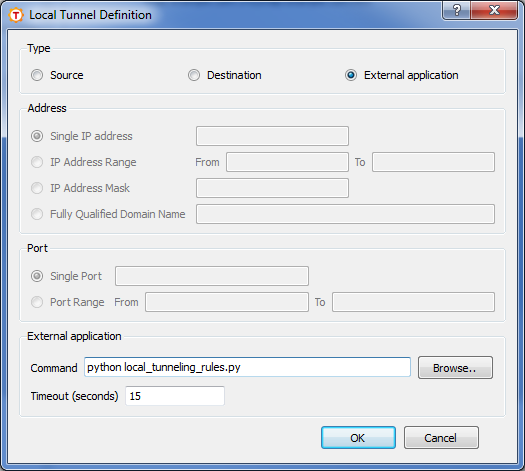
To define additional restrictions for the rule, click Add. The Local Tunnel Definition dialog box opens.
Select whether the definition is for the Source or Destination, or if you want to use an External application to set the tunneling restrictions. Note that for each local tunneling rule, you can define either source(s) and/or destination(s), or an external application; you cannot define an external application in the same rule with source and/or destination definitions.
The Address (IP or FQDN) can be given for the Source definition.
The Address (IP or FQDN) and the Port can be given for the Destination definition.
The Address can be in one of the following formats:
a single IP address x.x.x.x
an IP address range of the form x.x.x.x-y.y.y.y
an IP sub-network mask of the form x.x.x.x/y
The Fully Qualified Domain Name can include a comma-separated list of FQDN patterns (case-insensitive). These patterns may also contain "*" and "?" globbing characters. The form of the pattern is not checked.
The Port can be either a single port or a port range.
If you want to use an External application to set the tunneling restrictions, define the Command for executing the application. To select an executable, click the Browse button on the right-hand side of the text field. The Command/Script dialog appears, allowing you to specify the desired file. You can also type the command directly into the text field.
| Caution |
|---|---|
The external application will be launched under administrator privileges. |
Timeout defines the time limit for the external application to exit. The allowed value range is 1 to 3600 seconds, and the default value is 15 seconds. If the application hangs, Tectia Server will not kill it.
Tectia Server uses the Tectia Mapper protocol (see Appendix E) to communicate with the external application.
Tectia Server sends the following data to the external application:
user=userid:username
(specifies the user id and user name)
user-privileged=true|false (specifies whether the user has
administrator privileges)
{tunnel-src}addr-ip=ip-address
(specifies the tunnel's source IP address)
{tunnel-src}port=port (specifies
the tunnel's source port)
{tunnel-src}addr-fqdn=FQDN
(specifies the tunnel's source host (fully qualified domain name))
{tunnel-dst}addr-ip=ip-address
(specifies the tunnel's destination IP address)
{tunnel-dst}port=port (specifies
the tunnel's destination port)
{tunnel-dst}addr-fqdn=FQDN
(specifies the tunnel's destination host (fully qualified domain name))
For more information on the communication between Tectia Server and the external application, see Appendix E.
Click OK to create the definition and return to the Local Tunnel dialog box.
You can add one or more Source and/or Destination definitions to each rule, or alternatively one External application definition.
To edit a definition, select the definition from the list and click Edit.
To delete a definition, select the definition from the list and click Delete.
Click OK to create the tunneling rule.
To edit a tunneling rule, select the rule from the list and click Edit.
To delete a tunneling rule, select the rule from the list and click Delete.
To change the order of the rules, select a rule from the list, and click Up and Down to move it. The rules are read in order and the first matching rule is used.
On the Remote Tunnels tab, you can define rules for remote TCP tunnels (port forwarding). You can add several allow and deny rules with different address and port attributes. When a user attempts tunneling, the rules are read in order and the first matching rule is used.
For more information on remote tunnels, see Remote Tunnels.
To add a tunneling rule:
Click Add. The Remote Tunnel dialog box opens.
Select the tunneling Action (Allow or Deny).
If you define no other settings, the rule will match all tunneling requests.
To define additional source and listen restrictions for the rule, click Add. The Remote Tunnel Definition dialog box opens.
Select whether the definition is for the Source or Listen.
The Address (IP or FQDN) can be given for the Source definition.
The Address (IP) and the Port can be given for the Listen definition.
The Address can be in one of the following formats:
a single IP address x.x.x.x
an IP address range of the form x.x.x.x-y.y.y.y
an IP sub-network mask of the form x.x.x.x/y
The Fully Qualified Domain Name can include a comma-separated list of FQDN patterns (case-insensitive). These patterns may also contain "*" and "?" globbing characters. The form of the pattern is not checked.
The Port can be either a single port or a port range.
Click OK to create the definition and return to the Remote Tunnel dialog box.
If you want to allow non-privileged users access to privileged ports, enable
Disable privilege check.
You can add several definitions to the rule.
To edit a definition, select the definition from the list and click Edit.
To delete a definition, select the definition from the list and click Delete.
Click OK to create the tunneling rule.
To edit a tunneling rule, select the rule from the list and click Edit.
To delete a tunneling rule, select the rule from the list and click Delete.
To change the order of the rules, select a rule from the list, and click Up and Down to move it. The rules are read in order and the first matching rule is used.
On the Environment Variables tab, you can define the environment variables the users can set on the client side.
To add variables as allowed, enter the variables in the Environment Variable field as a comma-separated list.
Allowed variables are normally matched case-insensitively. Enter the variables in the Environment Variable (case-sensitive) field to match the variables case-sensitively.
If any variables are set as allowed, all other variables are implicitly denied. Do
not use * (asterisk), as it will allow any and all
variables, and that can be a security risk.
On the Subsystems tab, you can define other subsystems (other than SFTP) as allowed or denied. The most commonly used subsystem, SFTP, can be allowed and denied directly from the SFTP tab.
To add a subsystem, click Add. Enter the subsystem Type and select whether to Allow or Deny the subsystem. Define also the Application which is the the executable of the subsystem.
The subsystem can contain several attributes. To add an attribute, click Add. Enter the Attribute and its Value and click OK.
The attributes can be used, for example, on Windows platforms to set the user home directory and virtual folders for SFTP, as in the example screen above.
To edit an attribute, select an attribute and click Edit.
To remove an attribute, select an attribute and click Delete.
| |