|
     |
A local (outgoing) tunnel forwards traffic coming to a local port to a specified remote port.
With sshg3 on the command line, the syntax of the local tunneling command is
as follows:
client$ sshg3 -L [protocol/][listen-address:]listen-port:dst-host:dst-port sshserver
Setting up local tunneling allocates a listener port on the local client. Whenever a connection is made to this listener, the connection is tunneled over Secure Shell to the remote server and another connection is made from the server to a specified destination host and port. The connection from the server onwards will not be secure, it is a normal TCP connection.
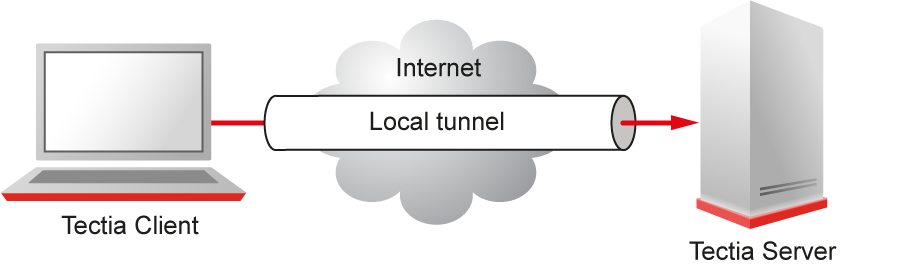
For example, when you use Tectia Client on the command line, and issue the following command, all traffic coming to port 1234 on the client will be forwarded to port 23 on the server. See Figure 8.1.
sshclient$ sshg3 -L 1234:localhost:23 username@sshserver
The forwarding address in the command is resolved at the (remote) end point of the tunnel.
In this case localhost refers to the server host (sshserver).
To use the tunnel, the application to be tunneled is set to connect to the local listener port instead of connecting to the server directly. Tectia Client forwards the connection securely to the remote server.
If you have three hosts, for example, sshclient, sshserver, and
imapserver, and you forward the traffic coming to the sshclient
port 143 to the imapserver port 143, only the connection between
sshclient and sshserver will be secured. The command you use would
be similar to the following one:
sshclient$ sshg3 -L 143:imapserver:143 username@sshserver
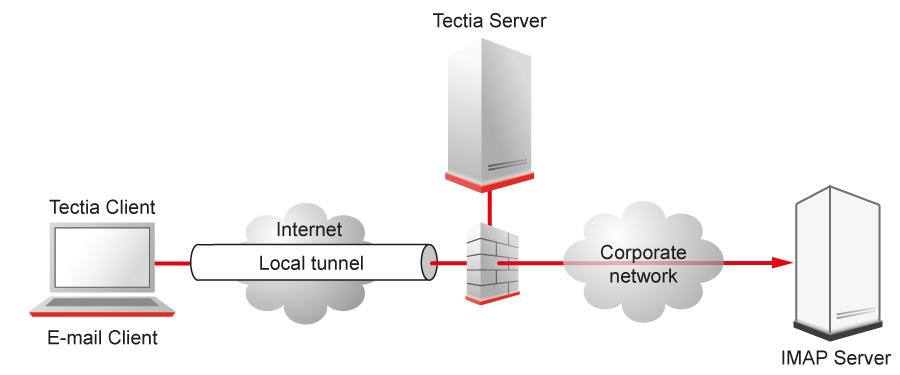
Figure 8.2 shows an example where the Secure Shell server resides in the DMZ network. The connection is encrypted from the Secure Shell client to the Secure Shell server and continues unencrypted in the corporate network to the IMAP server.
With transparent TCP tunneling active, there is no need to separately configure application software to use local ports to set up the tunnels. The applications to be tunneled are defined in the Connection Broker configuration (Filter Rules). The transparent TCP tunneling feature automatically captures the defined applications and the Connection Broker creates Secure Shell tunnels to the defined Tectia Server.
By default, local tunnels are allowed to all addresses for all users. The default setting
equals the following in the ssh-server-config.xml file:
<services>
  <rule>
    <tunnel-local action="allow" />
    ...
  </rule>
</services>
The connections can be restricted by specifying allowed addresses with the
src and dst elements. If any addresses are specified as allowed,
local tunnels to all other addresses are implicitly denied. See Local Tunneling Rule Examples for usage examples.
Using the Tectia Server Configuration GUI, the tunneling settings are made under the Services page on the Local Tunnels tab. See Local Tunnels.
This section gives examples on using the local tunneling rules in the
ssh-server-config.xml file.
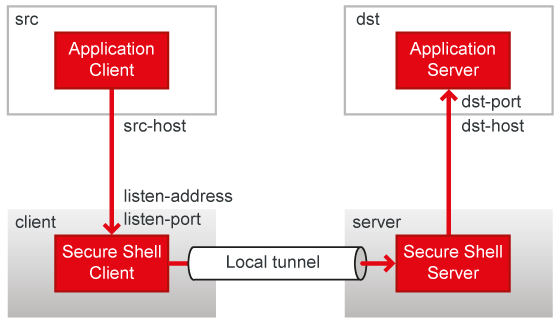
Figure 8.3 shows the different hosts and ports involved in local port forwarding.
The following configuration allows tunnels to imap.example.com ports 143
and 993. If this is the only tunnel-local rule, tunnels to all other
addresses are denied:
<rule>
  <tunnel-local action="allow">
    <dst fqdn="imap.example.com" port="143" />
    <dst fqdn="imap.example.com" port="993" />
  </tunnel-local>
...
</rule>
Opening the tunnel with a matching IP address should also work. Opening any other tunnel with IP address is denied.
The following configuration allows tunnels to 192.0.2.99 port 143. If this is the only
tunnel-local rule, tunnels to all other addresses are denied:
<rule>
  <tunnel-local action="allow">
    <dst address="192.0.2.99" port="143" />
  </tunnel-local>
...
</rule>
Opening the tunnel with a matching FQDN should also work. Opening any other tunnel with FQDN is denied.
The following configuration allows tunnels only to the server host itself (any port in the loopback interface):
<rule>
  <tunnel-local action="allow">
    <dst fqdn="localhost" />
  </tunnel-local>
...
</rule>
Note that the client must request tunneling to the internal loopback interface, not
the external interface of the server host. For example, if transparent TCP tunneling is
used on the client side and the external interface of the server host has IP address
192.168.92.250, then the following configuration allows tunnels only to the
server host itself (any port in the loopback interface or the external interface):
<rule>
  <tunnel-local action="allow">
    <dst fqdn="localhost" />
    <dst address="192.168.92.250" />
  </tunnel-local>
...
</rule>
By default, Tectia Client binds the listener to the internal loopback interface on the client
side allowing only local connections. If the allow-relay option is used on
the Tectia Client, all client-side interfaces are used, allowing connections from other hosts
unless Tectia Server denies this with the following configuration:
<rule>
  <tunnel-local action="allow">
    <src address="127.0.0.1" />
  </tunnel-local>
...
</rule>
The configuration allows tunnels originating from the client host only. However, restrictions based on the source address of local port forwarding are normally not reliable because the client can forge the source address. A configuration like this can be used only if the client can be trusted (for example, if it is administered by yourself).
The following configuration allows tunnels originating from the
example.com domain to the appserver.example.com ports
2000-9000. The "*" wildcard character matches all host names. As in the
previous example, this configuration should be used only if the client can be
trusted:
<rule>
  <tunnel-local action="allow">
    <src fqdn="*.example.com" />
    <dst fqdn="appserver.example.com" port="2000-9000" />
  </tunnel-local>
...
</rule>
The following configuration defines that Tectia Server uses the Python script
tunneling_control_script.py as an external application to verify
local tunneling connections:
<rule>
  <tunnel-local action="allow">
    <mapper command="python tunneling_control_script.py" timeout="25"/>
  </tunnel-local>
...
</rule>
Tectia Server uses the Tectia Mapper Protocol (for more information, see Appendix E) to communicate with the external application. In
this example the external application is used to check if user jbrown
from IP address 203.0.113.1 port 36388 is allowed to
tunnel to IP address 198.51.100.1 on port 12346. Tectia Server
sends the following messages to the application:
version:1
request:1
user=45678:jbrown
user-privileged=false
{tunnel-src}addr-ip=203.0.113.1
{tunnel-src}port=36388
{tunnel-src}addr-fqdn=abc.engineering.example.com
{tunnel-dst}addr-ip=198.51.100.1
{tunnel-dst}port=12346
{tunnel-dst}addr-fqdn=def.marketing.example.com
end-of-request:1
The external application sends back a positive response:
version:1
request:1
success:
The following configuration denies tunnels to the 192.168.23.0/24 domain.
If this is the only tunnel-local rule, tunnels to all other addresses are
allowed. If tunneling is attempted using a FQDN, the server will attempt to match to the
IP addresses using a DNS lookup:
<rule>
  <tunnel-local action="deny">
    <dst address="192.168.23.0/24" />
  </tunnel-local>
...
</rule>
The following configuration denies tunnels to the *.forbidden.example
domain. If this is the only tunnel-local rule, tunnels to all other addresses
are allowed. If tunneling is attempted using an IP address, the server will attempt to
match to the FQDN using a reverse DNS lookup. However, if this lookup fails, tunneling
using IP address is allowed:
<rule>
  <tunnel-local action="deny">
    <dst fqdn="*.forbidden.example" />
  </tunnel-local>
...
</rule>
To explicitly deny this, use a configuration similar to the following one:
<rule>
  <tunnel-local action="deny">
    <dst fqdn="*.forbidden.example" />
    <dst address="0.0.0.0/32" />
  </tunnel-local>
...
</rule>
This denies all local tunneling attempts using IP addresses.
Note that the tunneling rules are not intended to replace other access control mechanisms. If strict access control is required, it should be implemented at the application servers.
| |