|
     |
Public-key authentication is based on the use of digital signatures. Each user creates a pair of key files. One of these key files is the user's public key, and the other is the user's private key. The server knows the user's public key, and only the user has the private key.
The key files must be stored in a location where the user has the write
rights, (and read rights), but that is not accessible to others. These
user-specific rights are required for the key.pub file, the
authorized_keys directory, and for the
authorization file, if used.
When the user tries to authenticate, the client sends a signature to the server, and the server checks for matching public keys. If the key is protected with a passphrase, the server requests the user to enter the passphrase.
Remember that your private-key file is used to authenticate you. Keep your private-key file in a secure place and make sure that no one else has access to it. If anyone else can access your private-key file, they can attempt to log in to the remote host computer pretending to be you. Define a passphrase to protect your private key, whenever possible. On a machine shared by several users, make sure that the permission settings do not allow others to access your private key.
![[Caution]](images/caution.gif) | Caution |
|---|---|
Do not store your private keys in a location accessible to other users. |
Also note that if you are using the Windows roaming profiles functionality, your personal settings will be replicated with the roaming profile server. If you store your private keys in the default location (under the profile folder of your Windows user account) your private keys may be susceptible to a malicious user listening to the network traffic. Therefore the User Settings folder should not be a directory that is used in profile roaming.
To use public-key authentication with Tectia Client, do the following actions:
Generate a key pair. You can generate your own key files with the help of a built-in Public-Key Authentication Wizard on Windows (see Creating Keys with the Public-Key Authentication Wizard), or with ssh-keygen-g3 on Unix or Windows command line (see Creating Keys with ssh-keygen-g3).
You can also import existing keys on the Keys and Certificates page of the Tectia Connections Configuration GUI. See Managing Keys and Certificates.
Upload your public key to the remote host computer. On Windows, you can do this automatically (see Uploading Public Keys Automatically). On Unix and Windows, you can also copy the public key manually (see Uploading Public Keys Manually).
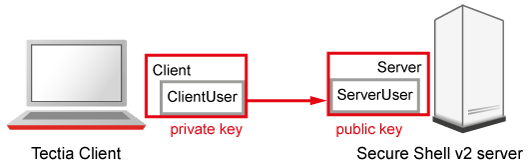
In the instructions in the following sections,
Server is the remote host running the Secure Shell server that you are
trying to connect to.
ServerUser is the user name on Server that you are logging
in as.
Client is the host running the Secure Shell client
(Tectia Client).
ClientUser is the user name on Client that should be allowed
to log in to Server as ServerUser.
The instructions assume that ClientUser is allowed to log in to
Server as ServerUser using some other authentication method
(usually password).
To create a public key pair, run ssh-keygen-g3 on
Client:
$ ssh-keygen-g3
Generating 3072-bit rsa key pair
   9 oOo.oOo.oOo
Key generated.
3072-bit rsa, ClientUser@Client, Mon Aug 15 2022 12:08:07 +0200
Passphrase :
Again :
Private key saved to  /home/ClientUser/.ssh2/id_rsa_3072_a
Public key saved to   /home/ClientUser/.ssh2/id_rsa_3072_a.pub
When run without options, ssh-keygen-g3 asks for a passphrase for the new key. Enter a sufficiently long (20 characters or so) sequence of any characters (spaces are OK).
![[Note]](images/note.gif) | Note |
|---|---|
In FIPS mode, due to a FIPS regulation which forbids exporting unencrypted private keys out of the FIPS module, it is not possible to generate user keys without a passphrase. |
The new authentication key pair consists of two separate files. One of the keys is your private key which must never be made available to anyone but yourself. The private key can only be used together with the passphrase.
On Unix, the key pair is by default stored in your
$HOME/.ssh2 directory (created by ssh-keygen-g3 if
it does not exist previously). On Windows, the key pair is by default stored in your
%APPDATA%\SSH\UserKeys directory.
In the example above, the private key file is id_rsa_3072_a. The
public key file is id_rsa_3072_a.pub, and it can be distributed to
other computers.
By default, ssh-keygen-g3 creates a 3072-bit RSA key pair. DSA, ECDSA
or Ed25519 keys can be generated by specifying the -t option with
ssh-keygen-g3. Key length can be specified with the -b
option. For automated jobs, the key can be generated without a passphrase with the
-P option, for example:
$ ssh-keygen-g3 -t ecdsa -b 384 -P
For more information on the ssh-keygen-g3 options, see ssh-keygen-g3(1).
All commands in this section are shown using sshg3 and scpg3 from the machine running Tectia Client. Server-side configuration can also be done by logging in to the remote server and entering the commands locally.
To enable public-key authentication with your key pair:
Place your keys in a directory where the Connection Broker can locate them.
By default, the Connection Broker attempts to use each key found in the
$HOME/.ssh2
directory on Unix, or in the
%APPDATA%\SSH\UserKeys and
%APPDATA%\SSH\UserCertificates directories on Windows.
You can also add other directory locations for keys on the Keys
and Certificates page of the Tectia Connections Configuration GUI. See Managing Keys and Certificates. On
Unix, you can use the general/key-stores/key-store element in the
ssh-broker-config.xml file. See the section called “Key Store Configuration Examples”.
(Optional) Create an identification file.
Using the identification file is not necessary if all your keys
are stored in the default directory and you allow all of them to be used for public-key
and/or certificate authentication. If the identification file does
not exist, the Connection Broker attempts to use each key found in the default directory. If the
identification file exists, the keys listed in it are attempted
first.
Create a file called identification, on Unix in your
$HOME/.ssh2 directory, or on Windows in your
%APPDATA%\SSH directory.
Edit it with your favorite text editor to include the following line
(replace id_rsa_3072_a with the file name of the private key):
IdKey id_rsa_3072_a
The keys are assumed to be in the same directory with the
identification file, but also an absolute or a relative path can
be given. For example, on Windows:
IdKey UserKeys\id_rsa_3072_a
The identification file can contain several key IDs. For more information on the
syntax of the identification file, see
$HOME/.ssh2/identification
.
Connect to Server using some other authentication method and create a
.ssh2 (and .ssh2/authorized_keys), or a
.ssh directory under your home directory if it does not exist
already.
Depending on the server version the remote host is running, run one of the following commands:
Tectia Server on Unix or z/OS:
$ sshg3 ServerUser@tectia_server mkdir .ssh2
If you do not want to use an authorization file on Tectia Server 5.x or later on Unix,
create also the authorized_keys directory:
$ sshg3 ServerUser@tectia_unix mkdir .ssh2/authorized_keys
Tectia Server on Windows:
$ sshg3 ServerUser@tectia_win "cmd /c mkdir .ssh2"
If you do not want to use an authorization file on Tectia Server 5.x or later on
Windows, create also the authorized_keys directory:
$ sshg3 ServerUser@tectia_win "cmd /c mkdir .ssh2\authorized_keys"
OpenSSH server on Unix or z/OS:
$ sshg3 ServerUser@open_server mkdir .ssh
Copy the public key to Server.
Depending on the server version the remote host is running, do one of the following actions:
Tectia Server 5.x or later on Unix and Windows:
Use SCP to upload your public key to the server, to your
authorized_keys directory (by default
$HOME/.ssh2/authorized_keys on Unix servers, or
%USERPROFILE%\.ssh2\authorized_keys on Windows
servers):
$ scpg3 id_rsa_3072_a.pub ServerUser@tectia_server:.ssh2/authorized_keys/
Tectia Server 4.x on Unix and Windows:
Use SCP to upload your public key to the server (by default to the
$HOME/.ssh2 directory on Unix and to the
%USERPROFILE%\.ssh2 directory on Windows servers):
$ scpg3 id_rsa_3072_a.pub ServerUser@tectia4x_server:.ssh2/
Tectia Server for IBM z/OS:
The public key must be converted to the EBCDIC format. This can be done
by including the scpg3
dst-site command-line option, or the
sftpg3 site commands in the file transfer command. For more
information on the site parameters, see Site Command.
Use SCP to upload your public key to the server (by default to the
$HOME/.ssh2 directory):
$ scpg3 --dst-site="C=ISO8859-1,D=IBM-1047,X=TEXT" id_rsa_3072_a.pub \
ServerUser@tectia_zos:$HOME/.ssh2/
OpenSSH server on Unix:
Use SCP to upload your public key to the server, to your
$HOME/.ssh directory:
$ scpg3 id_rsa_3072_a.pub ServerUser@open_unix:.ssh/
Create an authorization or authorized_keys
file on Server.
Depending on the server version the remote host is running, do one of the following actions:
Tectia Server 5.x or later on Unix and Windows do not require an authorization file if
the public keys are stored in the user's authorized_keys
directory. However, an authorization file may be optionally used. See instructions
for creating the file below in the Tectia Server 4.x information.
Tectia Server 4.x on Unix and Windows and Tectia Server for IBM z/OS require an
authorization file stored in the user's
.ssh2 directory. The authorization file specifies the public
keys that are authorized for login.
Add the key entry to the authorization file. On a Unix or z/OS server:
$ sshg3 ServerUser@tectia_server4x "echo Key id_rsa_3072_a.pub >> \
.ssh2/authorization"
On a Windows server:
$ sshg3 ServerUser@tectia4x_win "cmd /c echo Key id_rsa_3072_a.pub >> \
.ssh2\authorization"
An example authorization file is shown below (by default
$HOME/.ssh2/authorization on Unix and z/OS servers, and
%USERPROFILE%\.ssh2\authorization on Windows servers):
Key id_rsa_3072_a.pub
This directs Tectia Server to use id_rsa_3072_a.pub as a valid
public key when authorizing your login.
OpenSSH server requires that the public key is converted to the OpenSSH
public-key file format and stored in the authorized_keys file
in the user's .ssh directory.
Convert the public key to the OpenSSH public-key file format on the server and
append it to your $HOME/.ssh/authorized_keys file. This can be
done with a remote command on an OpenSSH server as follows:
$ sshg3 ServerUser@open_server "ssh-keygen -i -f id_rsa_3072_a.pub >> \
.ssh/authorized_keys"
Make sure that public-key authentication is enabled in the
ssh-broker-config.xml file (it is enabled by default).
<authentication-methods>
  <auth-publickey />
...
</authentication-methods>
Other authentication methods can be listed in the configuration file as well. Place the least interactive method first.
Assuming Server is configured to allow public-key authentication to your
account, you should now be able to log in from Client to Server
using public-key authentication.
Try to log in:
Client$ sshg3 Server
You should be prompted for the passphrase of the private key. After you have entered the passphrase, a Secure Shell connection will be established.
On Windows and Linux, you can use the Tectia Public-Key Authentication Wizard to generate a key pair and to upload a public key to a host, see Public-Key Generation and Uploading Public Keys Automatically. The wizard will generate two key files, your private key and your public key.
The new private and public key will be stored on your local computer in the
%APPDATA%\SSH\UserKeys directory on Windows and in the
$HOME/.ssh2/ directory on Linux. The private key file
has no file extension, and the public key has the same base file name as the private key,
but with .pub as the file extension.
Make sure that public-key authentication is allowed in the Connection Broker configuration, in the default settings and in the relevant connection profile (it is allowed by default). For the default settings, see Defining Authentication, and for the connection profile, see Defining Authentication.
To use the key pair for public-key authentication, you have to upload the public key to the remote host computer. If the remote host has an SFTP server running, you can automatically upload a copy of your new public key to the server with the wizard. To upload the key automatically, see Uploading Public Keys Automatically. To upload the key manually, see Uploading Public Keys Manually.
New keys are generated in the Tectia Connections Configuration GUI. Under User authentication, select the Keys and Certificates page and click New Key to start the Public-Key Authentication Wizard.
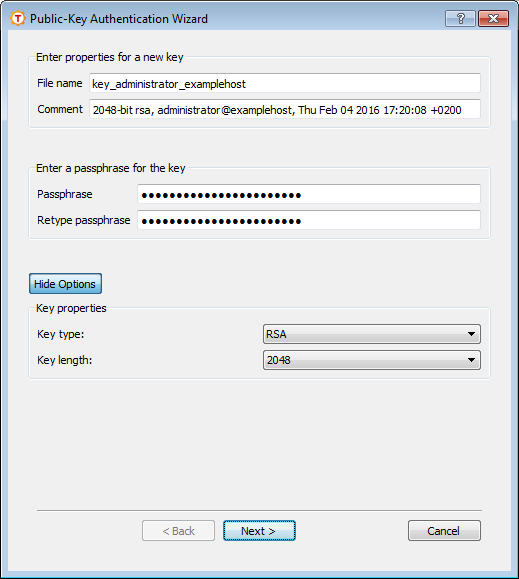
Define the key properties and the required passphrase to protect your private key; you will be requested to enter the passphrase always when using the keys to authenticate yourself.
Type a unique name for the key file. Tectia Client suggest a name consisting of the user name and the host name.
In this field you can write a short comment that describes the key pair. You can for example describe the connection the keys are used for. This field is not obligatory, but helps to identify the key later.
Type a phrase that you have to enter when handling the key. This passphrase works in a similar way to a password and gives some protection for your private key.
| Note |
|---|---|
In FIPS mode, due to a FIPS regulation which forbids exporting unencrypted private keys out of the FIPS module, it is not possible to generate user keys without a passphrase. |
Make the passphrase difficult to guess. Use ideally at least 20 characters, both letters and numbers. Any punctuation characters can be used as well. While the passphrase or private key is never sent over the network, a dictionary attack can be used against a private key if it is accessible locally. For ease of use, an authentication agent is recommended instead of leaving the passphrase empty. By default ssh-broker-g3 functions as an authentication agent.
Memorize the passphrase carefully, and do not write it down.
Type the passphrase again. This ensures that you have not made a typing error.
Click Advanced Options to define the type of the key to be generated and the key length to be different from the defaults. By default, Tectia Client generates a pair of 3072-bit RSA keys.
In the Key Properties fields, you can make the following selections:
Select the type of the key to be generated. Available options are Ed25519 RSA (default), ECDSA and DSA.
| Note |
|---|---|
In FIPS mode (conforming to FIPS 186-5) RSA, ECDSA and Ed25519 are supported. DSA has been deprecated. |
Select the length (complexity) of the key to be generated. Available options are:
DSA/RSA keys: 2048, 3072, 4096, 5120, 6144, 7168, 8192 bits
ECDSA keys: 256, 384, 521 bits
Ed25519 keys: 256 bits
Larger keys of the same key type are more secure, but also slower to generate. A 256-bit ECDSA key and a 3072-bit RSA key provide equivalent security.
Click Next to proceed to uploading the key as instructed in Uploading Public Keys Automatically.
Public keys can be uploaded automatically to servers that have the SFTP subsystem enabled. The Public-Key Authentication Wizard automatically uploads each new public key to a remote host of your choice. The wizard lists all existing keys, and you can select a key to upload it also to other remote servers at any time.
To access the Public-Key Authentication Wizard, click User Authentication → Keys and Certificates on the tree view.
Select a key from the Key and Certificate List and click Upload.
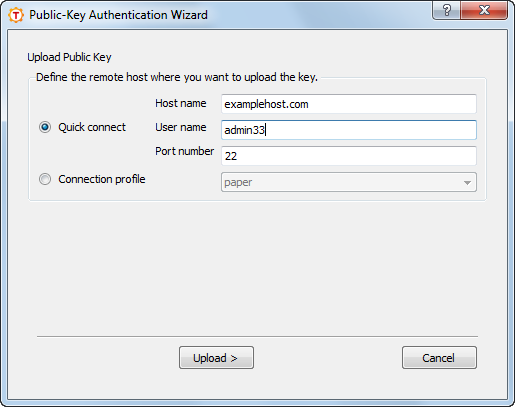
In the Upload Public Key view of the wizard, define the remote host where to upload the key:
Select this option to define the remote Host name and your User name there. The default Secure Shell port is 22.
Select from the drop-down list the connection profile that specifies the desired remote host and user name.
Click Upload to upload the key to the selected server. If you are already connected to the remote server host, the key upload starts immediately. If you are not connected, you will be prompted to authenticate on the server (by default with password).
The public key will be uploaded to the default user home directory
(%USERPROFILE%\.ssh2 on Windows, $HOME/.ssh2
on Unix).
| Note |
|---|---|
The key user is required to have the |
Even if the automatic upload succeeds, it is possible that the server administrator has configured the system to store keys elsewhere than under the user home directory. In this case the keys and the authorization file additions have to be moved manually to the proper directory.
If you do not use the automatic upload facility, see Uploading Public Keys Manually.
Tectia Client supports also user key pairs generated with OpenSSH. The OpenSSH keys can
be specified in the ssh-broker-config.xml file by using the
key-stores
element. An example
configuration is shown below:
<key-stores>
  <key-store type="software"
             init="key_files(/home/exa/keys/id_rsa.pub,/home/exa/keys/id_rsa)" />
  <key-store type="software"
             init="directory(path(/home/exa/.ssh))" />
</key-stores>
This example adds a key called id_rsa and all keys from the user's
default OpenSSH key directory (.ssh under the user's home
directory).
You can add OpenSSH keys and directories on the Keys and Certificates page of the Tectia Connections Configuration tool. See Managing Keys and Certificates.
The public key can be uploaded to the server the same way as with standard SSH2 keys. See Uploading Public Keys Manually and Uploading Public Keys Automatically.
If you use public-key authentication to log on to a Windows domain user account on Tectia Server
5.1 or earlier, you must give your user name as DOMAIN\user when attempting
logon. On Unix command line, the backslash has to be escaped, for example:
$ sshg3 DOMAIN\\user@win-server
With Tectia Server 5.2 and later, this is not required. When logging on to a machine that runs Tectia Server 5.2 or later, and belongs to a Windows domain, the user account is by default assumed to be a domain account in the default domain. If you want to log on to a local account with same name instead, you have to specify the machine name as the "domain", for example on Windows command line:
> sshg3 MACHINE\user@machine
| |