|
     |
You can use the Tectia Connections Configuration GUI to edit the authentication and connection profile settings on the Connection Broker included in Tectia Client.
Tectia Connections Configuration GUI is available on Windows, Linux and macOS for Tectia Client. There are some differences in the GUI options between different OS platforms and product versions. The following screen shots typically show Tectia Client on Windows. When the differences are important, the differences are noted.
On Linux and macOS, the Tectia Connections Configuration GUI interface differs from the Windows version most notably with the following exceptions:
The Microsoft Crypto API option on the Key Providers
page is not available.
![[Note]](images/note.gif) | Note |
|---|---|
Only KDE and Gnome window managers are supported. For other compatible managers, check the website for the Qt framework. |
The Tectia Connections Configuration GUI can be accessed in several ways:
When you have the PrivX Desktop GUI active, click the menu icon and select Configuration or right-click on a specific profile tile and select Edit profile... on Profiles page.
On Windows, right-click on the PrivX Desktop tray icon  in the Windows taskbar notification area to access the shortcut
menu, and select Configuration.
in the Windows taskbar notification area to access the shortcut
menu, and select Configuration.
On Linux and macOS, click on the PrivX Desktop tray icon in menu bar to access the tray icon
menu, and select Configuration.
The Tectia Connections Configuration GUI can be started by running on command-line:
ssh-tectia-configuration
The following options are available:
-f, --config=FILE
Use configuration file FILE.
-a, --broker-address=ADDR
Connect to separate Connection Broker process using given address.
-d, --debug=STR
Sets debug string to STR.
--convert
Convert old configuration file.
--new-profile
Add a new profile.
--profile-host=HOST
Profile host name when adding a new profile.
--profile-port=PORT
Profile port when adding a new profile.
--profile-user=USER
Profile user when adding a new profile.
--edit-profile=NAME
Edit existing profile NAME.
--ui-mode=MODE
User interface mode. Possible values are standard and
file-transfer.
-V, --version
Print version.
-h, --help
Print usage.
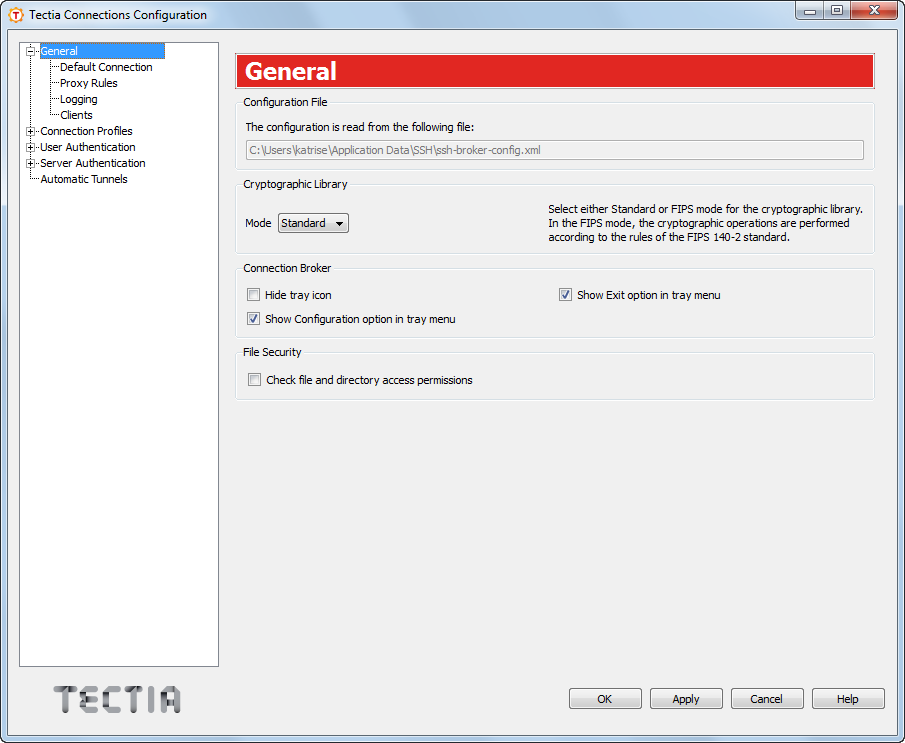
On the General page, you can select the cryptographic library to be used and define the Tectia tray icon settings.
Shows the location of the user-specific Broker configuration file. The default
location is "%APPDATA%\SSH\ssh-broker-config.xml" on Windows and
"$HOME/.ssh2/ssh-broker-config.xml" on Linux.
Each time the configuration file is saved, a backup of the old configuration is
stored in "%APPDATA%\SSH\ssh-broker-config.xml.bak" on Windows and
"$HOME/.ssh2/ssh-broker-config.xml.bak" on Linux.
Tectia Client can be operated in FIPS mode, using a version of the cryptographic library that has been validated according to the Federal Information Processing Standard (FIPS) 140-2. In this mode, the cryptographic operations are performed according to the rules of the FIPS 140-2 standard. The OpenSSL cryptographic library is used in the FIPS mode.
Select whether to use the Standard or the FIPS 140-2 certified version of the cryptographic library.
For the default settings, see Defining Ciphers, Defining MACs, and for the profile-specific settings, see Defining Ciphers, and Defining MACs.
Select whether to hide the Tectia tray icon from the Windows taskbar notification area, and whether to show the Exit and Configuration options in the shortcut menu.
Select the Check file and directory access permissions check
box to enable checking the access permissions for the user-specific configuration file
($HOME/.ssh2/ssh-broker-config.xml) and the private key files. By
default, file and directory access permissions are not checked.
When the file and directory access permissions are checked, the controls are applied as follows:
Expected permissions for the user configuration file: only the user has read and write rights. If the permissions are any wider, the Connection Broker will not start.
Expected permissions for the private key files: only the user has read and write rights. If the permissions are any wider, keys that do not pass the check will be ignored.
The Default Connection page allows you to edit the default settings for a user name (Defining Connection Settings), authentication (Defining Authentication), ciphers (Defining Ciphers), MACs (Defining MACs), KEXs Defining KEXs, server connections (Defining Server Connections), and tunneling (Defining Default Tunneling Settings).
Newly created connection profiles will inherit the default settings defined here. The values can be customized on the profile-specific tabbed pages and they override the default settings. See Defining Authentication, Defining Ciphers, Defining MACs, and Defining Server Connections.
On the Connection tab, you can define a default user name to be used when connecting to remote servers. This connection is useful when several users will be using profiles jointly, either with their own system user names or with a common user account.
Select the Use current Windows user name option, to automatically apply the Windows user name of the currently logged in user to connections to remote servers.
Select the Specify user name option and enter a generic user name. Note that the name is case sensitive.
The given user name will be used in connections unless another user name is specified in a connection profile or connection attempt. In case you select this option but leave the user name field empty, the Connection Broker will prompt the user for a user name.
In principle, you can enter value "%USERNAME%", but it has the same
effect as selecting Use current Windows user name.
If you specify a host name or the profile contains a host name, the Connection Broker will try to
resolve the address based on the Network address family setting. If you
select inet, the Connection Broker will resolve the host name only with an IPv4
address. If you select inet6, the Connection Broker will resolve the host name only
with an IPv6 address. Selecting Any means that the Connection Broker will resolve the
host name with any IP address (IPv4 or IPv6) available.
| Note |
|---|---|
You can specify a direct IP address (either IPv4 or IPv6) for the connection using either the connection profile or the command line. This setting does not restrict the user specified network family address. For example, the connection will be established to a specified IPv4 address even if the network address family was set to IPv6. |
Settings made in this tab take effect the next time a user logs in.
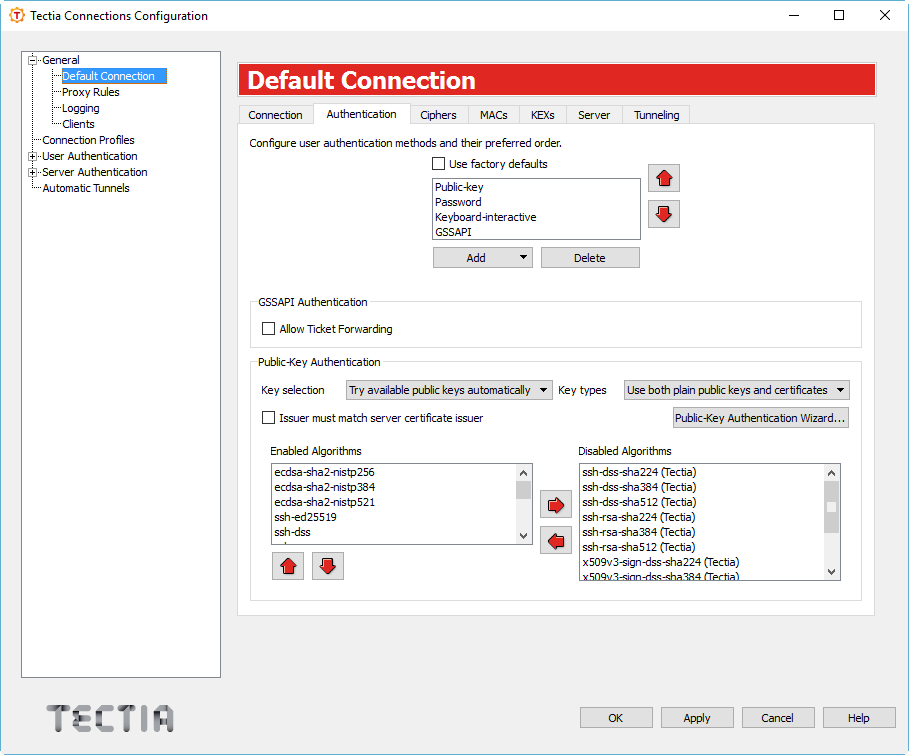
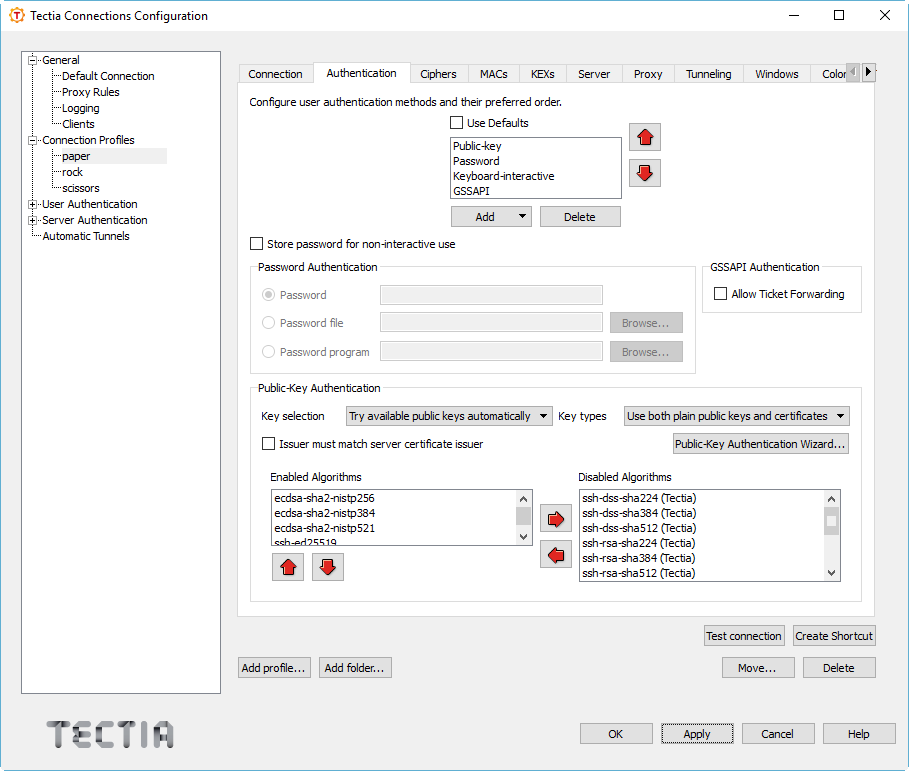
On the Authentication tab, you can define the default user authentication methods.
Select the Use factory defaults check box to use the factory default authentication methods, or clear the check box to define a custom list of authentication methods.
In Tectia Client 7.0, the factory default authentication methods are, in order:
Public-key
Password
Keyboard-interactive
GSSAPI
The authentication methods are supported on all platforms, except for GSSAPI, which is not available on IBM z/OS.
To add a new authentication method to the list, click Add and select the method from the drop-down menu.
To remove an authentication method, select the method from the list and click Delete.
Use the arrow buttons to organize the preferred order of the authentication methods. The first method that is allowed by the Secure Shell server is used. Note that in some cases, the server may require several authentication methods to be passed before allowing login.
Possible methods for user authentication are:
Public-key: Users are requested to use public-key authentication. See also Defining User Authentication.
Password: Users are requested to enter a password for authentication.
Keyboard-interactive: Keyboard-interactive is designed to allow the Secure Shell client to support several different types of authentication methods, including RSA SecurID, and PAM. For more information on keyboard-interactive, see User Authentication with Keyboard-Interactive.
GSSAPI: GSSAPI (Generic Security Service Application Programming Interface) is a common security service interface that allows different security mechanisms to be used via one interface. For more information on GSSAPI, see User Authentication with GSSAPI.
In the GSSAPI Authentication field, by selecting the Allow Ticket Forwarding check box you can enable Tectia Client to allow forwarding the Kerberos ticket over several connections.
When using Public-Key Authentication, you can also define which key types are used and how the keys are selected.
Key selection defines the policy Connection Broker uses when proposing user public keys to the server. Select the mode from the drop-down list. The options are:
Try available public keys automatically (the default). With this policy, the client will try the keys in the following order:
Keys with public key available and private key without a passphrase (no user interaction)
Keys with public key available but private key behind a passphrase (require a passphrase query, provided the key is accepted by the server)
The rest of the keys, meaning keys that require a passphrase for the public key as well as the private key.
Prompt user to select the public key - with this policy, the Connection Broker prompts the user to select the key from a list of available keys. If authentication with the selected key fails, the client will prompt the user again to select another key.
Key types defines whether only plain public keys or only certificates are tried during public-key authentication. Select the key type from the drop-down list. The default is to try both plain public keys and certificates.
By selecting the Issuer must match server certificate issuer check box, you can make the Connection Broker filter the user certificates that will be included in the list presented to the user. The client-side user certificates can be filtered according to their issuer name that is compared to the certificate issuers requested or accepted by the server. By default, the filtering is not done. This option is useful when a user has several certificates with different access rights to the same server, for example for a testing role and for an administrator role. The Connection Broker chooses the relevant certificates that are applicable on the remote host, and the user can choose the correct certificate from the short-listed ones.
To generate new public-key pairs and to upload the public part of the key to a server, click the Public-Key Authentication Wizard button. For more information, see Using the Public-Key Authentication Wizard.
Enabled algorithms lists the public-key signature algorithms that are used for authenticating and signing the user's public key. The algorithms that will be used are those that are configured for both Tectia Server and the Connection Broker. You can use the up and down arrow buttons to modify the order of the algorithms. To move an algorithm to the Disabled algorithms list, select it and click the right arrow button.
A list of factory default public-key signature algorithms can be found in Host-Key and Public Key Signature Algorithms.
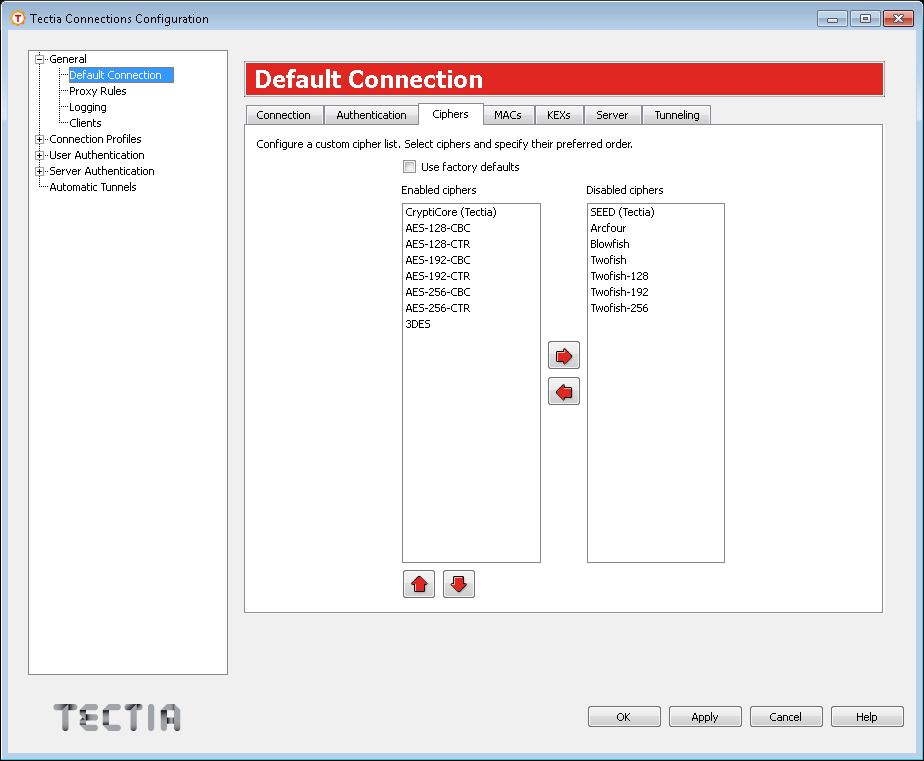
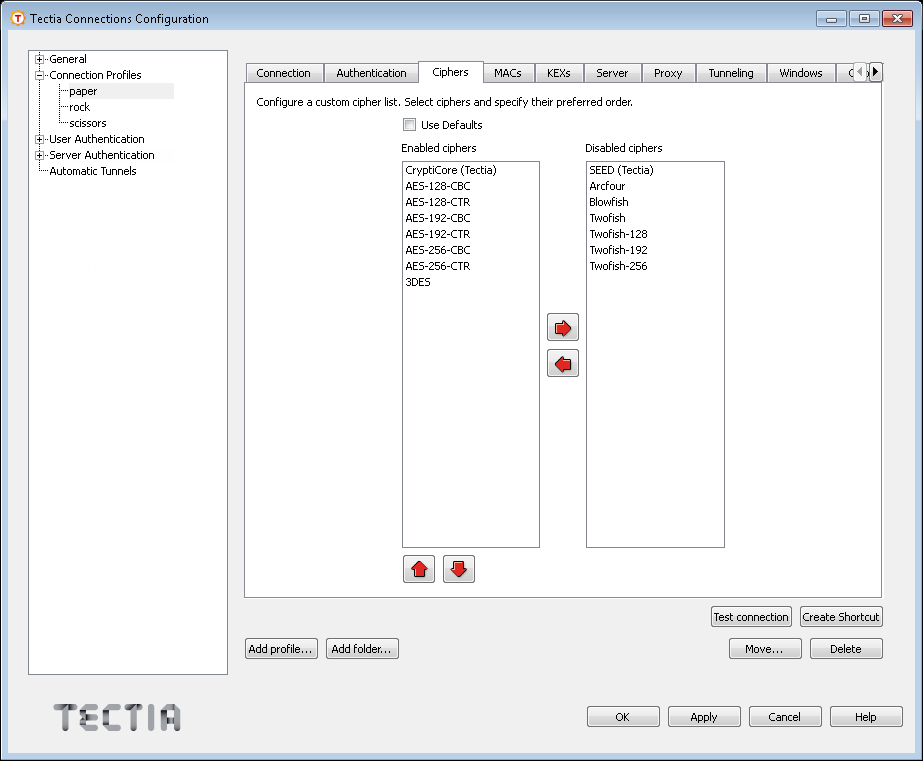
On the Ciphers tab, you can define the encryption algorithms used.
Select the Use factory defaults check box to use the factory default algorithms, or define a cipher list using the arrow buttons. The ciphers are tried in the order they are specified.
A list of factory default ciphers can be found in Ciphers.
Tectia proprietary algorithms are marked with (Tectia) and are operable
with Tectia products only. They correspond to the algorithms that end with
@ssh.com in the Connection Broker configuration file.
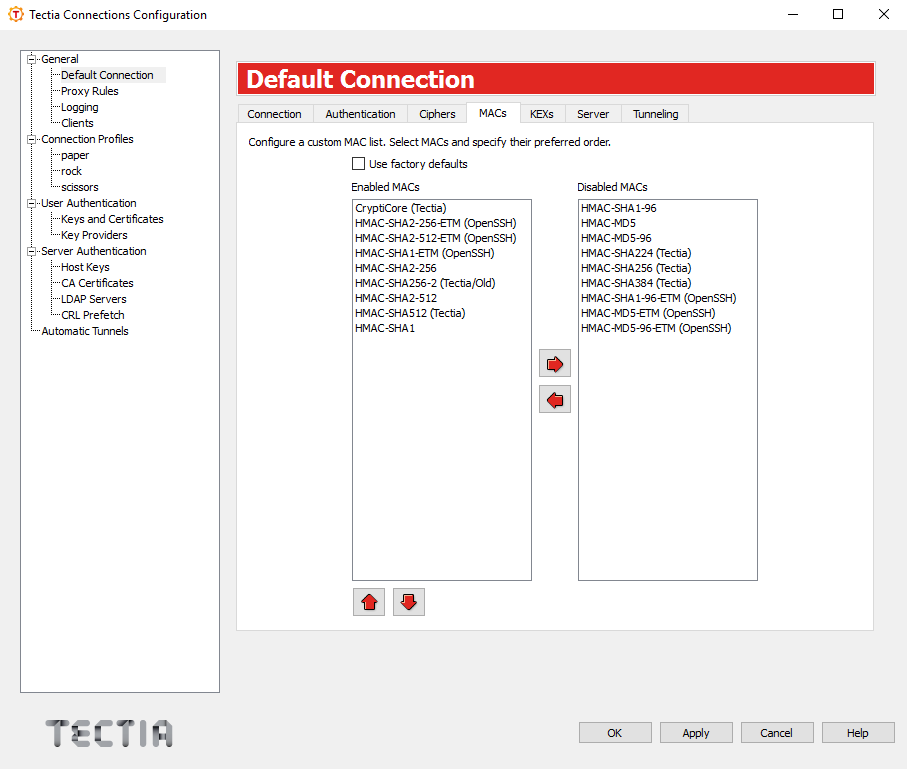
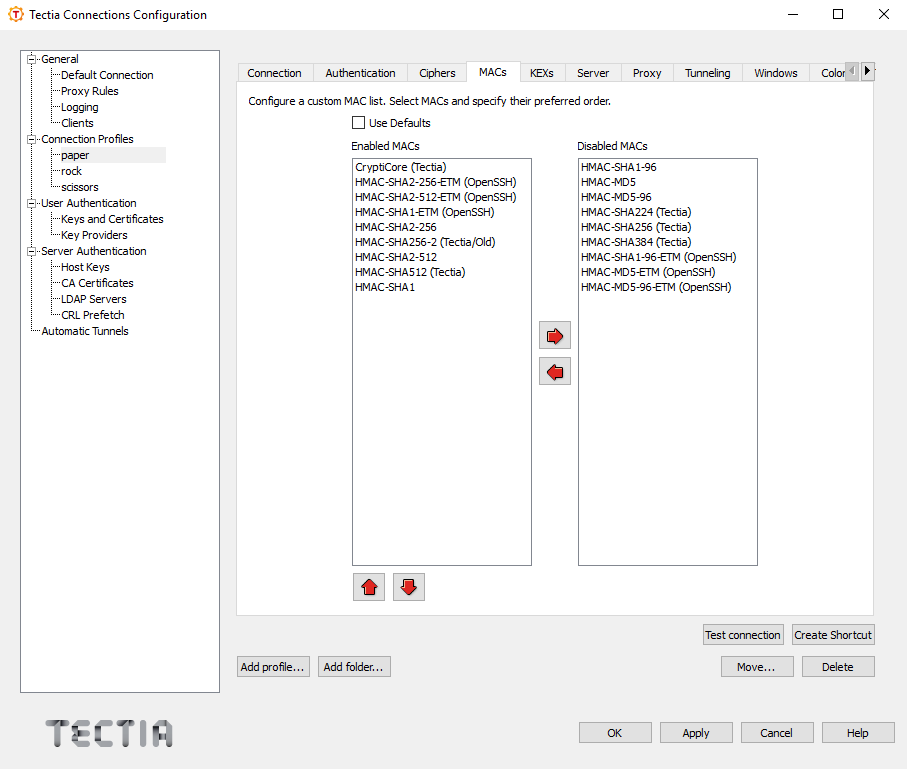
On the MACs tab, you can configure the message integrity algorithms used.
Select the Use factory defaults check box to use the factory default algorithms, or define a MAC list using the arrow buttons. The MACs are tried in the order they are specified.
A list of factory default MACs can be found in Message-Authentication Codes
Tectia proprietary algorithms are marked with (Tectia) and are operable
with Tectia products only. They correspond to the algorithms that end with
@ssh.com in the Connection Broker configuration file.
The algorithms marked with (OpenSSH) correspond to the algorithms
that end with @openssh.com in the Connection Broker configuration file.
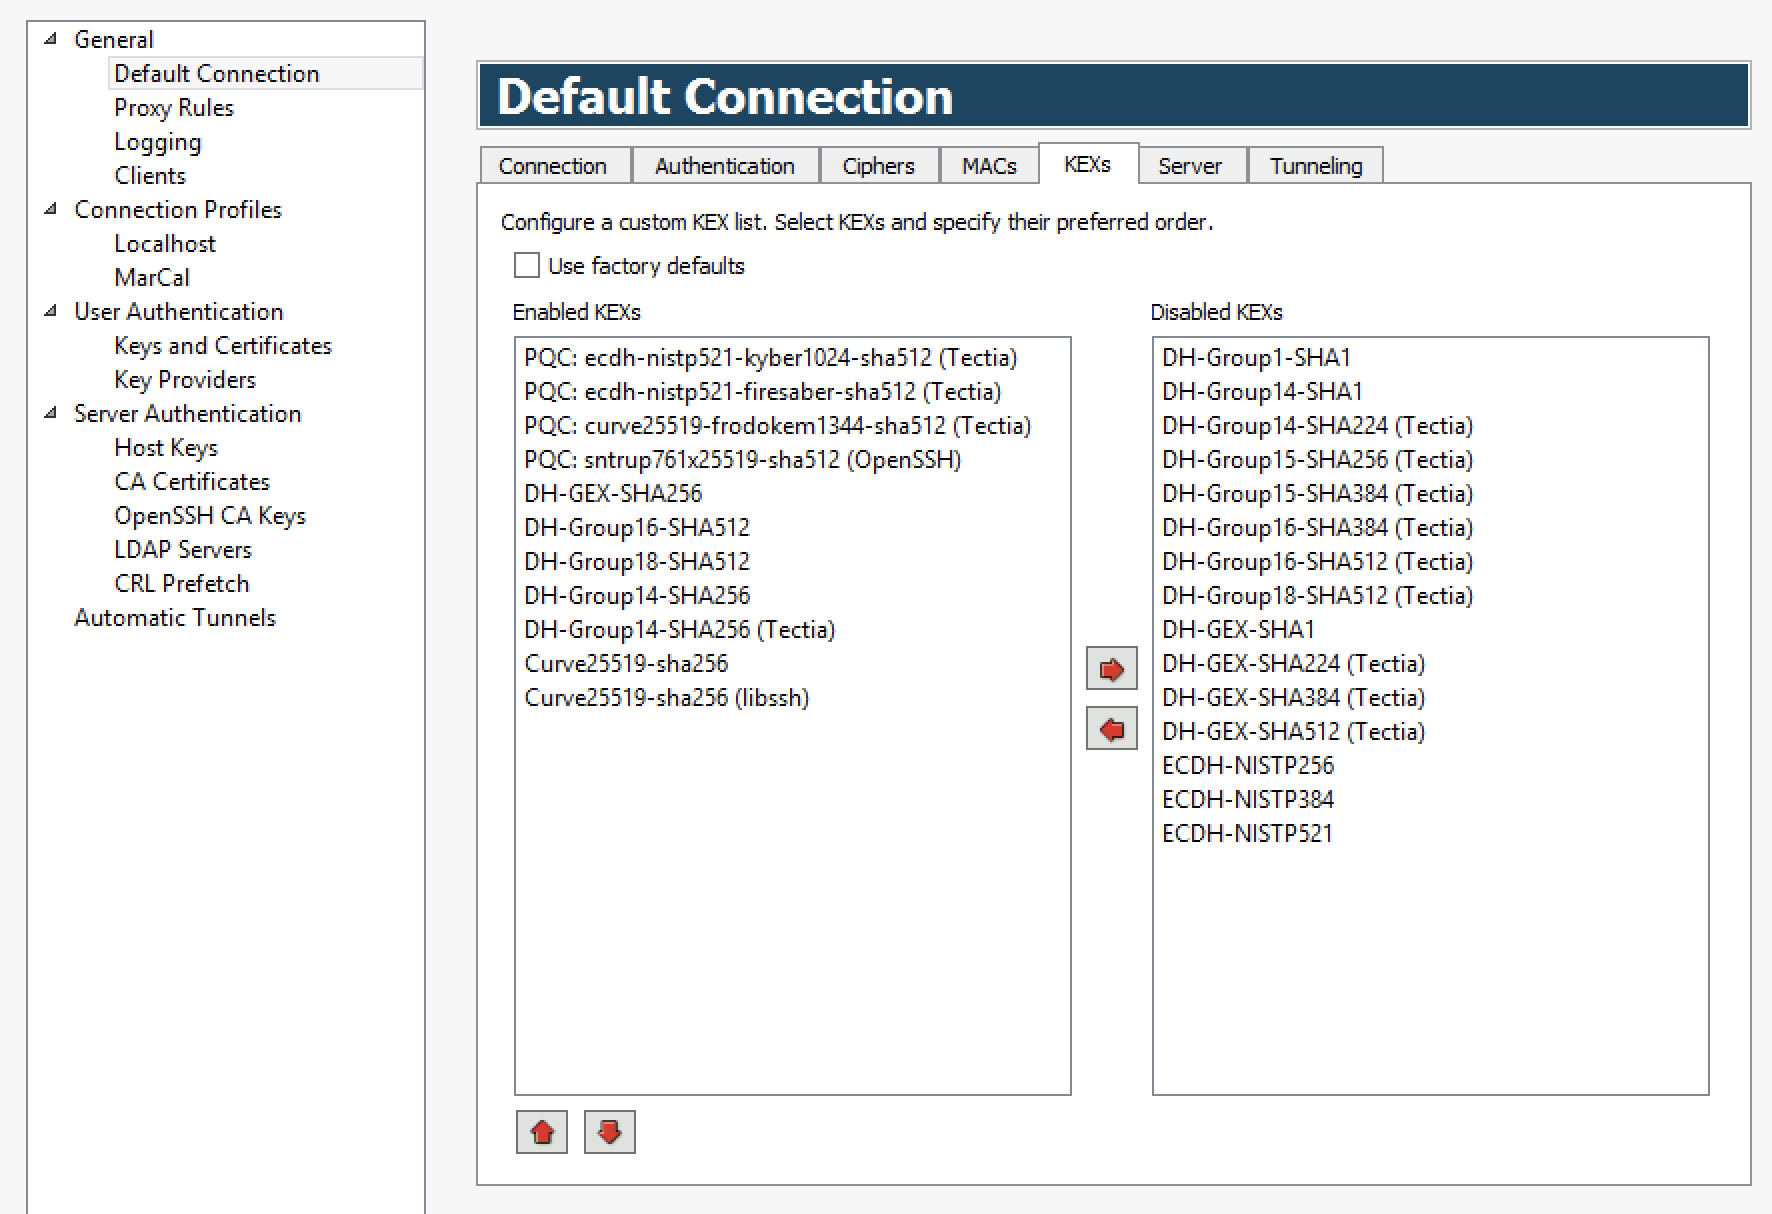
On the KEXs tab, you can configure the key exhange methods used.
Select the Use factory defaults check box to use the factory default methods, or define a KEX list using the arrow buttons. The KEX methods are tried in the order they are specified.
A list of factory default KEXs can be found in Key-Exchange Algorithms.
Tectia proprietary algorithms are marked with (Tectia) and are operable
with Tectia products only. They correspond to the algorithms that end with
@ssh.com in the Connection Broker configuration file.
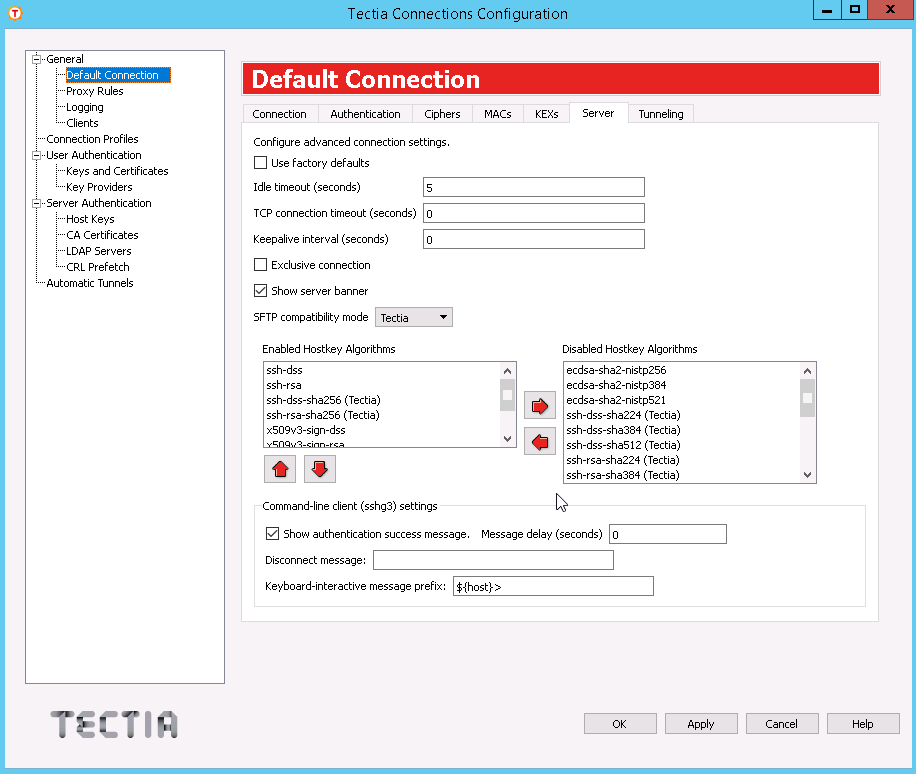
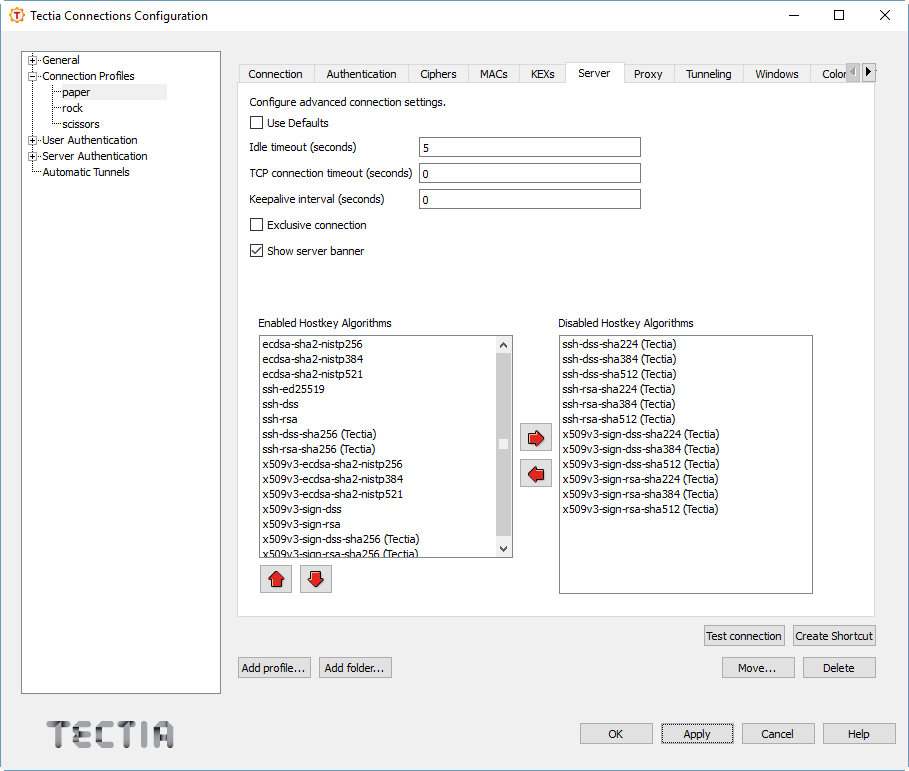
On the Server tab, you can define advanced server connection settings.
Select the check box to use the default values for the server connection settings.
Specify how long idle time (after all connection channels are closed) is allowed for a connection before automatically closing the connection. The default is 5 seconds. Setting a longer time allows the connection to the server to remain open even after a session (for example, PrivX Desktop GUI) is closed. During this time, a new session to the server can be initiated without re-authentication. Setting the time to 0 (zero) terminates the connection immediately when the last channel to the server is closed.
Specify for how long a TCP connection will be attempted to a Secure Shell server. Define the timeout in seconds, and after that time the TCP connection will be released in case the remote server is down or unreachable. Setting the value as 0 (zero) means this Tectia setting is disabled and the system default TCP timeout will be used. By default, the system timeout is used.
Specify an interval (in seconds) for sending keepalive messages to a Secure Shell server. The default is 0, meaning that no keepalive messages are sent.
Select this check box if you want always a new connection opened, instead of reusing a currently open connection.
Select this check box if you want to have the server banner message file (if it exists) visible to users before login.
Clear this check box if you do not want to have the
AuthenticationSuccessMsg messages output and logged. By default
the messages are enabled.
Sets the time for how long the authentication success message is shown. Default
value is 2. When the value is set to 0, the message is not
shown, only logged.
Sets the message that is shown when you disconnect. By default this is turned off. For a list of accepted substitution variables, see disconnect-message
String shown before the keyboard-interactive prompt. Default value is
${host}> . For a list of accepted substitution variables, see keyboard-interactive
Select a suitable mode for transferring files with SFTP. This setting affects the behavior of the get/mget/sget and put/mput/sput commands and the recursion level used by the sftpg3 client. The following options are available:
Tectia (the default) - sftpg3 transfers
files recursively from the current directory and all its subdirectories.
OpenSSH - copies only regular files and symbolic links from
the specified directory, and no subdirectories are copied. Otherwise the
semantics of the get command are unchanged.
FTP - the get/put commands are executed
as sget/sput meaning that they transfer a single file, and no
subdirectories are copied.
The recursion depth can be overridden by using the sftpg3
client's commands get/put/mget/mput with command-line option
--max-depth="LEVEL". For more information, see sftpg3(1).
The host key signature algorithms used for server authentication with host keys or certificates are listed here. The algorithms that will be used are those that are defined in both Tectia Server and Connection Broker configuration files. This way the use of only certain algorithms, such as SHA-2, can be enforced by the server.
The host key algorithms are tried in the order they are specified. Exception: If a host key of a server already exists in the host key store of the client, its algorithm is preferred. You can use the up and down arrow buttons to modify the order of the algorithms.
A list of factory default host key algorithms can be found in Host-Key and Public Key Signature Algorithms.
The host key algorithms listed here are not used for server authentication. To disable a host key algorithm, select it in the Enabled Hostkey Algorithms list and click the right arrow button.
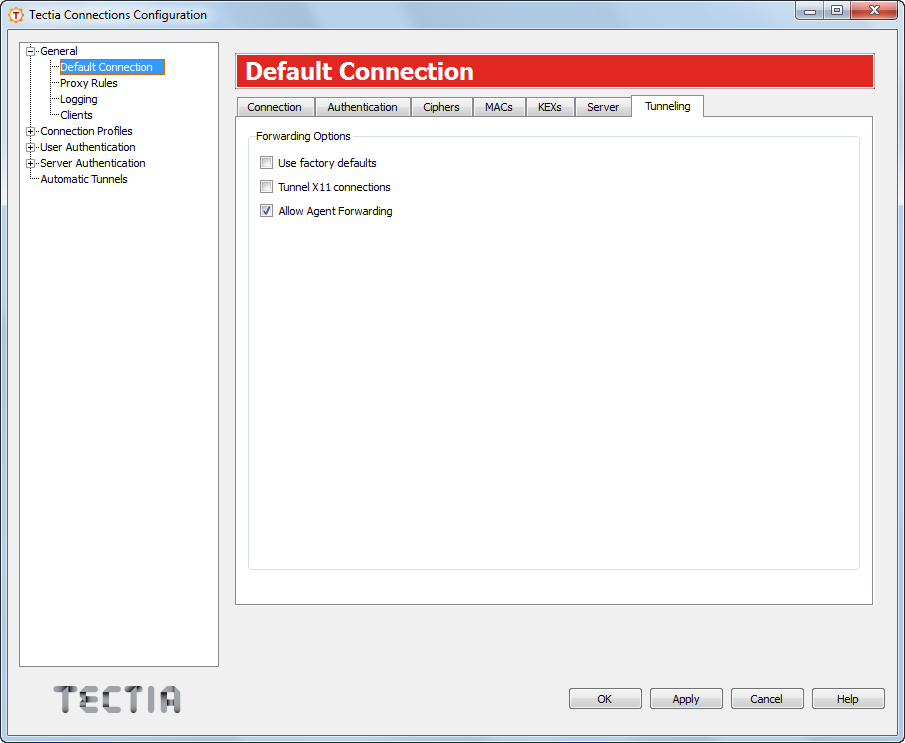
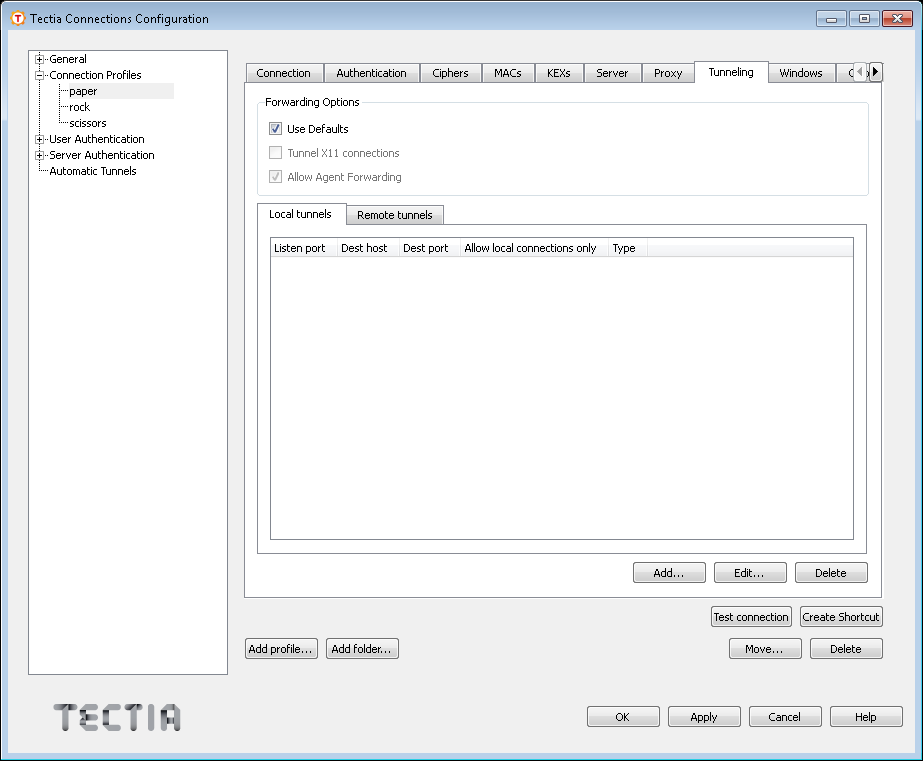
On the Tunneling tab, you can define the default settings for X11 connections and agent forwarding (tunneling). The defaults are applied to new connection profiles and to those connection profiles that do not have their own tunneling settings defined.
Select the Use factory defaults check box to apply the factory defaults for X11 and agent forwarding. According to the factory defaults, X11 forwarding is disabled (off) and agent forwarding is enabled (on).
To allow X11 forwarding on the client side, select the Tunnel X11 connections check box.
To disable agent forwarding on the client side, unselect the Allow Agent Forwarding check box.
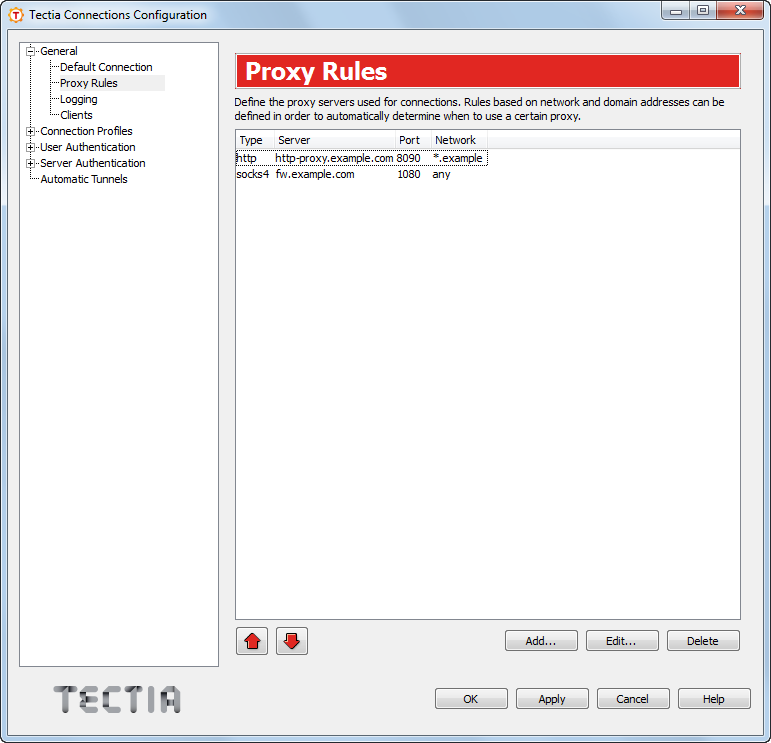
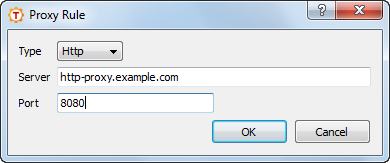
On the Proxy Rules page, you can define proxy rules to be used for connections.
To add a new proxy rule:
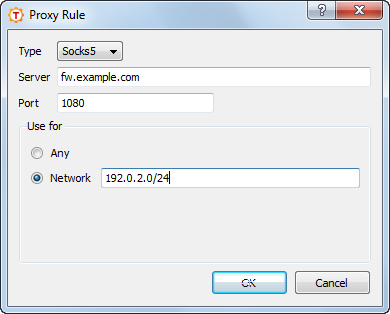
Click Add. The Proxy Rule dialog box opens.
Select the Type of the rule. The type can be Direct (no proxy), Socks4, Socks5, or Http.
For other types than direct, enter the proxy Server address and Port.
Select also whether the proxy rules applies to Any connection or
only to connections to the specified Network. In the
Network field, you can enter one or more conditions delimited by
commas (,). The conditions can specify IP addresses or DNS names.
The IP address/port conditions have an address pattern and an optional port range
(ip_pattern[:port_range]).
The ip_pattern may have one of the following forms:
a single IP address x.x.x.x
an IP address range of the form x.x.x.x-y.y.y.y
an IP sub-network mask of the form x.x.x.x/y
The DNS name conditions consist of a hostname which may be a regular expression
containing the characters "*" and "?" and a port range
(name_pattern[:port_range]).
Click OK.
To edit a proxy rule, select a rule from the list and click Edit.
To delete a proxy rule, select a rule from the list and click Delete.
The rules are read from top down. Use the arrow button to change the order of the rules.
To use these general proxy rules with a connection profile, you must select to do so in the profile settings. See Defining Proxy Settings.
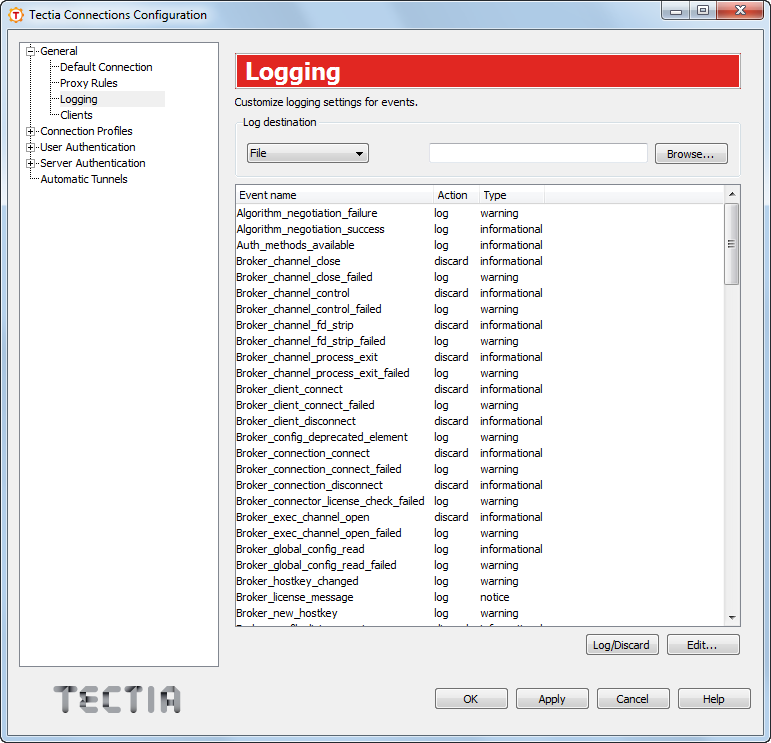
On the Logging page, you can enable logging and customize the information that will be logged in the event log. By default logging is disabled.
To enable logging of Tectia Client internal events, select how the logs will be saved. In the Log Destination field:
Select File to have the log data saved in to a file named in the field on the right. Enter the exact file name or browse to an existing file.
Select Event Log to have the Tectia Client data stored in the Event Log of the host.
Each program-internal event has an associated Action and Type. They have reasonable default values, which are used if no explicit logging settings are made.
The action can be either log or discard.
The event type can be one of the following:
Informational
Warning
Error
Security success
Security failure
For a description of the log events, see Appendix D.
To change whether the event is logged or not, select an event from the list and click Log/Discard. You can select multiple events by holding down the SHIFT or CTRL key while clicking.
To customize the event action and type, select an event from the list and click
Edit. You can select multiple events by holding down the SHIFT or CTRL
key while clicking. The Edit Audit dialog box opens. Select the
Action (log or discard) and the
Type (informational, warning, error, security-success or
security-failure) for the event and click OK.
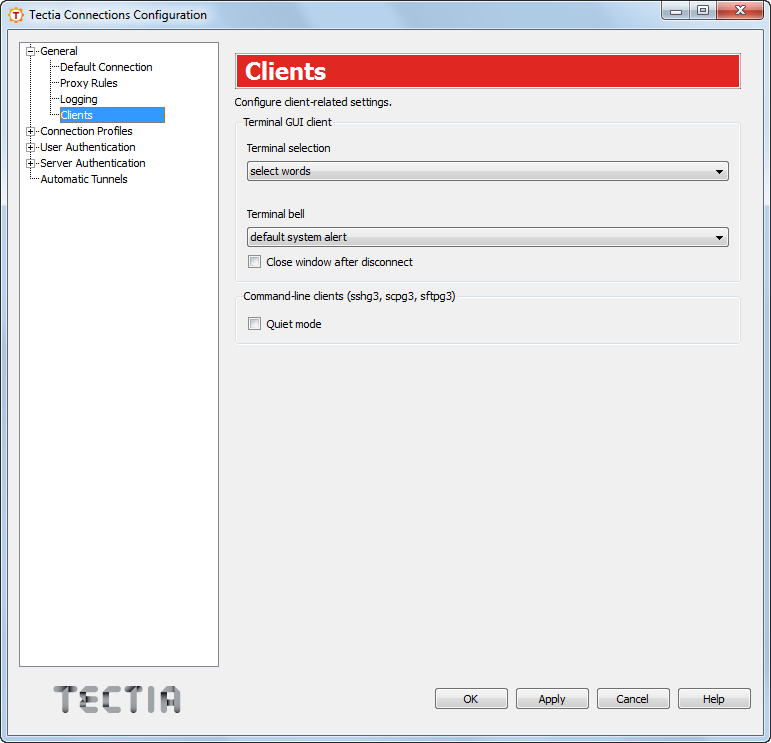
On the Clients settings page, you can define settings related to clients.
Select the Close window after disconnect option to define that
also the PrivX Desktop GUI window is to be closed while disconnecting from a server session by
pressing CTRL+D. By default the terminal remains open, and only the
server connection is closed.
The Quiet mode setting defines whether the command line clients should suppress warnings, error messages and authentication success messages. The setting affects the command line tools scpg3, sshg3 and sftpg3.
Under Connection Profiles you can configure separate connection settings for each Secure Shell server you connect to. You can also configure several profiles for the same server, for example, with different user accounts.
Click Test Connection to open a connection to the remote server. You need to connect to the server once in order to get the server's host key. Tectia Client will prompt you to verify the received key. Check that it is valid, preferably by calling the server's administrator, and save the validated key. After this, the locally saved information on the key will be used in the authentication process automatically.
To add a connection profile, click Add profile in the Connection Profiles page. Enter a name for the profile and click OK. By default, the profile name is also used as the hostname of the server.
Newly created connection profiles will inherit the default values for authentication, ciphers, MACs, KEXs, and advanced server settings defined under the General → Defaults page (Defining Default Connection Settings). The values can be customized on the profile-specific tabbed pages.
Define the profile settings in the tabbed view as described in Defining Connection Settings, Defining Authentication, Defining Ciphers, Defining MACs, Defining KEXs, Defining Server Connections, Defining Proxy Settings, Defining Tunneling,
You can organize the connection profiles in folders for each server you are connecting to. To add a folder for connection profiles, click Add folder in the Connection Profiles page. Enter a name for the folder and click OK. Add connection profiles to the folder by selecting the folder and clicking Add profile. The profile is created into the folder.
To move a profile to a different profile folder, select the profile from the list and click Move. Select the folder where you want to move the profile from the drop-down list and click OK.
To rename a connection profile or a profile folder, right-click on a profile or a folder name under Connection Profiles and click Rename. Type a new name, press Enter, and click OK or Apply.
To remove a connection profile or a profile folder, select a profile or a folder and click Delete. You will be asked for confirmation. Click OK to proceed with the deletion.
Note that removing a profile folder removes also all profiles in it.
To add a shortcut to the created profile on your desktop on Windows, click Create Shortcut. When you double-click the icon, it will directly open a connection to the host defined in the profile.
To add the created profile to your Windows taskbar, right-click the newly created desktop shortcut icon and then click Pin to Taskbar on the shortcut menu. When you click the pinned PrivX Desktop GUI taskbar button, a new PrivX Desktop GUI window will appear, opening a Secure Shell connection with the settings defined in the profile (hostname, port, user name etc.).
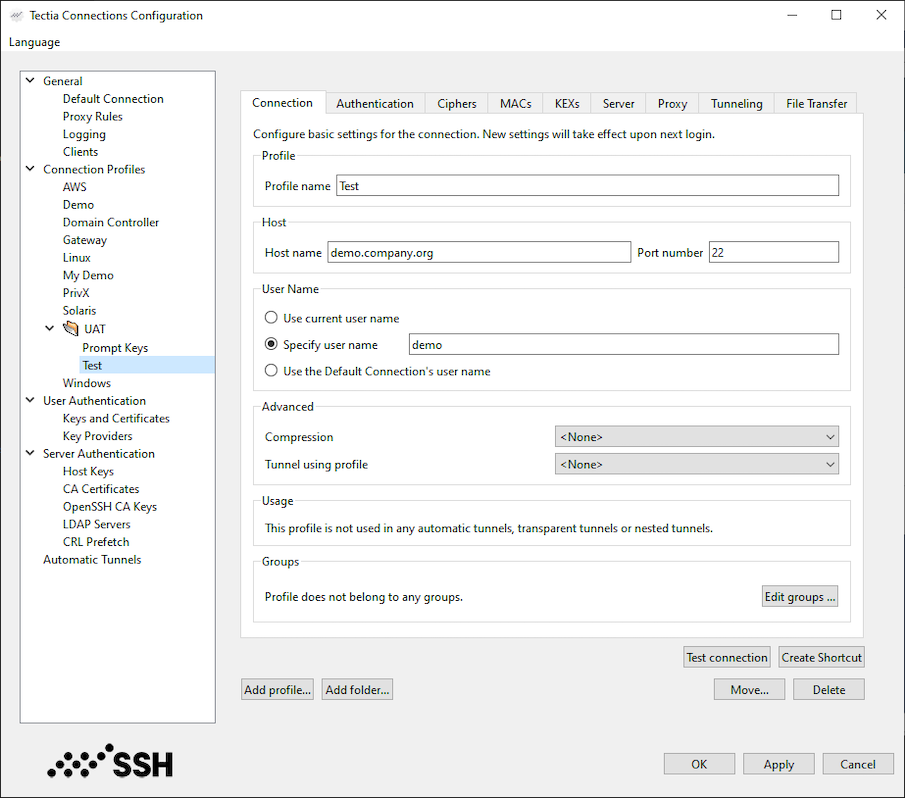
On the Connection tab, you can define the protocol settings used in the connection. Any changed connection settings will take effect the next time you log in.
Specify the host name or the IP address of the remote host computer to which you want to connect with the profile.
Define the listen port on the Secure Shell server. The default SSH port number is 22. In case you know that the remote server uses another port, enter the number in the Port Number field.
| Note |
|---|---|
A Secure Shell server program must be listening to the specified port on the remote host computer or the connection attempt will not succeed. If you are unsure which port the remote host computer is listening to, contact the system administrator of the remote host. |
Select Use current Windows user name if the connection should
always be made using the currently logged in Windows user name. This is similar to
defining %USERNAME% (note the percent signs) as the user name.
%USERNAME% reads the actual user name from an environment
variable.
Select Specify user name and enter the user name, if you want to define the user name this profile will use when connecting to the remote host computer.
Select Prompt user for the user name if the user should enter the user name manually every time when connecting.
Select Use the Default Connection's user name if you want to apply the generic user name defined in the General - Default Connection settings.
In Compression, select the desired compression setting from the drop-down menu. Valid choices are zlib and none. Compression is disabled by default.
In Tunnel using profile, use the drop-down list to select a profile for creating a nested tunnel. The first tunnel will be created to the server defined in the current connection profile, and from there, the second tunnel will be created to a host defined in the profile selected with the Tunnel using profile setting. By default, tunneling is disabled.
This field shows information on where the defined profile is used.
On the Authentication tab, you can define the user authentication methods for the profile.
Select the Use Defaults check box to use the authentication methods defined on the Default Connection page (Defining Authentication), or clear the check box to define a custom list of authentication methods.
To add a new authentication method to the list, click Add and select the method from the drop-down menu.
To remove an authentication method, select a method from the list and click Delete.
Use the arrow buttons to organize the preferred order of the authentication methods. The first method that is allowed by the Secure Shell server is used. Note that in some cases, the server may require several authentication methods to be passed before allowing login.
Possible methods for user authentication are:
Public-key: Use public-key authentication. See also Defining User Authentication.
Password: Use a password for authentication.
Keyboard-interactive: Keyboard-interactive is designed to allow the Secure Shell client to support several different types of authentication methods, including RSA SecurID, and PAM. For more information on keyboard-interactive, see User Authentication with Keyboard-Interactive.
GSSAPI: GSSAPI (Generic Security Service Application Programming Interface) is a common security service interface that allows different security mechanisms to be used via one interface. For more information on GSSAPI, see User Authentication with GSSAPI.
If you want to use the profile in non-interactive connections, you can select to store a password with the profile in the Password Authentication field.
Select Password to enter the actual password string.
Select Password file to enter a path to a file containing the password.
Select Password program to enter a path to a program or a script that outputs the password.
![[Caution]](images/caution.gif) | Caution |
|---|---|
If the password is given using this option, it is extremely important that the
|
| Note |
|---|---|
Any password given with the command-line options will override this setting. |
In the GSSAPI Authentication field, by selecting the Allow Ticket Forwarding check box you can enable Tectia Client to allow forwarding the Kerberos ticket over several connections.
When using Public-Key Authentication, you can also define which key types are used and how the keys are selected.
Key selection defines the policy Connection Broker uses when proposing user public keys to the server. Select the mode from the drop-down list. The options are:
Try available public keys automatically (the default). With this policy, the client will try the keys in the following order:
Keys with public key available and private key without a passphrase (no user interaction)
Keys with public key available but private key behind a passphrase (require a passphrase query, provided the key is accepted by the server)
The rest of the keys, meaning keys that require a passphrase for the public key as well as the private key.
Prompt user to select the public key - with this policy, the Connection Broker prompts the user to select the key from a list of available keys. If authentication with the selected key fails, the client will prompt the user again to select another key.
Key types defines whether only plain public keys or only certificates are tried during public-key authentication. Select the key type from the drop-down list. The default is to try both plain public keys and certificates.
By selecting Issuer must match server certificate issuer, you can make the Connection Broker filter the user certificates that will be included in the list presented to the user. The client-side user certificates can be filtered according to their issuer name that is compared to the certificate issuers requested or accepted by the server. By default, the filtering is not done. This option is useful when a user has several certificates with different access rights to the same server, for example for a testing role and for an administrator role. The Connection Broker chooses the relevant certificates that are applicable on the remote host, and the user can choose the correct certificate from the short-listed ones.
To generate a public-key pair and to upload it to the remote server, click the Public-Key Authentication Wizard button. For instructions, see Using the Public-Key Authentication Wizard.
Enabled algorithms lists the public-key signature algorithms that are used for authenticating and signing the user's public key. The algorithms that will be used are those that are configured for both Tectia Server and the Connection Broker. You can use the up and down arrow buttons to modify the order of the algorithms. To move an algorithm to the Disabled algorithms list, select it and click the right arrow button.
Click OK to save the connection profile.
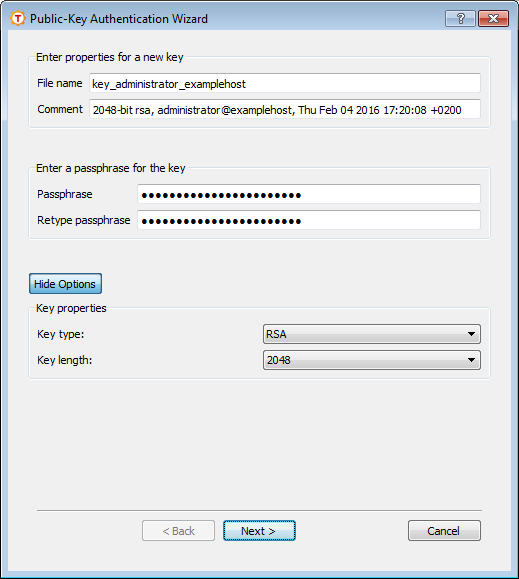
On Windows, you can use the Tectia Public-Key Authentication Wizard to generate and to upload public-key pairs. The wizard will generate two key files, your private key and your public key.
The new private and public key will be stored on your local computer in the
%APPDATA%\SSH\UserKeys directory. The private key file has no file extension,
and the public key has the same base file name as the private key, but with
.pub as the file extension.
Select the Keys and Certificates page under User authentication and click New Key to start the Public-Key Authentication Wizard.
Define the key properties and the required passphrase to protect your key pair; you will be requested to enter the passphrase always when using the keys to authenticate yourself.
Type a unique name for the key file. Tectia Client suggest a name consisting of the user name and the host name.
In this field you can write a short comment that describes the key pair. You can for example describe the connection the keys are used for. This field is not obligatory, but helps to identify the key later.
Type a phrase that you have to enter when handling the key. This passphrase works in a similar way to a password and gives some protection for your private key.
| Note |
|---|---|
In FIPS mode, due to a FIPS regulation which forbids exporting unencrypted private keys out of the FIPS module, it is not possible to generate user keys without a passphrase. |
Make the passphrase difficult to guess. Use ideally at least 20 characters, both letters and numbers. Any punctuation characters can be used as well. While the passphrase or private key are never sent over the network, a dictionary attack can be used against a private key if it is accessible locally. For ease of use, an authentication agent is recommended instead of leaving the passphrase empty. By default ssh-broker-g3 functions as an authentication agent.
Memorize the passphrase carefully, and do not write it down.
For connections where no user interaction is available, you can consider leaving the passprase empty.
Type the passphrase again. This ensures that you have not made a typing error.
Click the Advanced Options, to define the type of the key to be generated and the key length to be different from the defaults. By default, Tectia Client generates a pair of 3072-bit RSA keys.
In the Key Properties fields, you can make the following selections:
Select the type of the key to be generated. Available options are Ed25519, RSA, ECDSA and DSA.
| Note |
|---|---|
In FIPS mode (conforming to FIPS 186-5) RSA, ECDSA and Ed25519 are supported. DSA has been deprecated. |
Select the length (complexity) of the key to be generated. Available options are:
DSA/RSA keys: 2048, 3072, 4096, 5120, 6144, 7168, 8192 bits
ECDSA keys: 256, 384, 521 bits
Ed25519 keys: 256 bits
Larger keys of the same key type are more secure, but also slower to generate. A 256-bit ECDSA key and a 3072-bit RSA key provide equivalent security.
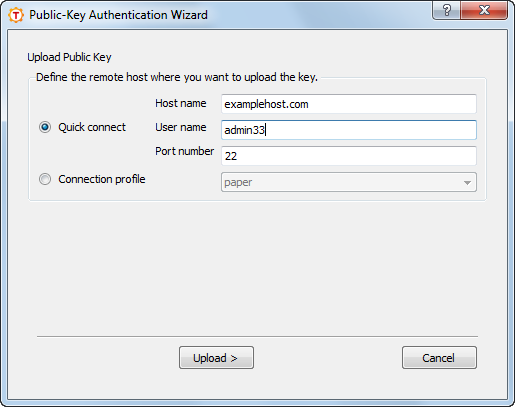
As soon as a new key has been generated, the Wizard proceeds to uploading the key to a remote server. In case you want to upload an existing key to a remote server, select the key file in the Keys and Certificates view, and click Upload. The following dialog appears in both cases:
In the Upload Public Key view of the wizard, define the remote host where to upload the key:
Select this option to define the remote Host name and your user name there. The default Secure Shell port is 22.
Select a Connection profile from the drop-down list that specifies the desired remote host and user name.
Click Upload to upload the key to the selected server. If you are already connected to the remote server host, the key upload starts immediately. If you are not connected, you will be prompted to authenticate on the server (by default with password).
The public key will be uploaded to the default user home directory
(%USERPROFILE%\.ssh2 on Windows, $HOME/.ssh2 on Unix).
On the Ciphers tab, you can define the encryption algorithms used for the profile.
Select the Use Defaults check box to use the algorithms defined on the Default Connection page (Defining Ciphers), or define a cipher list using the arrow buttons. The ciphers are tried in the order they are specified.
Tectia proprietary algorithms are marked with (Tectia) and are operable
with Tectia products only. They correspond to the algorithms that end with
@ssh.com in the Connection Broker configuration file.
On the MACs tab, you can configure the message integrity algorithms used for the profile.
Select the Use Defaults check box to use the algorithms defined on the Default Connection page (Defining MACs), or define a MAC list using the arrow buttons. The MACs are tried in the order they are specified.
Tectia proprietary algorithms are marked with (Tectia) and are operable
with Tectia products only. They correspond to the algorithms that end with
@ssh.com in the Connection Broker configuration file.
On the KEXs tab, you can configure the key exchange methods used for the profile.
Select the Use Defaults check box to use the methods defined on the Default Connection page (Defining KEXs), or define a KEX list using the arrow buttons. The KEXs are tried in the order they are specified.
Tectia proprietary algorithms are marked with (Tectia) and are operable
with Tectia products only. They correspond to the algorithms that end with
@ssh.com in the Connection Broker configuration file.
On the Server tab, you can define advanced server connection settings for the profile.
Select the check box to use the values defined on the Default Connection page (Defining Server Connections) for the server connection settings.
Specify how long idle time (after all connection channels are closed) is allowed for a connection before automatically closing the connection. The default is 5 seconds. Setting a longer time allows the connection to the server to remain open even after a session (for example, PrivX Desktop GUI) is closed. During this time, a new session to the server can be initiated without re-authentication. Setting the time to 0 (zero) terminates the connection immediately when the last channel to the server is closed.
Specify for how long a TCP connection will be attempted to a Secure Shell server. Define the timeout in seconds. After the defined time the TCP connection will be released in case the remote server is down or unreachable. Setting the value as 0 (zero) means that the default system TCP timeout will be used.
Specify an interval (in seconds) for sending keepalive messages to a Secure Shell server. The default is 0, meaning that no keepalive messages are sent.
Select this check box if you want that the profile always opens a new connection, instead of reusing a currently open connection.
Select the check box if you want to have the server banner message file (if it exists) visible to users before login.
This list shows the host key signature algorithms used for server authentication with host keys or certificates. The algorithms that will be used are those that are defined in both Tectia Server and Connection Broker configuration files. This way the use of only certain algorithms, such as SHA-2, can be enforced by the server.
The host key algorithms are tried in the order they are specified, with one exception: If a host key of a server already exists in the host key store of the client, its algorithm is preferred. You can use the up and down arrow buttons to modify the order of the algorithms.
The host key algorithms listed here are not used for server authentication. To disable a host key algorithm, select it in the Enabled Hostkey Algorithms list and click the right arrow button.
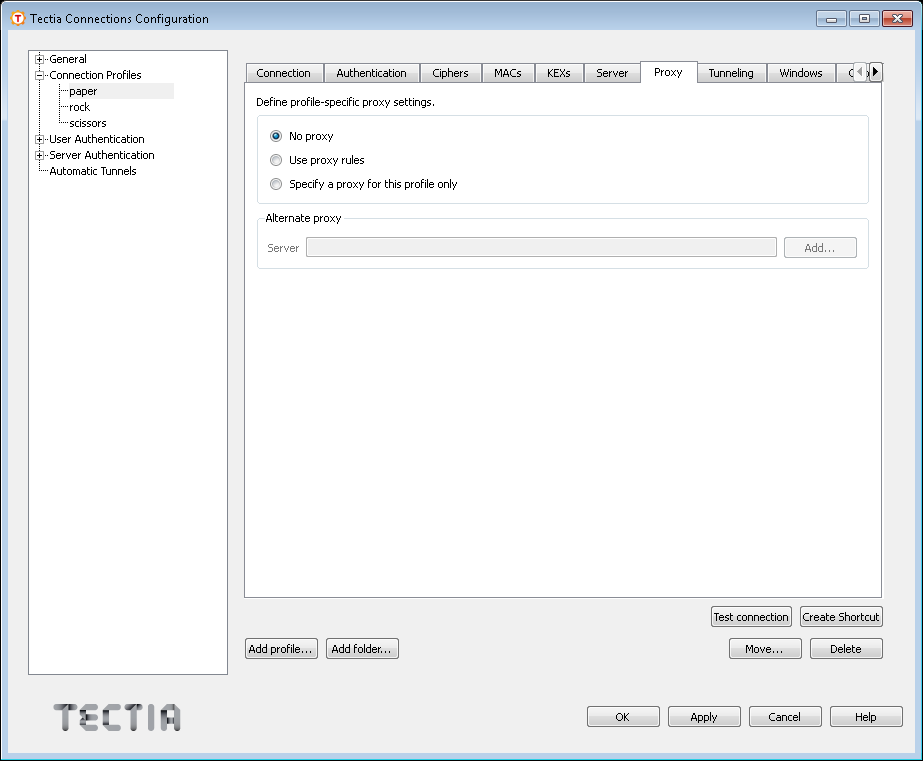
On the Proxy tab, you can select proxy settings for the profile.
Select this option if you do not want to use a proxy.
Select this option to use the proxy rules defined in the General settings Proxy Rules page (Defining Proxy Rules).
Click Add to add a new proxy definition for this profile.
Select the Type of the rule. The type can be Direct, Socks4, Socks5, or Http.
For other types than direct, enter the address of the proxy Server and Port.
Tunneling, or port forwarding, is a way of forwarding otherwise unsecured TCP traffic through an encrypted Secure Shell connection (tunnel). You can secure for example POP3, SMTP, and HTTP connections that would otherwise be unsecured.
The tunneling settings for the connection profile are configured using the Tunneling tab. Any changed tunneling settings will take effect the next time you log in.
| Note |
|---|---|
The client-server applications using the tunnel will carry out their own authentication procedures (if any) the same way they would without the encrypted tunnel. |
It is possible to define separately for each connection profile whether X11 and/or agent forwarding are enabled, or whether the general default forwarding settings are applied to the profile.
Select this option to make the profile follow the default settings for X11 and agent forwarding defined on the Defaults - Tunneling tab (Defining Default Tunneling Settings).
To allow X11 forwarding for this connection profile, select this check box.
Tectia Client can securely tunnel (forward) X11 graphic connections from the remote host computer to an X Windows server running on the local computer.
| Note |
|---|---|
A prerequisite for X11 tunneling is that you have an X emulator (such as eXceed or Reflection X) running in passive mode on the Windows computer. |
To tunnel (forward) X11 traffic, do the following actions:
Install an X server (X emulation) program on Windows (eXceed, Reflection X, or the like).
Start Tectia Client.
Select the Tunneling tab of the Connection Profiles page and make sure that the Tunnel X11 connections check box is selected.
Save your settings for Tectia Client.
Restart Tectia Client and log into the remote host.
Start the X server (X emulation) program.
To test the tunneling, run xterm or xclock from Tectia Client.
For more information, see X11 Forwarding.
To allow agent forwarding on the client side for this connection profile, select this check box.
In agent forwarding, Secure Shell connections and public-key authentication data are forwarded from one server to another without the user having to authenticate separately for each server.
For more information, see Agent Forwarding.
There are two types of tunnels that can be defined for application tunneling, local (outgoing) tunnels and remote (incoming) tunnels.
Local tunnels protect TCP connections that your local computer forwards from a specified local port to a specified port on the remote host computer you are connected to. It is also possible to forward the connection beyond the remote host computer, but the connection is encrypted only between Tectia Client and Tectia Server.
Remote tunnels protect TCP connections that a remote host forwards from a specified remote port to a specified port on your local computer.
To edit local tunnel definitions, click the Local tunnels tab.
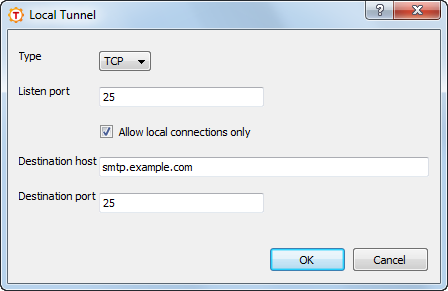
To add a new local tunnel, click Add. The Local Tunnel dialog box opens.
The following fields are used to define a local tunnel:
Type: Select the type of the tunnel from the drop-down list. Valid choices are TCP and FTP. If you are tunneling an FTP connection, set the tunnel type as FTP. For other protocols, set the tunnel type as TCP.
| Note |
|---|---|
If the Secure Shell server and the FTP server are located on different computers, FTP tunneling works only if FTP is set to run in passive mode. If the Secure Shell server and the FTP server are located on the same computer, tunneling works regardless of whether FTP is running in passive or active mode. For more information on FTP tunneling, see Non-Transparent FTP Tunneling. |
Listen port: This is the number of the local port which the tunnel listens to or captures.
| Note |
|---|---|
The protocol or application that you wish to create the tunnel for may have a fixed port number (for example 143 for IMAP) that it needs to use to connect successfully. Other protocols or applications may require an offset (for example 5900 for VNC) that you will have to take into an account. |
Allow local connections only: Select this option if you want to allow only local connections to be made. This means that other computers will not be able to use the tunnel created by you. By default, only local connections are allowed. This is the right choice for most situations.
Consider the security implications carefully if you decide to also allow outside connections.
Destination host: This field defines the destination host for
the tunneling. The default value is localhost.
| Note |
|---|---|
The destination host is resolved by the Secure Shell server, so here
|
Destination port: The destination port defines the port that is used for the forwarded connection on the destination host.
To edit a tunnel definition, select a tunnel from the list and click Edit. The Local Tunnel dialog opens.
To delete a tunnel definition, select a tunnel from the list and click Delete to remove a tunnel. Note that the selected tunnel will be removed immediately, with no confirmation dialog.
For more information on local tunnels, see Local Tunnels.
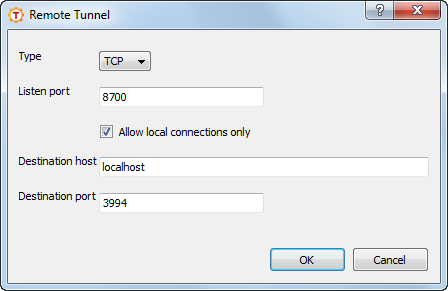
Remote (incoming) tunnels protect TCP connections that the remote host forwards from a specified remote port to the specified port on your local computer.
Click the Remote tunnels tab to edit incoming tunnel definitions. Click Add to open the Remote Tunnel dialog box.
The following fields are used to define a remote tunnel:
Type: Select the type of the tunnel from the drop-down list. Valid choices are TCP and FTP. For more information on FTP tunneling, see Non-Transparent FTP Tunneling.
Listen port: Enter the port that the tunnel listens to or captures from the remote host computer.
| Note |
|---|---|
Privileged ports (below 1024) can be forwarded only when logging in with root privileges on the remote host computer. |
Destination host: Define the destination host for the port forwarding. The default value is localhost.
| Note |
|---|---|
Here localhost refers to your local computer. Also note that if the connection from the remote host computer is forwarded beyond your local computer, that connection is unsecured. |
Destination port: Define the port that is used for the forwarded connection on the destination host.
To edit a tunnel definition, select a tunnel from the list and click Edit. The Remote Tunnel dialog opens.
To delete a tunnel definition, select a tunnel from the list and click Delete to remove a tunnel. Note that the selected tunnel will be removed immediately, with no confirmation dialog.
For more information on remote tunnels, see Remote Tunnels.
Under User Authentication, you can configure settings related to public-key and certificate authentication. See Managing Keys and Certificates and Managing Key Providers.
To enable or disable public-key authentication, see Defining Default Connection Settings and Defining Authentication.
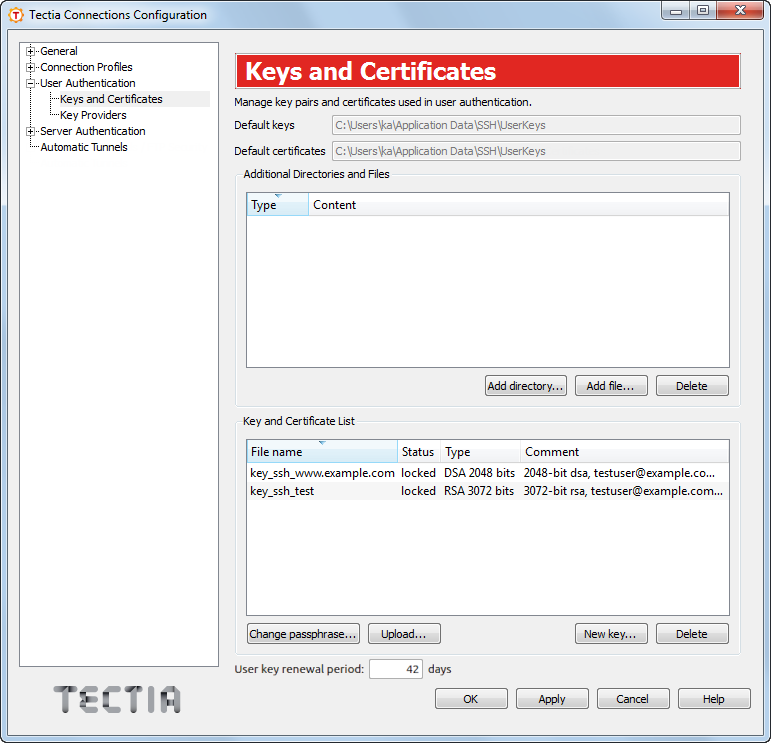
On the Keys and Certificates page, you can add key and certificate files used in user authentication and directories for them, generate a new key, upload a key to a server, or change the passphrase for a key.
The default location of user keys.
The default location of user certificates.
Additional key directories and files explicitly added to the Tectia Client configuration.
Click the Add directory button to add a directory of keys or certificates.
Click the Add file button to add a key or certificate file.
Select a directory or a file and click the Delete button to remove it. The reference to the directory, the key or certificate file is removed from the configuration. The keys themselves are not removed from the disk.
All public keys and certificates known to Tectia Client are listed in this field. That is, those keys and certificates stored in locations in Default keys, Default certificates and Additional Directories and Files fields. Also the keys and certificates from external key providers are shown here (see Managing Key Providers.
The value shown in the Status field can be:
locked - The file is passphrase protected and the passphrase is not known to the Connection Broker. Uploading the file to a remote host unlocks it.
open - The passphrase is known to the Connection Broker.
If the field is empty, the file is not passphrase protected.
You can modify the key details by selecting a key file in the list and clicking a button at the bottom.
Click Change passphrase to change the passphrase of a selected key. Note that the command may not be supported for all key types.
Click Upload to upload the key to a remote server. You can only upload plain public keys. See also Uploading Public Keys Automatically.
Click New key to start the key generation wizard. The new key will be added to the Default keys directory and it will become visible in the Key and Certificate List field. For a description of the wizard, see Using the Public-Key Authentication Wizard.
| Note |
|---|---|
The user-specific |
Set how many days it takes for automatic key rotation to happen. This affects the user keys in both the default key location, as well as the locations defined as additional directories above. Seperate key files do not support key rotation. If rotation period is set to 0, the automatic key rotation is disabled.
When connecting to a host, the client will attempt to replace any keys older than the key rotation period with newly generated keys. This will not work if the server does not allow users to upload keys.
Warning: If the same private key has been copied to multiple clients, replacing the public key from one of them will break the others.
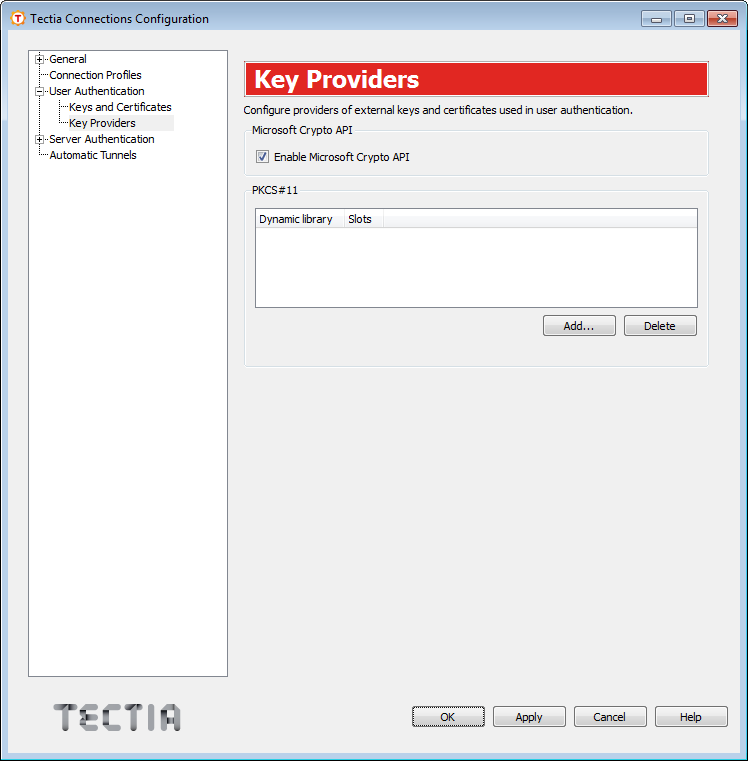
On the Key Providers page you can define the settings of external key providers used in user authentication. Available key providers are Microsoft Crypto API and PKCS #11.
Tectia Client can access keys via Microsoft Crypto API (MSCAPI). MSCAPI is a standard cryptographic interface used in Microsoft Windows systems.
Microsoft Crypto API (MSCAPI) providers can be enabled by selecting the Enable Microsoft Crypto API check box. If you enable the MSCAPI providers, you can use software keys and certificates created by Microsoft applications.
By using the PKCS #11 provider, Tectia Client can use keys and certificates stored in PKCS #11 tokens (for example, smart cards or USB tokens).
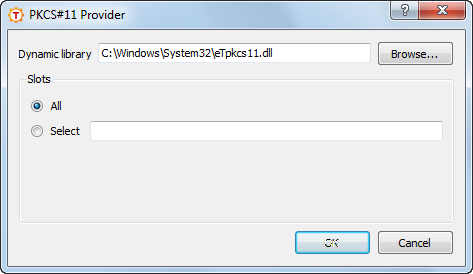
Click Add to define a PKCS #11 provider.
Use the Dynamic library to define a dynamic library containing
the PKCS #11 driver. For example on macOS OpenSC library:
/Applications/PrivX Desktop.app/Contents/PlugIns/OpenSC/opensc-pkcs11.so
Use the Slots to define slots. A slot is a logical reader that
potentially contains a token. Slots are manufacturer- specific. They are defined with
an integer. Examples: "0,1", "0-3, !2",
"2".
Under Server Authentication, you can define how Tectia Client authenticates remote server hosts.
To use public keys in server authentication, define the settings as described in Managing Host Keys.
To apply certificates, define the settings as described in Managing CA Certificates.
Settings required for LDAP usage are described in Managing LDAP Server Settings.
To define regular intervals for fetching certificate revocation lists (CRLs), see Managing CRL Prefetch Settings.
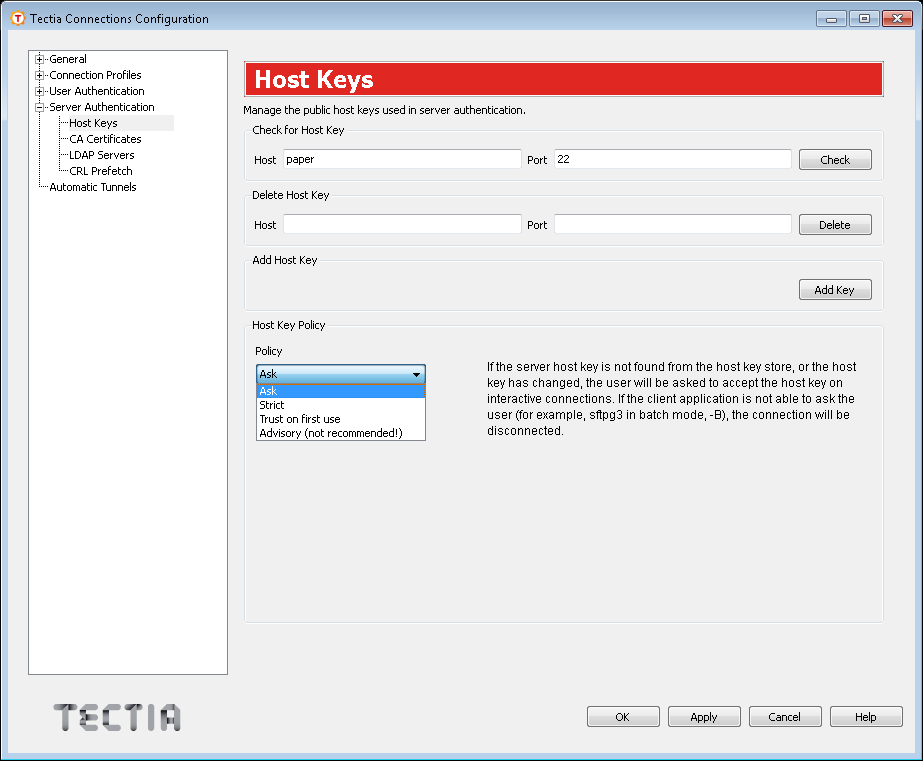
On the Host Keys page, you can add new public host keys, define the
host key acceptance policy, and view and manage known host keys used in server
authentication. Known host keys mean keys already stored to the user-specific
%APPDATA%\SSH\Hostkeys directory.
| Note |
|---|---|
The host key policy settings have changed in version 6.1.4. Tectia Connections Configuration GUI updates the user-specific configuration automatically to use the new policy based on the old Strict host key checking, Accept unknown host keys, and Always show host key prompt settings. The interpretation of the old policy to the new policy is shown in Table A.2. |
The Host Keys view includes the following options:
You can check if a public host key of a remote server exists on your client, and view its fingerprint. To check the host key, enter the name of the server in the Host field and the listener port number in the Port field, and click Check.
Note that wildcard characters are not allowed, specify the exact host name and port.
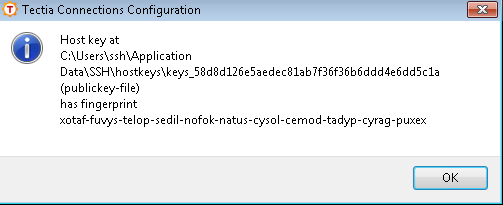
When a public host key for the specified server is found on the client, a dialog-box shows where the host key is stored and what is the fingerprint of the public key. The fingerprint is shown in the SSH Babble format, consisting of a series of pronounceable five-letter words in lower case and separated by dashes. See an example below.
For more information on server public host keys, see Server Authentication with Public Keys.
In case you want to delete a known public host key from the client side, enter the name of the relevant server in the Host field and the listener port number in the Port field, and click Delete.
A dialog box appears asking you to confirm or to cancel the deleting of the host key.
Click the Add Key button to add a new host key to your known host keys directory. The Connection Broker opens a file manager view where you can browse to the key location and select the host key you want to copy.
Select the policy you want to apply to the checking of server host keys and to the handling of unknown server host keys.
| Note |
|---|---|
This setting strongly affects the security of the client side host. |
The options are:
Ask - the default - the user will be
asked to verify and accept the server public host keys, if the keys are not found
in the host key store or if the keys have changed. The user can decide whether the
key is to be stored to %APPDATA%\SSH\Hostkeys, or used once
without storing it, or cancelled. Connection is allowed only to a server whose
host key is either found in the known host keys directory or accepted by the user
currently.
This policy requires an interactive connection to get a response from the user. If the Ask option is applied on a non-interactive connection, the connection will be closed.
Strict - the connection to the server will be allowed only if the host key is found in the user's known host keys storage. Otherwise, the connection will be closed. This option expects that all acceptable server host keys have already been stored on the client. No new host key's will be stored, and connections to any servers that have changed host keys will be closed.
This option can be used on non-interactive connections, once the host keys have been received by other means. This policy provides maximum protection against man-in-the-middle attacks.
Trust on first use - new host keys are stored without prompting the user to accept them. Connections to servers offering a changed host key will be closed. This policy should be used only when server host keys cannot be added to the key storage by any other means.
Advisory - not recommended - new host keys are stored without prompting the user to accept them, and connections are allowed also to servers offering a changed host key. Changed keys are not stored on the client, and data about opening connections with them are logged, provided that logging is enabled on the Connection Broker.
If you choose this policy, make sure the Connection Broker has logging activated in the General - Logging view, see Defining Logging Settings. Then you have the possibility to detect any connections with changed host keys in the logs.
| Caution |
|---|---|
Consider carefully before you activate the Advisory policy, as it practically disables server authentication and makes the connection vulnerable to active attackers. |
Select the rotation options you want to apply to the server host keys.
The options are:
No - Disables key rotation.
Yes - Enables key rotation.
Append only - Enables key rotation. When this option is selected, the new key file is appended to the keyfile, without the old keys being removed.
Tectia only - the default - Enables key rotation, but only for Tectia servers. This option requires enabling on the server also.
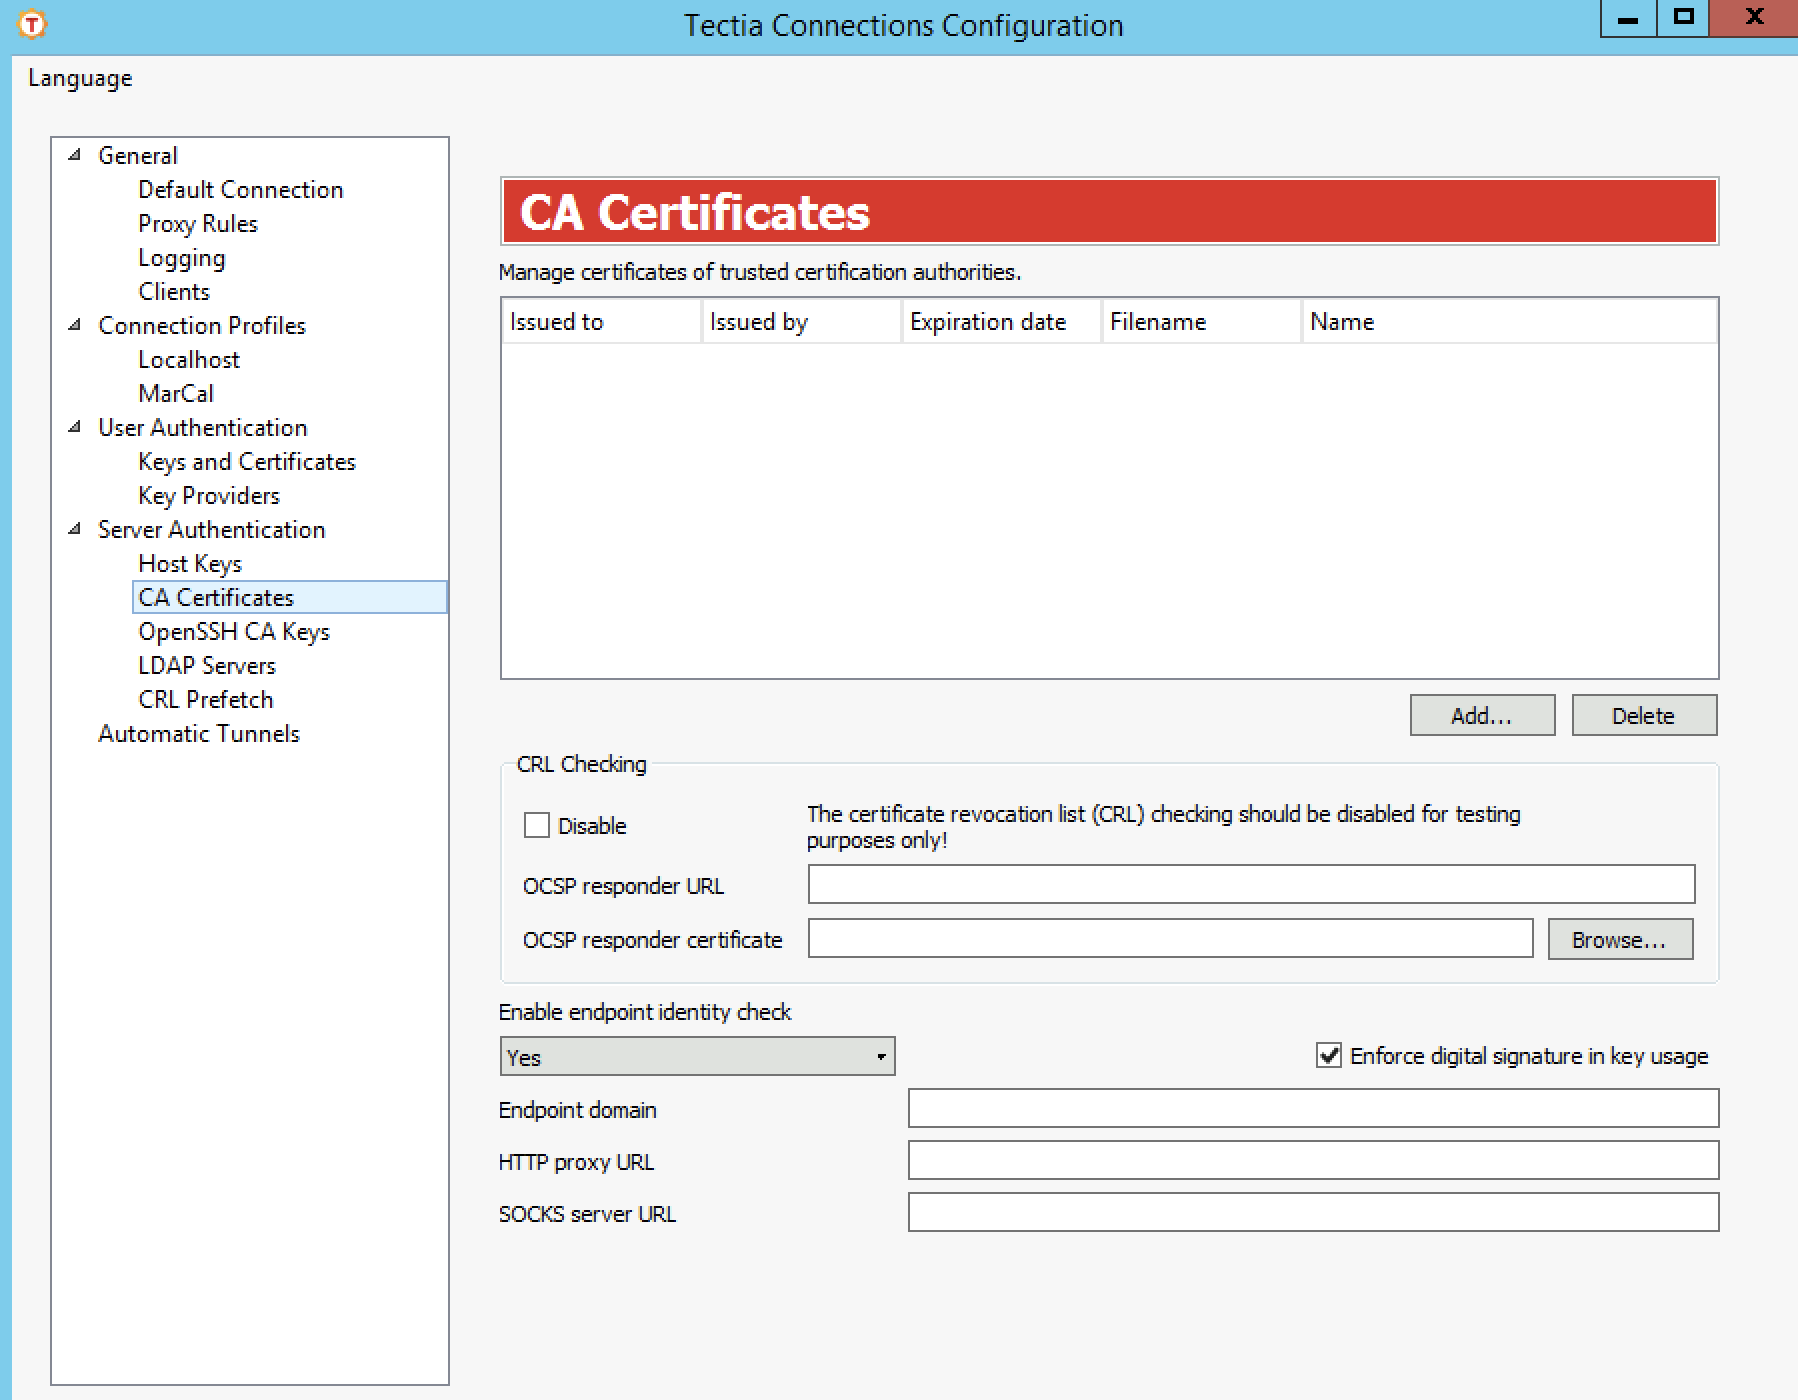
On the Certificates page, you can manage trusted CA certificates.
For more information on server certificate authentication, see Server Authentication with Certificates.
To add a CA certificate, click the Add button and select the certificate you want to add.
You can add X.509 certificate(s) as such. To add certificates from a PKCS #7 package
(.p7b), you must first extract the CA certificates from the package
by specifying the -7 option with ssh-keygen-g3 on the command line:
> ssh-keygen-g3 -7 certfile.p7bYou can then add the extracted CA certificates.
The following fields are displayed on the CA certificate list:
Issued to: The certification authority to whom the certificate has been issued.
Issued by: The entity who has issued the CA certificate.
Expiration date: The date that the CA certificate will expire.
Filename: The file containing the CA certificate.
Select the Disable check box to prevent the use of a certificate revocation list (CRL). A CRL is used to check if any of the used server certificates have been revoked.
| Note |
|---|---|
Disabling CRL checking is a security risk and should be done for testing purposes only. |
The OCSP Responder Service provides client applications a point of control for retrieving real-time information on the validity status of certificates using the Online Certificate Status Protocol (OCSP).
For the OCSP validation to succeed, both the end-entity (=Secure Shell server)
certificate and the OCSP responder certificate must be issued by the same CA. If the
certificate has an Authority Info Access extension with an OCSP Responder
URL, it is only used if there are no configured OCSP responders. It is not used if any
OCSP responders have been configured.
If an OCSP responder is defined in the configuration file or in the certificate, it is tried first; only if it fails, traditional CRL checking is tried, and if that fails, the certificate validation returns a failure.
Specifies whether the client will verify the server's hostname or IP address
against the Subject Name or Subject Alternative
Name (DNS Address) specified in the server host certificate. By default,
Enable endpoint identity check is enabled (option
yes). The other options are no, and ask.
If No is selected, the fields in the server host certificate are not
verified and the certificate is accepted based on the validity period and CRL check
only.
| Caution |
|---|---|
Disabling the endpoint identity check on the client is a security risk. Then anyone with a certificate issued by the same trusted CA that issues the server host certificates can perform a man-in-the-middle attack on the server. |
If ask is selected, the user will be prompted to verify the
certificate information and to either accept or cancel the connection.
One of the compliance requirements of the US Department of Defense Public-Key Infrastructure (DoD PKI) is to have the Digital Signature bit set in the Key Usage of the certificate. To fulfill the compliance requirement by enforcing digital signature in key usage, select this check box.
Specify the default domain used in the end-point identity check. This is the default domain part of the remote system name and it is used if only the base part of the system name is available.
If the default domain is not specified, the end-point identity check will still
work with short host names. For example, when a user tries to connect to a host
"rock" giving only the short host name and the certificate contains
the full DNS address "rock.example.com", the connection will be
opened and Tectia Client will issue a warning about accepting a connection to
"rock".
Specify the HTTP proxy used when making LDAP or OCSP queries for certificate validity.
The format of the address is
"http://username@proxy_server:port/network/netmask,network/netmask...
              "
. The network/netmask part is optional and defines the network(s)
that are connected directly (without the proxy).
Specify the SOCKS server used when making LDAP or OCSP queries for certificate validity.
The format of the address is
"socks://username@socks_server:port/network/netmask,network/netmask...
                "
. The network/netmask part is optional and defines the
network(s) that are connected directly (without the SOCKS server).
On the OpenSSH CA Keys page, you can manage OpenSSH certificates.
To add an OpenSSH certificate, click the Add button.
To delete an OpenSSH certificate, select the certificate from the list, and click Delete.
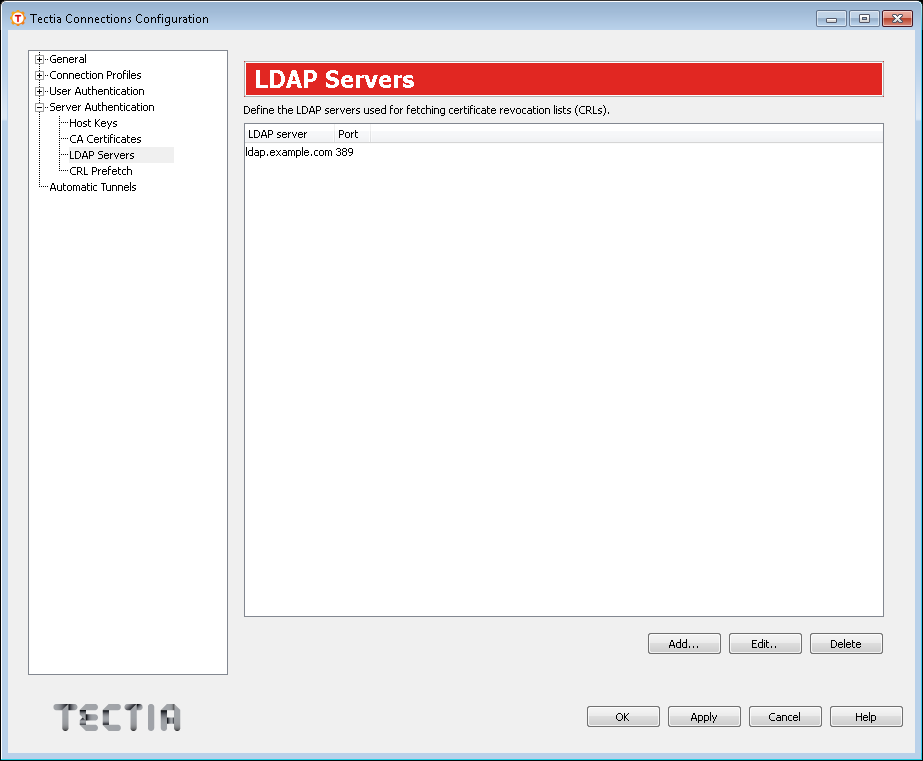
On the LDAP Servers page, you can define LDAP servers used for fetching CRLs and/or subordinate CA certificates based on the issuer name of the certificate being validated.
CRLs are automatically retrieved from the CRL distribution point defined in the certificate to be verified if the point exists.
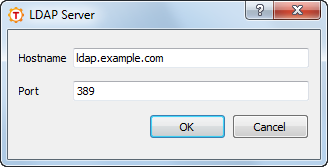
To add an LDAP server, click the Add button. Define the hostname and port for the server.
To edit an LDAP server, select the server from the list and click Edit.
To delete an LDAP server, select the server from the list and click Delete.
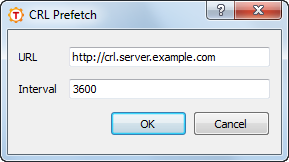
On the CRL Prefetch page, you can define certificate revocation lists (CRLs) to be fetched from the defined location at regular intervals. The CRL distribution point can be either a standard format LDAP or HTTP URL, or it can refer to a file. The file format must be either binary DER or base64, PEM is not supported.
CRLs are automatically retrieved from the CRL distribution point defined in the certificate to be verified if the point exists.
To add a CRL prefetch address, click Add. The CRL Prefetch dialog box opens.
Enter the URL of the CRL distribution point and the
Interval how often the CRL is downloaded and click
OK. The default download interval is 3600
(seconds).
In case the CRL distribution point refers to a file, enter the file URL in this format:
file:///absolute/path/name
To edit an existing CRL prefetch setting, select the setting from the list and click Edit.
To delete an existing CRL prefetch setting, select the setting from the list and click Delete.
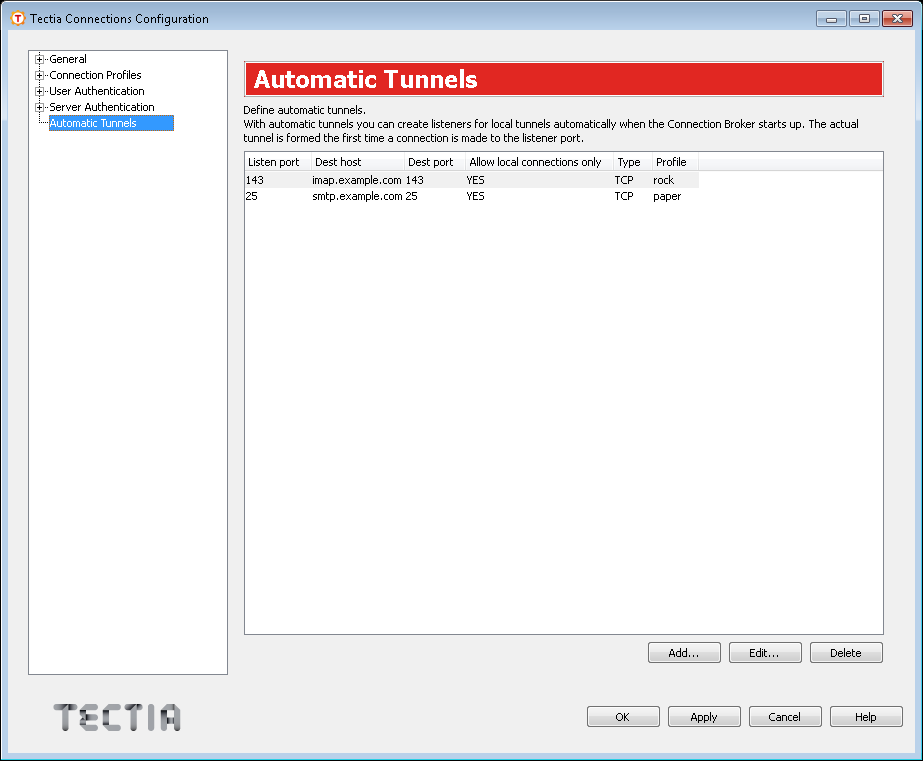
On the Automatic Tunnels page, you can create listeners for local tunnels that are started automatically when the Connection Broker starts up. The actual tunnel is formed the first time a connection is made to the listener port. If the connection to the server is not open at that time, it will be opened automatically as well.
When the Connection Broker starts, the list of the automatic tunnels is read, and the connection initiating applications will be matched to the rules defined here.
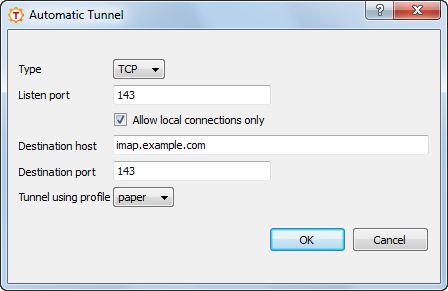
Select Automatic Tunnels in the tree menu and click Add to open the Automatic Tunnel dialog box.
Type: Select the type of the tunnel from the drop-down list. Valid choices are TCP and FTP.
Listen port: This is the number of the local port that the tunnel listens to, or captures. Do not use a reserved port number.
| Note |
|---|---|
The protocol or application that you wish to create the tunnel for may have a fixed port number (for example 143 for IMAP) that it needs to use to connect successfully. Other protocols or applications may require an offset (for example 5900 for VNC) that you will have to take into account. |
Allow local connections only: If you want to allow only local connections to be made, leave this check box selected. This means that other computers will not be able to use the tunnel created by you. By default, only local connections are allowed. This is the right choice for most situations. You should carefully consider the security implications if you decide to also allow outside connections.
Destination host: This field defines the destination host for the port forwarding. The default value is localhost.
| Note |
|---|---|
The value of localhost is resolved by the Secure Shell server, so here
|
Destination port: The destination port defines the port that is used for the forwarded connection on the destination host.
Tunnel using profile: Select the profile to use for the tunnel.
To edit an automatic tunnel, select a tunnel from the list and click Edit.
To delete an automatic tunnel, select a tunnel from the list and click Delete.
For more information on tunneling, see Local Tunnels.
| |