|
     |
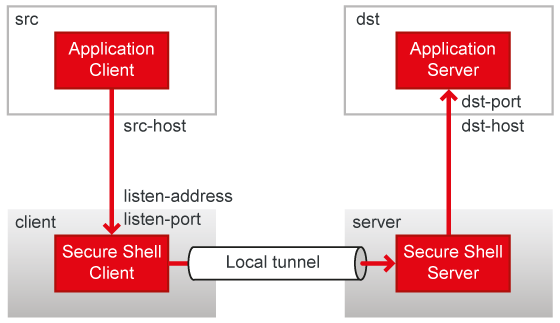
A local (outgoing) tunnel forwards traffic coming to a local port to a specified remote port.
With sshg3 on the command line, the syntax of the local tunneling command is
as follows:
client$ sshg3 -L [protocol/][listen-address:]listen-port:dst-host:dst-port sshserver
where:
[protocol/] specifies which protocol is to be used in the tunneled
connection, it can be ftp or tcp (optional argument). The
default is tcp.
[listen-address:] defines which interface on the local client will be
listened to (optional argument). If it is omitted, only local interface is listened
unless the -g --gateway option is used before
-L to bind to all interfaces on the client-side.
listen-port is the number of the port on the local client, and
connections coming to this port will be tunneled to the server.
dst-host:dst-port define the destination host address and the port to
which the connection is tunneled from the server.
sshserver is the IP address or the host name of the Secure Shell
server.
The host name or IP address of the destination host and sshserver can be defined as regular expressions that follow the egrep syntax, but no wildcards are supported.
![[Note]](images/note.gif) | Note |
|---|---|
If |
Setting up local tunneling allocates a listener port on the local client host. Whenever a connection is made to this listener, the connection is tunneled over Secure Shell to the remote server and another connection is made from the server to a specified destination host and port. The connection from the server onwards will not be secure, it is a normal TCP connection.
| Note |
|---|---|
Every user with access to the local client host will be able to use the local tunnels. |
Figure 6.1 shows the different hosts and ports involved in local tunneling (port forwarding).
For example, when you issue the following sshg3 command on the command line,
all traffic coming to port 1234 on the client host will be forwarded to port 23 on the
server.
client$ sshg3 -L 1234:localhost:23 --abort-on-failing-tunnel username@sshserver
The forwarding address in the command is resolved at the (remote) end point of the tunnel.
In this case localhost refers to the server host (sshserver).
In this example, also the --abort-on-failing-tunnel option is specified.
It causes the command to abort if creating the tunnel listener fails (for example, if the port
is already reserved). Normally if the connection to the server succeeds, but creating the
listener fails, no error message is given.
You can configure Tectia Client on Windows to automatically tunnel outbound TCP connections via secure SSH tunnels.
| Note |
|---|---|
Using this feature requires that you've installed Tectia Client's Transparent TCP Tunneling module. If needed, you can install this by running the Tectia Client installation wizard. |
A Tectia Broker filters outbound TCP connections and creates secure SSH tunnels between the Broker and the SSH Server. You can configure Tectia Broker to tunnel, block, or permit connections. You can configure filtering per application name, remote IPv4/IPv6 address, hostname, and port.
There are two brokers for filtering connections:
Trusted broker: Any filter rules configured in the trusted broker have priority over user-broker rules. By default does not do any filtering of its own, only helps user brokers with hostname filtering. Runs as SYSTEM by default.
User broker: Broker with user-specific filtering rules for outbound TCP and DNS.
If you only want to filter using one type of broker, you may disable either broker type.
Transparent tunneling on Windows also relies on the capture driver. The capture driver captures the outbound TCP connections and DNS queries and asks
first the trusted Broker (if configured) and then the user specific Broker (if configured) what to do with these TCP connections and DNS queries.
Rules for transparent tunneling are configured in the brokers' filter-engine element.
For more information about the element's syntax, see filter-engine.
To configure the trusted broker, run the following with Administrator privileges. Or if you have a non-default trusted user, as the trusted user:
ssh-tectia-configuration.exe -a capture-trusted-broker
The host keys of transparent-tunnel targets must be in the known hosts file. Otherwise the tunneling will fail. You can add a host key to a user broker with:
$ ssh-broker-ctl probe-key --save-hostkey ip#portTo save a host key to the trusted broker, run the following with Administrator privileges. Or if you have a non-default trusted user, as the trusted user:
# ssh-broker-ctl -a capture-trusted-broker probe-key --save-hostkey ip#portIf you want to use the trusted broker as a regular user, set your broker with:
$ set SSH_SECSH_BROKER=capture-trusted-broker
Any subsequent client commands (sshg3, scpg3, sftpg3) shall use the trusted broker for filtering connections.
In the global broker configuration file, the windows-capture section
allows you to configure trusted-broker settings, such as trusted user, filtering,
automatic start on boot etc. After changes to the windows-capture
section, you will need to run the following:
# ssh-broker-ctl capture-driver reconfig
The capture driver is managed via ssh-broker-ctl capture-driver. For more information about available commands and options, such as capture-driver setup and debug logging, see the section called “Commands”
You can obtain information about transparent-tunneling components for logging and troubleshooting purposes.
For information about the Tectia Broker in transparent tunneling, run:
$ ssh-broker-ctl status
To view the status of the trusted broker, run the following as Administrator when using a default trusted user, or as the trusted user when using a custom trusted user:
# ssh-broker-ctl -a capture-trusted-broker status
You can review capture driver logs from Windows Event Logs:
For major events, see Applications and Services Logs→SSHCaptureDriver→Operational
For debug logs, go to Applications and Services Logs→SSHCaptureDriver, right click SSHCaptureDriver and select View→Show Analytic and Debug Logs, then open SSHCaptureDriver→Debug.
| Note |
|---|---|
Debug logs are disabled by default. They can be enabled with
ssh-broker-ctl capture-driver debug
We do not recommend leaving debug logging enabled for prolonged time, at least not with levels 4 and greater. Doing so may result in lots of logs and consume memory. |
When non-transparent TCP tunneling is used, the application to be tunneled is set to connect to the local listener port instead of connecting to the server directly. Tectia Client forwards the connection securely to the remote server.
If you have three hosts, for example, sshclient, sshserver,
and imapserver, and you forward the traffic coming to the
sshclient's port 143 to the imapserver's port
143, only the connection between the sshclient and
sshserver will be secured. The command you use would be similar to the
following one:
sshclient$ sshg3 -L 143:imapserver:143 username@sshserver
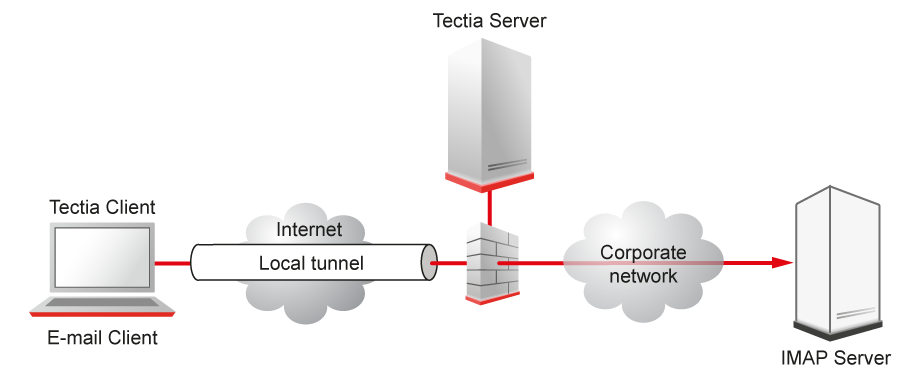
Figure 6.3 shows an example where the Secure Shell server resides in the DMZ network. Connection is encrypted from the Secure Shell client to the Secure Shell server and continues unencrypted in the corporate network to the IMAP server.
Tunnels can also be defined for connection profiles in the Connection Broker configuration file. The
defined tunnels are opened automatically when a connection with the profile is made. The
following is an example from a ssh-broker-config.xml file:
<profile id="id1" host="sshserver.example.com">
...
  <tunnels>
    <local-tunnel type="tcp"
                  listen-port="143"
                  dst-host="imap.example.com"
                  dst-port="143"
                  allow-relay="no" />
  ...
  </tunnels>
</profile>
By default, local tunnels originating only from the client host itself are allowed. To
allow also other machines to connect to the tunnel listener port, set the
allow-relay to yes.
The tunneling settings can be made in the Tectia Connections Configuration GUI, under Connection Profiles → Tunneling per each profile. See Defining Tunneling.
Automatic tunnels are one way of creating non-transparent local tunnels for application connections.
Automatic tunnels always use a connection profile in the tunnel establishing. You can create listeners for local tunnels that will be activated automatically when the Connection Broker starts up. The actual tunnel will be formed the first time a connection is made to the listener port. If the connection to the server is not open at that time, it will be opened automatically as well.
In the Connection Broker configuration file, make the following kind of settings:
<static-tunnels>
  <tunnel type="tcp"
          listen-port="9874"
          dst-host="st.example.com"
          dst-port="9111"
          allow-relay = "no"
          profile="id1" />
</static-tunnels>
You can configure the automatic tunnels in the Tectia Connections Configuration GUI, on the Automatic Tunnels page. For instructions, see Defining Automatic Tunnels.
When sshg3 is used to create secure tunnels using local port forwarding, the TCP applications to be tunneled are configured to connect to a localhost port instead of the application server port.
Example application, clientapp1, by default connects to a Unix server
unix.example.com using TCP port 2345.
$ clientapp1 --username user1 --server unix.example.com --port 2345
For securing this TCP application using Secure Shell, use the following commands:
$ sshg3 -L 2345:localhost:2345 user1@unix.example.com -S -f &
$ clientapp1 --username user1 --server localhost --port 2345
The above sshg3 command connects to remote Secure Shell server
unix.example.com, creates a local listener on port 2345, instructs the
remote Secure Shell server to forward the incoming traffic to localhost:2345,
and goes to background in single-shot-mode.
Non-transparent FTP tunneling is an extension to the generic tunneling mechanism. Unlike generic tunneling (port forwarding) mechanism, non-transparent FTP tunneling secures the transferred files, in addition to the FTP control channel. The FTP tunneling code monitors the tunneled FTP control channels and dynamically creates new tunnels for the data channels as they are requested.
When non-transparent FTP tunneling is used, tunnels are created from local client ports to remote servers. The FTP client is configured to connect to Tectia Client which will forward the connection to the endpoint where a Secure Shell server is running.
The typical use case is that Tectia Client is located on the same host as the FTP client; and the FTP server is on the same host as the Secure Shell server. However, other configurations are also supported, but it is worth noticing that the connection is encrypted only between Tectia Client and the Secure Shell server.
Non-transparent FTP tunneling can be requested on the command line, or enabled and defined in the Connection Broker configuration. The configured non-transparent FTP tunneling uses connection profiles, that are defined on Tectia Client.
On command-line, FTP tunneling can be used for both local and remote tunnels.
Non-transparent FTP-tunneling is started by entering a sshg3 command with the
following syntax:
sshclient$ sshg3 -L ftp/1234:localhost:21 username@sshserver
For information on the sshg3 command, see the sshg3(1) man
page.
The FTP tunneling settings can be made in the Tectia Connections Configuration GUI, under Connection Profiles → Tunneling for each profile. See Defining Tunneling.
FTP tunnels can also be defined for connection profiles in the Connection Broker configuration file.
The following is an example from the Connection Broker configuration file
ssh-broker-config.xml:
<profiles>
  <profile id="id1" host="sshserver.example.com"
  ...
    <tunnels>
      <local-tunnel type="FTP"
                    listen-port="1234"
                    dst-host="127.0.0.1"
                    dst-port="21"
                    allow-relay="NO" />
      ...
    </tunnels>
  </profile>
</profiles>
An FTP connection can then be made with the following (example) commands:
sshclient$ ftp
ftp$ open localhost 1234
The FTP connection to port 1234 on client is now tunneled to port 21 on the Secure Shell server.
As an alternative to FTP tunneling, you can use the sftpg3 or scpg3 clients for secure file transfers. These clients can be used on command line or in scripts and they require less configuration than FTP tunneling, since Tectia Server already has sft-server-g3 as a subsystem, and sftpg3 and scpg3 clients are included with Tectia Client. Managing remote user restrictions on the server machine will be easier, since you do not have to do it also for FTP.
To understand exactly how FTP tunneling is done, two different cases need to be examined: the active mode and the passive mode of the FTP protocol.
In passive mode, the FTP client sends the command PASV to the server,
which reacts by opening a listener port for the data channel and sending the IP address
and port number of the listener as a reply to the client. The reply is of the form
227 Entering Passive Mode (a1,a2,a3,a4,p1,p2)
where
a1.a2.a3.a4 is the IP address and p1*256+p2 is the port
number. For example, the reply for IP address 10.1.60.99 and port 1548 is: 227
Entering Passive Mode (10,1,60,99,6,12).
When the Connection Broker notices the reply to the PASV command, it will create a
local port forwarding to the destination mentioned in the reply. After this the Connection Broker will
rewrite the IP address and port in the reply to point to the listener of the newly created
local port forwarding (which exists always in a localhost address, 127.0.0.1) and pass the
reply to the FTP client. The FTP client will open a data channel based on the reply,
effectively tunneling the data through the Secure Shell connection, to the listener the
FTP server has opened. The net effect is that the data channel is secured all the way
except from the Secure Shell server to the FTP server if they are on different machines.
This sequence of events takes place automatically for every data channel.
Since the tunnel is opened to a localhost address, the FTP client must run on the same machine as Tectia Client if passive mode is used.
In active mode, the FTP client creates a listener on a local port, for a data channel from the FTP server to the FTP client, and requests the channel by sending the IP address and the port number to the FTP server in a command of the following form:
PORT a1,a2,a3,a4,p1,p2
where a1.a2.a3.a4 is the IP address
and p1*256+p2 is the port number. The Connection Broker intercepts this command and
creates a remote port forwarding from the localhost address of the Secure Shell server to
the address and port specified in the PORT command.
After creating the tunnel, the Connection Broker rewrites the address and port in the
PORT command to point to the newly opened remote forwarding on the Secure
Shell server and sends it to the FTP server. Now the FTP server will open a data channel
to the address and port in the PORT command, effectively forwarding the data
through the Secure Shell connection. The Connection Broker passes the incoming data to the original
listener created by the FTP client. The net effect is that the data channel is secure the
whole way except from Tectia Client to the FTP client. This sequence of events takes place
automatically for every data channel.
For FTP tunneling in active mode to work, the FTP server must be run on the same host as the Secure Shell server, and the FTP client and Tectia Client must reside on the same host.
| Note |
|---|---|
Tunneling FTP in active mode is not guaranteed to work in all setups. If possible, use the passive mode when tunneling FTP connections. |
SOCKS tunneling is a mechanism available for tunneling applications that support the SOCKS4 or SOCKS5 client protocol.
Instead of configuring tunneling (a.k.a port forwarding) from specific ports on the local host to specific ports on the remote server, you can specify a SOCKS server which can be used by the user's applications. Each application is configured in the regular way except that it is configured to use a SOCKS server on a localhost port. The Secure Shell client application, Tectia Client, opens a port in the localhost and mimics a SOCKS4 and SOCKS5 server for any SOCKS client applications.
When the applications connect to services such as IMAP4, POP3, SMTP, and HTTP, they provide the necessary information to the SOCKS server, which is actually Tectia Client mimicking a SOCKS server. Tectia Client will use this information in creating a tunnel to the Secure Shell server and relaying the traffic back and forth securely.
With sshg3 on the command line, the syntax of the SOCKS tunneling command
is as follows:
client$ sshg3 -L socks/[listen-address:]listen-port username@sshserver
where:
[listen-address:] defines which interface on the client will be
listened to (optional argument)
listen-port is the number of the port on the client
sshserver is the IP address or the host name of the Secure Shell
server.
For example, the following command will set up a local tunnel from port
1234 on the client to sshserver. The applications are set to use
a SOCKS server at port 1234 on the client. From the server, the connections are
forwarded unsecured to the destination hosts requested by the applications.
sshclient$ sshg3 -L socks/1234 username@sshserver
SOCKS tunnels can also be defined for connection profiles in the Connection Broker configuration
file. The following is an example from a ssh-broker-config.xml
file:
<profile id="id1" host="sshserver.example.com">
...
  <tunnels>
    <local-tunnel type="socks"
                  listen-port="1234"
                  allow-relay="no" />
  ...
  </tunnels>
</profile>
| |