|
     |
Certificate authentication is technically a part of the public-key authentication method. The signature created with the private key and the verification of the signature using the public key (contained in the X.509 certificate when doing certificate authentication) are done identically with conventional public keys and certificates. The major difference is in determining whether a specific user is allowed to log in with a specific public key or certificate. With conventional public keys, every server must have every user's public key, whereas with certificates the users' public keys do not have to be distributed to the servers - distributing the public key of the CA (self-signed certificate) is enough.
In brief, certificate authentication works as follows:
The client sends the user certificate (which includes the user's public key) to the server. The packet also contains data unique to the session and it is signed by the user's private key.
The server uses the CA certificate (and external resources as required) to check that the user's certificate is valid.
The server verifies that the user has a valid private key by checking the signature in the initial packet.
The server matches the user certificate against the rules in the server configuration file to decide whether login is allowed or not.
To configure the client to authenticate itself with an X.509 certificate, perform the following tasks:
Enroll a certificate for yourself. This can be done, for example, with the ssh-cmpclient-g3 or ssh-scepclient-g3 command-line tools.
Example: Key generation and enrollment using ssh-cmpclient-g3:
$ ssh-cmpclient-g3 INITIALIZE
-P generate://ssh2:passphrase@rsa:3072/user_rsa \
-o /home/user/.ssh2/user_rsa -p 62154:ssh \
-s 'C=FI,O=SSH,CN=user;email=user@example.org' \
-S http://fw.example.com:1080 http://pki.example.com:8080/pkix/ \
'C=FI, O=SSH, CN=Test CA 1'
Place your keys and certificates in a directory where the Connection Broker can locate them.
By default, the Connection Broker attempts to use each key found in the
$HOME/.ssh2
directory on Unix, or in the
%APPDATA%\SSH\UserKeys and
%APPDATA%\SSH\UserCertificates directories on Windows.
You can also add other directory locations for keys on the Keys
and Certificates page of the Tectia Connections
Configuration tool. See Managing Keys and Certificates. On Unix, you can use
the general/key-stores/key-store element in the
ssh-broker-config.xml file. See the section called “Key Store Configuration Examples”.
(Optional) Create an identification file.
Using the identification file is not necessary if all your keys
are stored in the default directory and you allow all of them to be used for public-key
and/or certificate authentication. If the identification file does
not exist, the Connection Broker attempts to use each key found in the default directory. If the
identification file exists, the keys listed in it are attempted
first.
Specify the private key of your software certificate in the
$HOME/.ssh2/identification file (the CertKey
option works identically with the IdKey option):
CertKey user_rsa
The certificate itself will be read from user_rsa.crt.
For more information on the syntax of the identification file, see
$HOME/.ssh2/identification
.
Make sure that public-key authentication is enabled in the
ssh-broker-config.xml file (it is enabled by default).
<authentication-methods>
  <auth-publickey />
...
</authentication-methods>
Other authentication methods can be listed in the configuration file as well. Place the least interactive method first.
You can configure user authentication with X.509 certificates on Windows using Tectia Connections Configuration GUI. You also need to configure Tectia Server for user authentication with certificates, see Tectia Server Administrator Manual.
Launch Tectia Connections Configuration GUI.
Right-click  in the notification area of the Windows taskbar and select
Configuration.
in the notification area of the Windows taskbar and select
Configuration.
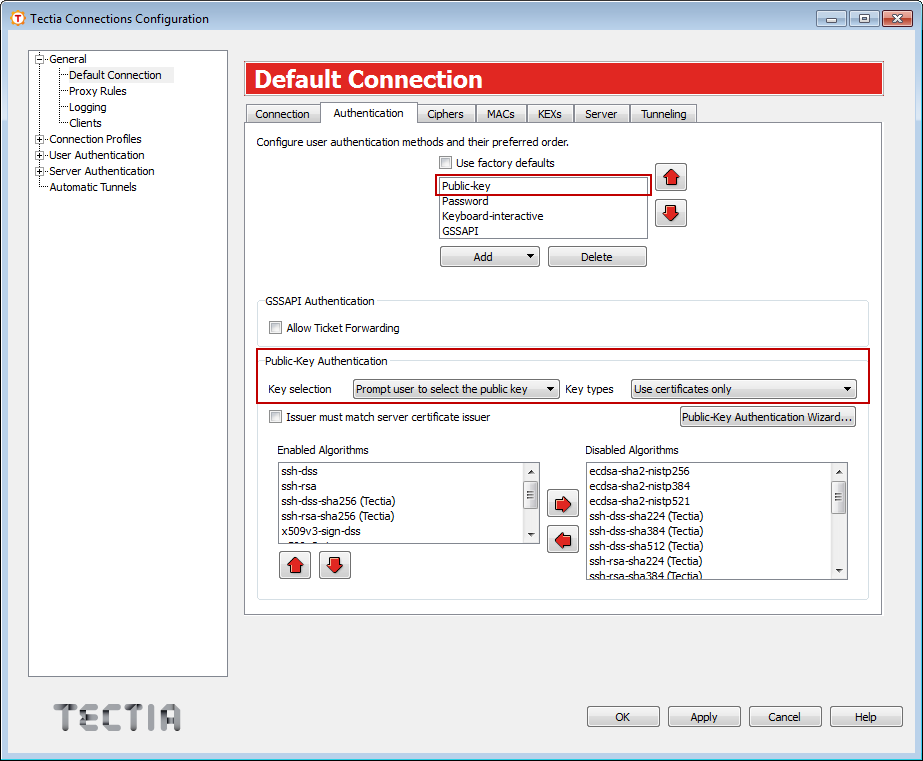
Under General, click Default Connection. Select the Authentication tab. Ensure that public-key authentication is enabled and it is the first or only method in the list. By default, it is enabled.
Under Public-Key Authentication, you can select to use public keys or certificates or both in the authentication.
If you are using connection profiles, select the profile name under Connection Profiles. Select the Authentication tab and ensure that public-key authentication is enabled.
Tectia suggests installing the certificate into the Microsoft Certificate store that is a personal store for the user.
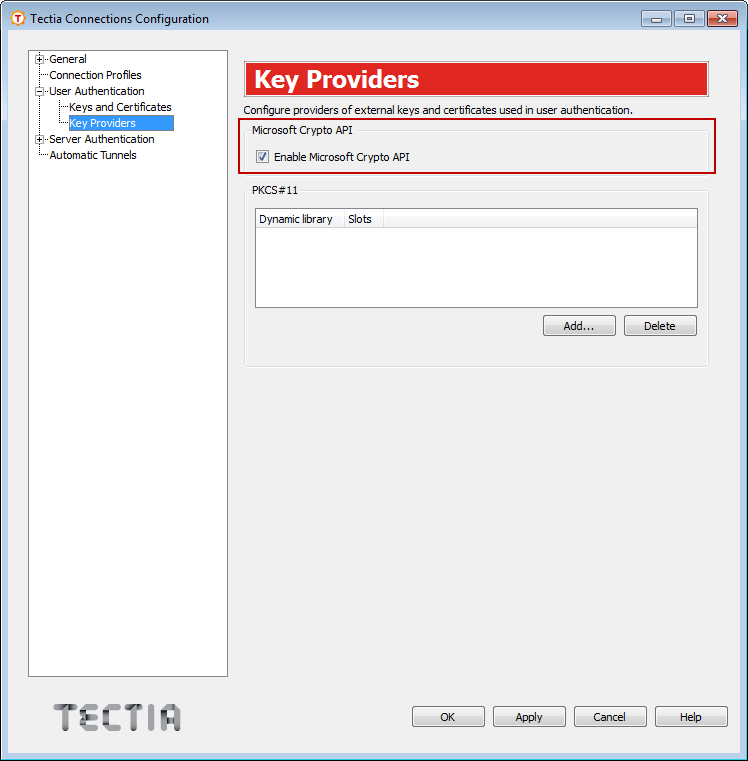
Under User Authentication, select Key Providers. Enable Microsoft Crypto API and click .
You can also read certificate information from USB tokens or smartcards via Microsoft Crypto API if they are compatible with the API. Alternatively USB tokens or smartcards can be used by enabling PCKS#11.
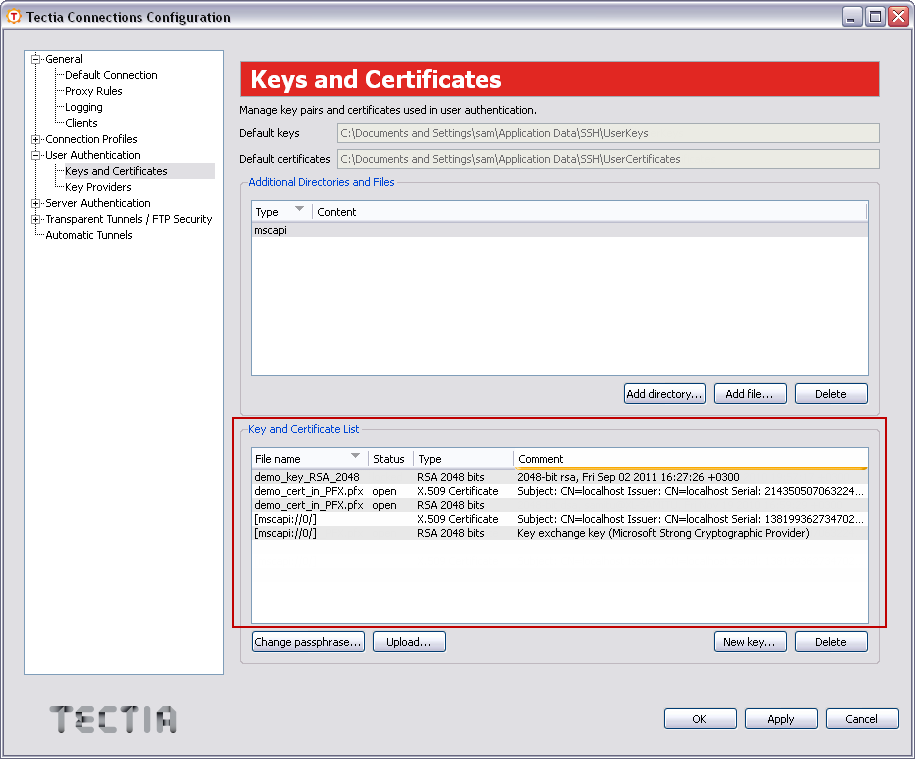
The certificate is now loaded into the client automatically. Under User Authentication, select Keys and Certificates. You can see the available certificates under Key and Certificate List.
Tectia Client can also read key and certificate information from the file system. These can be defined under Additional Directories and Files.
![[Note]](images/note.gif) | Note |
|---|---|
Ensure that the client certificate is set up for client authentication only. It makes troubleshooting several certificates easier, for example, as server authentication certificates cannot be used as user certificates. |
For more information about the key and certificate settings, see Managing Keys and Certificates.
If the certificate authentication does not succeed for some reason, running Tectia Server in the troubleshooting mode and viewing the troubleshooting log can provide a lot of information about the end-user connection. For more information, refer to Section Starting Tectia Server in Debug mode on Windows in the Tectia Server Administrator Manual.
You can import existing PKCS #12, PKCS #7 and X.509 certificates on the Keys and Certificates page under User Authentication in the Tectia Connections Configuration GUI. See Managing Keys and Certificates.
| |