|
Tunneling Applications
Tunneling, or port forwarding, is a way of forwarding otherwise unsecured TCP
traffic through an encrypted Secure Shell tunnel. You can secure for example
POP3, SMTP, and HTTP connections that would otherwise be unsecured.
Note: The client-server applications using the tunnel will carry out
their own authentication procedures (if any) the same way they would without the
encrypted tunnel.
For a more thorough explanation of tunneling, see SSH Tectia
Client/Server Product Description. For practical tunneling
examples, see Sections How to Set Up Tunneling for E-Mail and How to Set Up Tunneling for FTP.
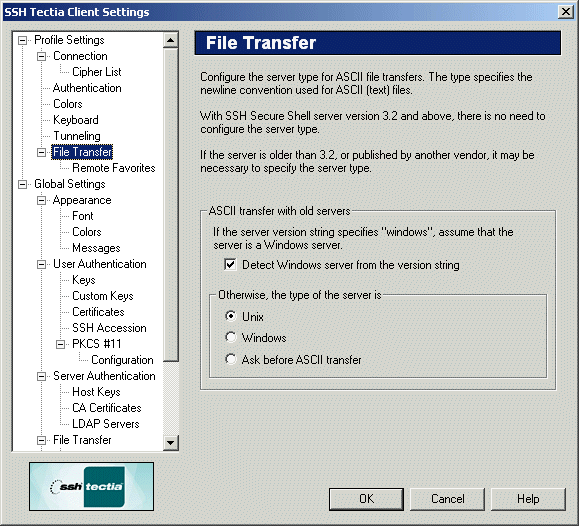
Tunneling settings are configured using the Tunneling page of
the Settings dialog. Any changed tunneling settings will take effect the
next time you log in.

Figure : The Tunneling page of the Settings dialog
The outgoing and incoming tunnel settings are configured using the
Outgoing and Incoming tabs of the Tunneling page.
Outgoing
Outgoing tunnels protect TCP connections that your local computer
forwards from a specified local port to the specified port on the remote
host computer you are connected to.

Figure : Tunneling an IMAP connection for secure e-mail
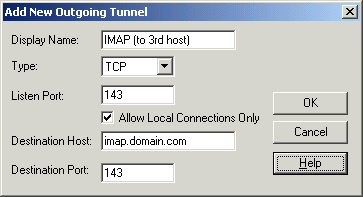
It is also possible to forward the connection beyond the remote host
computer. However, the connection is encrypted only between the client
(local computer) and the Secure Shell server. See Figure
Forwarding to a third host.

Figure : Forwarding to a third host
Click the Outgoing tab to edit outgoing tunnel definitions.
The following fields are used to define an outgoing tunnel. These values
can be edited by clicking Add or Edit on the Outgoing
page of the Settings dialog.
- Name
The name of the tunnel definition. You can use this field to type in a
descriptive name that will help you to recognize this tunnel definition
later on.
- Listen Port
This is the number of the local port that the tunnel listens to, or captures.
Note: The protocol or application that you wish to create the
tunnel for may have a fixed port number (for example 143 for IMAP) that
it needs to use to connect successfully. Other protocols or applications
may require an offset (for example 5900 for VNC) that you will have to
take into an account.
- Destination Host
This field defines the destination host for the port forwarding. The
default value is localhost.
Note: The value of localhost is resolved after the
Secure Shell connection has been established, so here localhost
refers to the remote host computer you have connected to.
- Destination Port
The destination port defines the port that is used for the forwarded
connection on the destination host.
- Allow Local Connections Only
Leave a check mark in this box if you want to allow only local
connections to be made. This means that other computers will not be able
to use the tunnel created by you. By default, only local connections are
allowed. This is the right choice for most situations. You should
carefully consider the security implications if you decide to also allow
outside connections.
- Type
Select the type of the tunnel from the drop-down list. Valid choices are
TCP and FTP.
Incoming
Incoming tunnels protect TCP connections that the remote host forwards
from a specified remote port to the specified port on your local
computer. Click the Incoming tab to edit incoming tunnel
definitions.

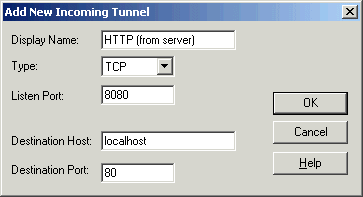
Figure : Redirecting the HTTP connection to a remote host port 8080 to your local computer port 80
The following fields are used to define an incoming tunnel. These values
can be edited by clicking Add or Edit.
- Name
The name of the tunnel definition. You can use this field to type in a
descriptive name that will help you to recognize this tunnel definition
later on.
- Listen Port
The port that the tunnel listens to, or captures from the remote host
computer.
Note: Privileged ports (below 1024) can be forwarded only when
logging in with root privileges on the remote host computer.
- Destination Host
This field defines the destination host for the port forwarding. The
default value is localhost.
Note: Here localhost refers to your local computer.
Also note that if the connection from the remote host computer is
forwarded beyond your local computer, that connection is unsecured.
- Destination Port
The destination port defines the port that is used for the forwarded
connection on the destination host.
- Type
Select the type of the tunnel from the drop-down list. Valid choices are
TCP and FTP.
Configuring Tunnels
The following buttons are available for configuring outgoing and incoming tunnels.
- Add
Click Add to add a tunnel definition. An Add New
Tunnel dialog opens, allowing you to define the name, type, listen
port, destination host, and destination port for the port forwarding.
With outgoing tunnels you can also define whether you allow local
connections only.
Note: If you are tunneling an FTP connection, you must set the
tunnel type as FTP.
If the Secure Shell server and the FTP server are located on separate host
computers, FTP tunneling works only if FTP is set to run in passive mode.
If the Secure Shell server and the FTP server are located on the same
computer, tunneling works regardless of whether FTP is running in passive
or active mode.
- Edit
Select a tunnel definition from the list and click Edit to edit
a tunnel. An Edit Tunnel dialog opens, allowing you to edit the
name, listen port, destination host, and destination port of the
outgoing tunnel. With outgoing tunnels you can also define whether you
allow local connections only.
- Remove
Select a tunnel definition from the list and click Remove to
remove a tunnel. Note that the selected tunnel will be removed
immediately, with no confirmation dialog.
X11 Tunneling
SSH Tectia Client can securely tunnel (forward) X11 graphic connections from the
remote host computer to an X Windows server running on the local computer.
Note: You must also be running an X emulator such as
eXceed or Reflection X in passive mode on the Windows
computer for X11 tunneling to work.
To tunnel (forward) X11 traffic, do the following:
- Install an X server (X emulation) program on Windows
(eXceed, Reflection X, or the like).
- Start SSH Tectia Client.
- Select the Edit -> Settings... -> Tunneling
option and make sure that the Tunnel X11 connections
check box is selected.
- Save your settings for SSH Tectia Client.
- Quit the client, start it again and log into the remote host.
- Start the X server (X emulation) program.
- To test the tunneling, run
xterm or xclock from
SSH Tectia Client.


 [Contents]
[Index]
[ Contact Information | Support | Feedback | SSH Home Page | SSH Products ]
Copyright © 2010 SSH Communications Security Corp.
This software is protected by international copyright laws. All rights reserved.
Copyright Notice
|
 |