|
     |
On Windows and Linux, you can use the Tectia Public-Key Authentication Wizard to generate a key pair and to upload a public key to a host, see Public-Key Generation and Uploading Public Keys Automatically. The wizard will generate two key files, your private key and your public key.
The new private and public key will be stored on your local computer
in the %APPDATA%\SSH\UserKeys directory on Windows and in the
$HOME/.ssh2/authorized_keys directory on Linux. The private key file
has no file extension, and the public key has the same base file name as the
private key, but with .pub as the file extension.
Make sure that public-key authentication is allowed in the Connection Broker configuration, in the default settings and in the relevant connection profile (it is allowed by default). See Defining Authentication and Defining Authentication.
To use the key pair for public-key authentication, you have to upload the public key to the remote host computer. If the remote host has an SFTP server running, you can automatically upload a copy of your new public key to the server with the wizard. To upload the key automatically, see Uploading Public Keys Automatically. To upload the key manually, see Uploading Public Keys Manually.
New keys are generated in the Tectia Connections Configuration GUI. Select the Keys and Certificates page under User authentication and click New Key to start the Public-Key Authentication Wizard.
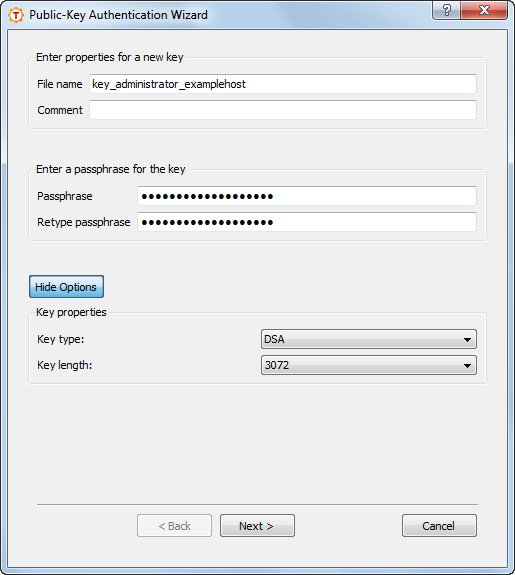
Define the key properties and the required passphrase to protect your key pair; you will be requested to enter the passphrase always when using the keys to authenticate yourself.
Type a unique name for the key file. Tectia ConnectSecure suggest a name consisting of the user name and the host name.
In this field you can write a short comment that describes the key pair. You can for example describe the connection the keys are used for. This field is not obligatory, but helps to identify the key later.
Type a phrase that you have to enter when handling the key. This passphrase works in a similar way to a password and gives some protection for your private key.
![[Note]](images/note.gif) | Note |
|---|---|
In FIPS mode, due to a FIPS regulation which forbids exporting unencrypted private keys out of the FIPS module, it is not possible to generate user keys without a passphrase. |
Make the passphrase difficult to guess. Use at least 8 characters, both letters and numbers. Any punctuation characters can be used as well.
Memorize the passphrase carefully, and do not write it down.
Type the passphrase again. This ensures that you have not made a typing error.
Click the Advanced Options, to define the type of the key to be generated and the key length to be different from the defaults. By default, Tectia ConnectSecure generates a pair of 2048-bit DSA keys.
In the Key Properties fields, you can make the following selections:
Select the type of the key to be generated. Available options are DSA or RSA.
Select the length (complexity) of the key to be generated. Available options are 1024, 2048 or 3072 bits. Larger keys are more secure, but also slower to generate.
Click Next to proceed to uploading the key as instructed in Uploading Public Keys Automatically.
Public keys can be uploaded automatically to servers that have the SFTP subsystem enabled. The Public-Key Authentication Wizard automatically uploads each new public key to a remote host of your choice. The wizard lists all existing keys, and you can select a key to upload it also to other remote servers at any time.
To access the Public-Key Authentication Wizard, click User Authentication → Keys and Certificates on the tree view.
Select a key and click Upload.
In the Upload Public Key view of the wizard, define the remote host where to upload the key:
Select this option to define the remote Host name and your user name there. The default Secure Shell port is 22.
Select a Connection profile from the drop-down list that specifies the desired remote host and user name.
Click Upload to upload the key to the selected server. If you are already connected to the remote server host, the key upload starts immediately. If you are not connected, you will be prompted to authenticate on the server (by default with password).
The public key will be uploaded to the default user home directory
(%USERPROFILE%\.ssh2 on Windows, $HOME/.ssh2 on Unix).
| Note |
|---|---|
The key user is required to have the |
Even if the automatic upload succeeds, it is possible that the server administrator has configured the system to store keys elsewhere than under the user home directory. In this case the keys and the authorization file additions have to be moved manually to the proper directory.
If you do not use the automatic upload facility, see Uploading Public Keys Manually.
| |
Copyright  2012 Tectia Corporation
This software is protected by international copyright laws. All rights reserved.
Contact Information