|
     |
Under Connection Profiles you can configure separate connection settings for each Secure Shell server you connect to. You can also configure several profiles for the same server, for example, with different user accounts.
Click Test Connection to open a connection to the remote server. You need to connect to the server once in order to get the server's host key. Tectia ConnectSecure will prompt you to verify the received key. Check that it is valid, preferably by calling the server's administrator, and save the validated key. After this, the locally saved information on the key will be used in the authentication process automatically.
To add a connection profile, click Add profile in the Connection Profiles page. Enter a name for the profile and click OK. By default, the profile name is also used as the hostname of the server.
Newly created connection profiles will inherit the default values for authentication, ciphers, MACs, KEXs, and advanced server settings defined under the General → Defaults page (Defining Default Connection Settings). The values can be customized on the profile-specific tabbed pages.
Define the profile settings in the tabbed view as described in Defining Connection Settings, Defining Authentication, Defining Ciphers, Defining MACs, Defining KEXs, Defining Server Connections, Defining Proxy Settings, Defining Tunneling, Defining Windows Settings, Defining Color Settings, Defining Terminal Settings, Defining File Transfer Settings, and Defining Favorite Folders.
You can organize the connection profiles in folders for each server you are connecting to. To add a folder for connection profiles, click Add folder in the Connection Profiles page. Enter a name for the folder and click OK. Add connection profiles to the folder by selecting the folder and clicking Add profile. The profile is created into the folder.
To move a profile to a different profile folder, select the profile from the list and click Move. Select the folder where you want to move the profile from the drop-down list and click OK.
To rename a connection profile or a profile folder, select a profile or a folder and click Rename. Enter a new name and click OK.
To remove a connection profile or a profile folder, select a profile or a folder and click Delete. You will be asked for confirmation. Click OK to proceed with the deletion.
Note that removing a profile folder removes also all profiles in it.
To add a shortcut to the created profile on your desktop on Windows, click Create Shortcut. When you double-click the icon, it will directly open a connection to the host defined in the profile.
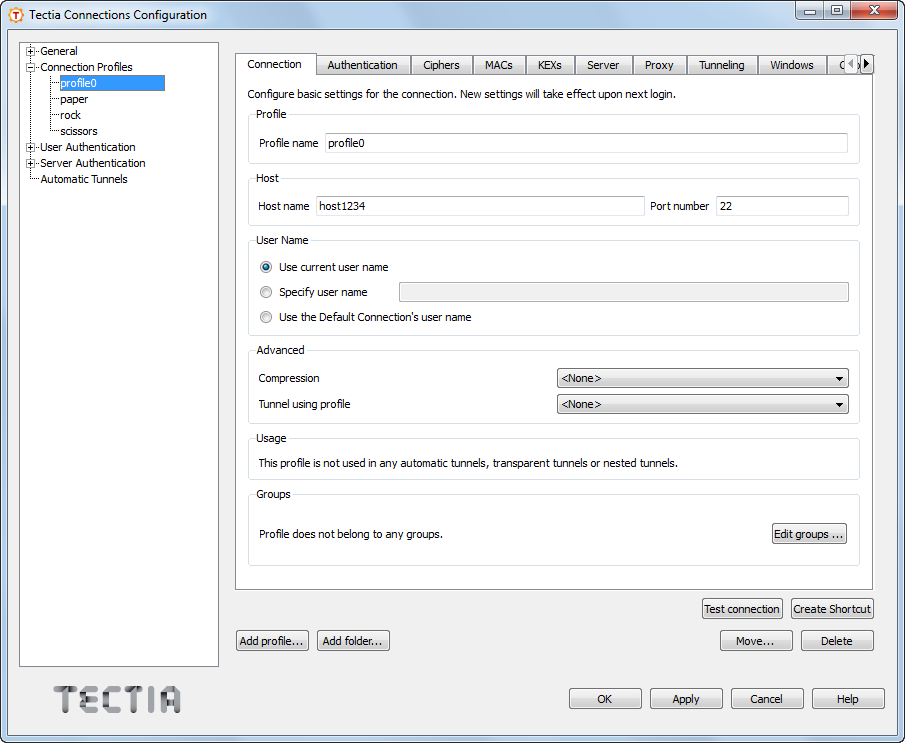
On the Connection tab, you can define the protocol settings used in the connection. Any changed connection settings will take effect the next time you log in.
Specify the host name or the IP address of the remote host computer to which you want to connect with the profile.
When transparent TCP tunneling is used on Windows,
'%DESTINATION_HOSTNAME%' is supported as the hostname
definition. This option exists for backward compatibility reasons. From
release 6.0 onwards, you can define that Tectia ConnectSecure uses the destination
IP address received from the tunneled application with setting
Transparent Tunnels → Filter Rules → Use host name from
the application (in XML configuration:
hostname-from-app="yes").
Define the listen port on the Secure Shell server. The default SSH port number is 22. In case you know that the remote server uses another port, enter the number in the Port Number field.
![[Note]](images/note.gif) | Note |
|---|---|
A Secure Shell server program must be listening to the specified port on the remote host computer or the connection attempt will not succeed. If you are unsure which port the remote host computer is listening to, contact the system administrator of the remote host. |
Select Use current Windows user name if the
connection should always be made using the currently logged in Windows user
name. This is similar to defining %USERNAME% (note the percent
signs) as the user name. %USERNAME% reads the actual user name
from an environment variable.
Select Specify user name and enter the user name, if you want to define the user name this profile will use when connecting to the remote host computer.
Select Prompt user for the user name if the user should enter the user name manually every time when connecting.
Select Use the Default Connection's user name if you want to apply the generic user name defined in the General - Default Connection settings.
In Compression, select the desired compression setting from the drop-down menu. Valid choices are zlib and none. Compression is disabled by default.
In Tunnel using profile, use the drop-down list to select a profile for creating a nested tunnel. The first tunnel will be created to the server defined in the current connection profile, and from there, the second tunnel will be created to a host defined in the profile selected with the Tunnel using profile setting. By default, tunneling is disabled.
This field shows information on where the defined profile is used.
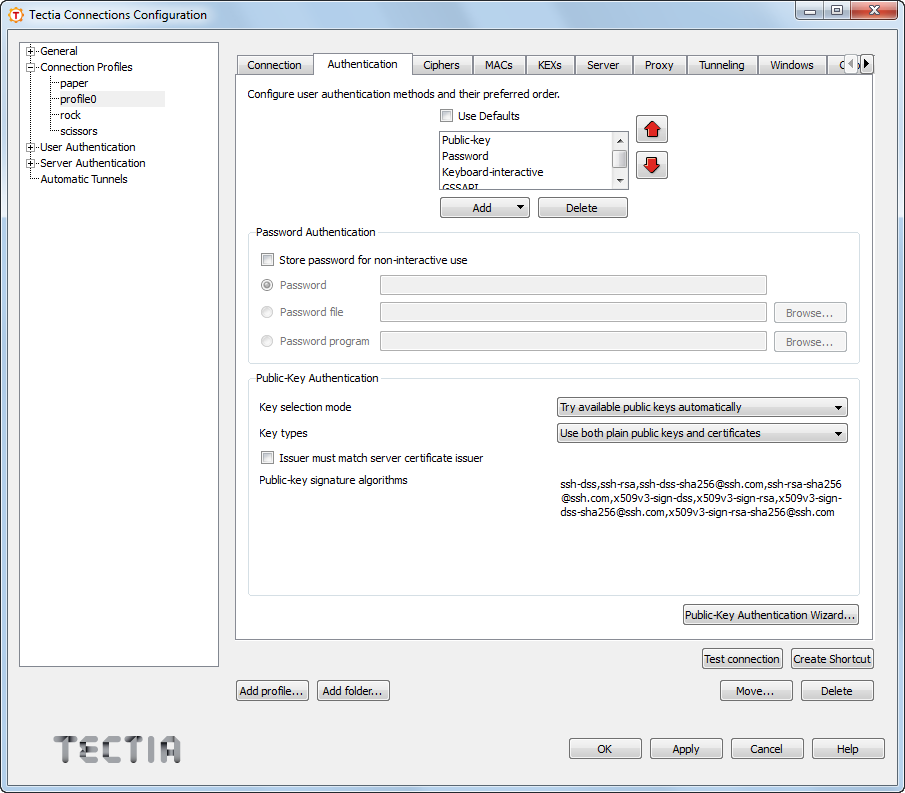
On the Authentication tab, you can define the user authentication methods for the profile.
Select the Use Defaults check box to use the authentication methods defined on the Default Connection page (Defining Authentication), or clear the check box to define a custom list of authentication methods.
To add a new authentication method to the list, click Add and select the method from the drop-down menu.
To remove an authentication method, select a method from the list and click Delete.
Use the arrow buttons to organize the preferred order of the authentication methods. The first method that is allowed by the Secure Shell server is used. Note that in some cases, the server may require several authentication methods to be passed before allowing login.
Possible methods for user authentication are:
Public-key: Use public-key authentication. See also Defining User Authentication.
Password: Use a password for authentication.
Keyboard-interactive: Keyboard-interactive is designed to allow the Secure Shell client to support several different types of authentication methods, including RSA SecurID, and PAM. For more information on keyboard-interactive, see User Authentication with Keyboard-Interactive.
GSSAPI: GSSAPI (Generic Security Service Application Programming Interface) is a common security service interface that allows different security mechanisms to be used via one interface. For more information on GSSAPI, see User Authentication with GSSAPI.
If you want to use the profile in non-interactive connections, you can select to store a password with the profile in the Password Authentication field.
Select Password to enter the actual password string.
Select Password file to enter a path to a file containing the password.
Select Password program to enter a path to a program or a script that outputs the password.
![[Caution]](images/caution.gif) | Caution |
|---|---|
If the password is given using this option, it is extremely
important that the |
| Note |
|---|---|
Any password given with the command-line options will override this setting. |
When using public-key authentication, you can also define which key types are used and how the keys are selected.
Key selection mode defines the policy Connection Broker uses when proposing user public keys to the server. Select the mode from the dropdown list. The options are:
Try available public keys automatically (the default). With this policy, the client will try the keys in the following order:
Keys with public key available and private key without a passphrase (no user interaction)
Keys with public key available but private key behind a passphrase (require a passphrase query, provided the key is accepted by the server)
The rest of the keys, meaning keys that require a passphrase for the public key as well as the private key.
Prompt user to select the public key - with this policy, the Connection Broker prompts the user to select the key from a list of available keys. If authentication with the selected key fails, the client will prompt the user again to select another key.
Key types defines whether only plain public keys or only certificates are tried during public-key authentication. Select the key type from the dropdown list. The default is to try both plain public keys and certificates.
By selecting Issuer must match server certificate issuer, you can make the Connection Broker filter the user certificates that will be included in the list presented to the user. The client-side user certificates can be filtered according to their issuer name that is compared to the certificate issuers requested or accepted by the server. By default, the filtering is not done. This option is useful when a user has several certificates with different access rights to the same server, for example for a testing role and for an administrator role. The Connection Broker chooses the relevant certificates that are applicable on the remote host, and the user can choose the correct certificate from the short-listed ones.
The configured Public-Key signature algorithms for
authenticating and signing the user's public key are listed here. The
public-key signature algorithms are configured in the Connection Broker configuration
file ssh-broker-config.xml.
To generate a public-key pair and to upload it to the remote server, click the Public-Key Authentication Wizard button. For instructions, see Using the Public-Key Authentication Wizard.
Click OK to save the connection profile.
On Windows, you can use the Tectia Public-Key Authentication Wizard to generate and to upload public-key pairs. The wizard will generate two key files, your private key and your public key.
The new private and public key will be stored on your local computer in
the %APPDATA%\SSH\UserKeys directory. The private key file has
no file extension, and the public key has the same base file name as the
private key, but with .pub as the file extension.
Select the Keys and Certificates page under User authentication and click New Key to start the Public-Key Authentication Wizard.
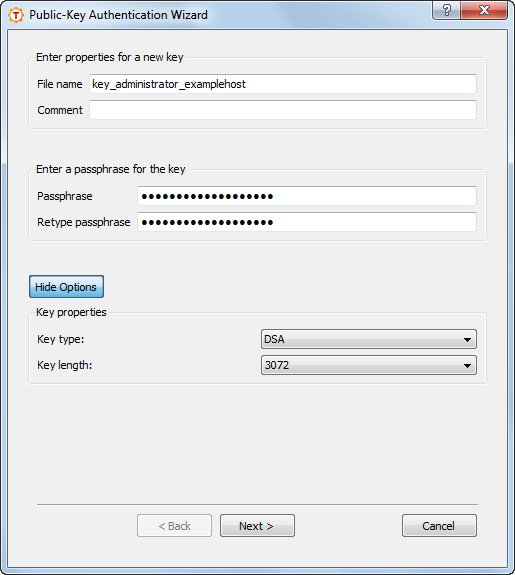
Define the key properties and the required passphrase to protect your key pair; you will be requested to enter the passphrase always when using the keys to authenticate yourself.
Type a unique name for the key file. Tectia ConnectSecure suggest a name consisting of the user name and the host name.
In this field you can write a short comment that describes the key pair. You can for example describe the connection the keys are used for. This field is not obligatory, but helps to identify the key later.
Type a phrase that you have to enter when handling the key. This passphrase works in a similar way to a password and gives some protection for your private key.
| Note |
|---|---|
In FIPS mode, due to a FIPS regulation which forbids exporting unencrypted private keys out of the FIPS module, it is not possible to generate user keys without a passphrase. |
Make the passphrase difficult to guess. Use at least 8 characters, both letters and numbers. Any punctuation characters can be used as well.
Memorize the passphrase carefully, and do not write it down.
For connections where no user interaction is available, you can consider leaving the password empty.
Type the passphrase again. This ensures that you have not made a typing error.
Click the Advanced Options, to define the type of the key to be generated and the key length to be different from the defaults. By default, Tectia ConnectSecure generates a pair of 2048-bit DSA keys.
In the Key Properties fields, you can make the following selections:
Select the type of the key to be generated. Available options are DSA or RSA.
Select the length (complexity) of the key to be generated. Available options are 1024, 2048 or 3072 bits. Larger keys are more secure, but slower to generate.
As soon as a new key has been generated, the Wizard proceeds to uploading the key to a remote server. In case you want to upload an existing key to a remote server, select the key file in the Keys and Certificates view, and click Upload. The following dialog appears in both cases:
In the Upload Public Key view of the wizard, define the remote host where to upload the key:
Select this option to define the remote Host name and your user name there. The default Secure Shell port is 22.
Select a Connection profile from the drop-down list that specifies the desired remote host and user name.
Click Upload to upload the key to the selected server. If you are already connected to the remote server host, the key upload starts immediately. If you are not connected, you will be prompted to authenticate on the server (by default with password).
The public key will be uploaded to the default user home directory
(%USERPROFILE%\.ssh2 on Windows, $HOME/.ssh2 on Unix).
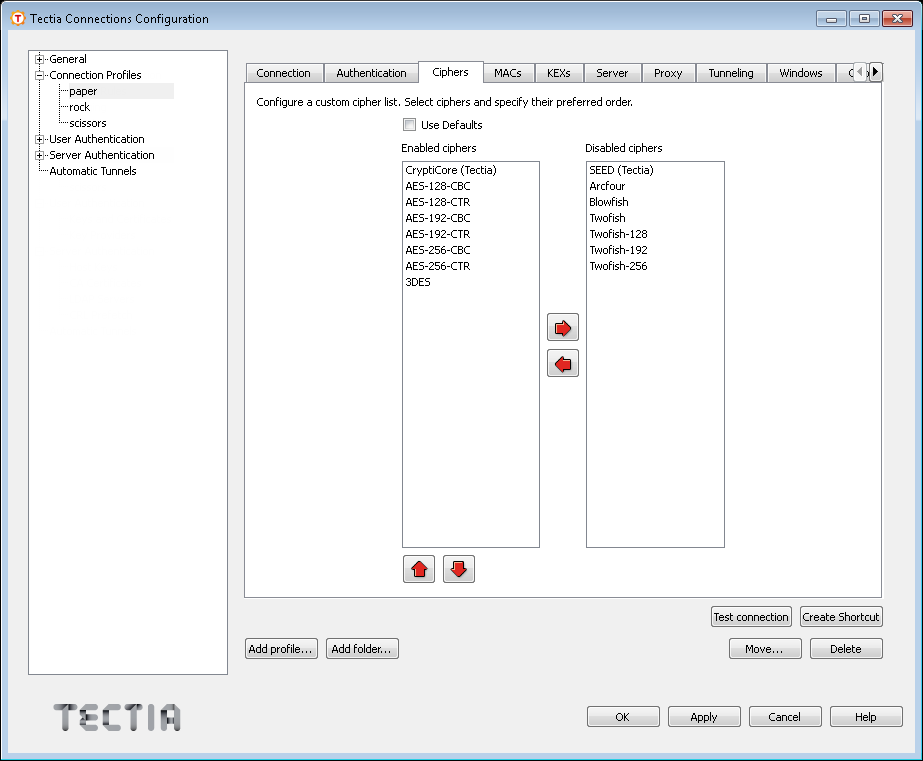
On the Ciphers tab, you can define the encryption algorithms used for the profile.
Select the Use Defaults check box to use the algorithms defined on the Default Connection page (Defining Ciphers), or define a cipher list using the arrow buttons. The ciphers are tried in the order they are specified.
Tectia proprietary algorithms are marked with
(Tectia) and are operable with Tectia products only. They
correspond to the algorithms that end with @ssh.com in the
Connection Broker configuration file.
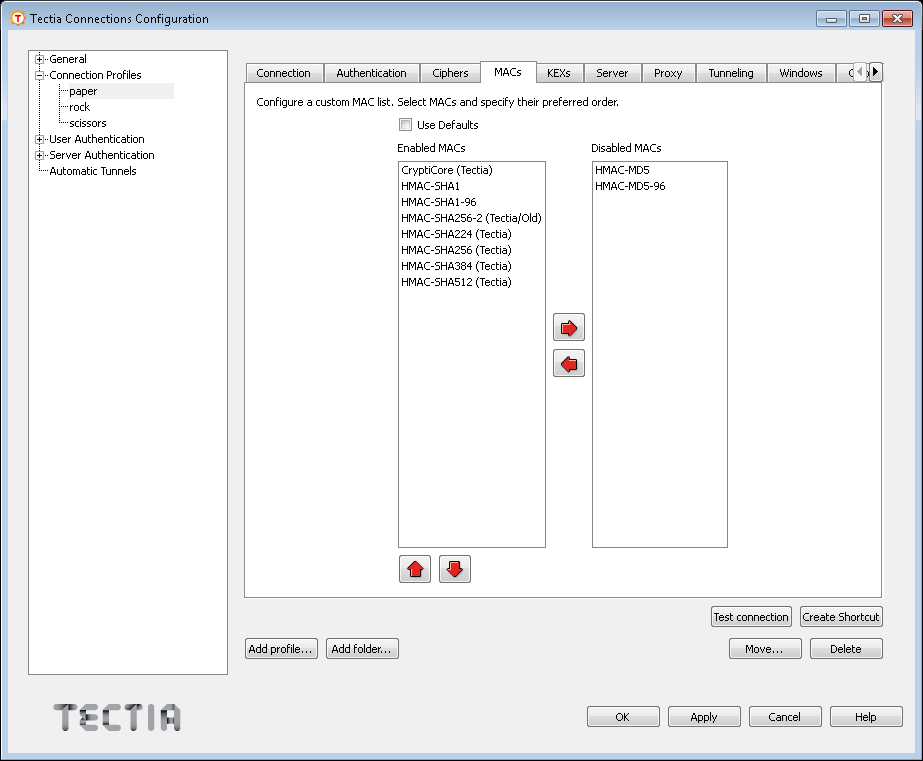
On the MACs tab, you can configure the message integrity algorithms used for the profile.
Select the Use Defaults check box to use the algorithms defined on the Default Connection page (Defining MACs), or define a MAC list using the arrow buttons. The MACs are tried in the order they are specified.
Tectia proprietary algorithms are marked with
(Tectia) and are operable with Tectia products only. They
correspond to the algorithms that end with @ssh.com in the
Connection Broker configuration file.
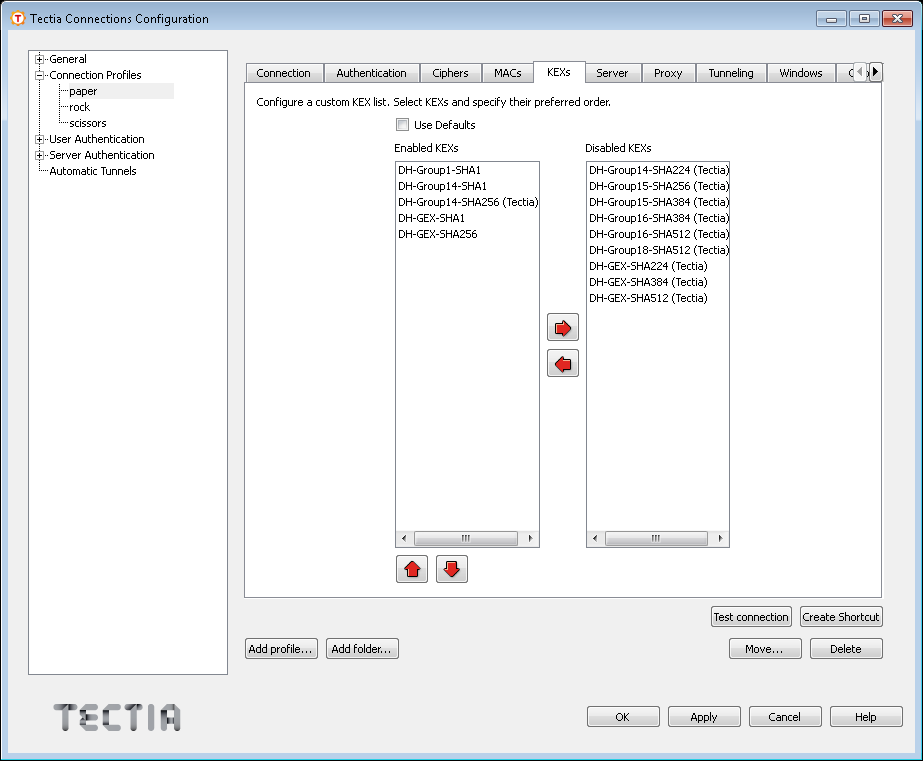
On the KEXs tab, you can configure the key exchange methods used for the profile.
Select the Use Defaults check box to use the methods defined on the Default Connection page (Defining KEXs), or define a KEX list using the arrow buttons. The KEXs are tried in the order they are specified.
Tectia proprietary algorithms are marked with
(Tectia) and are operable with Tectia products
only. They correspond to the algorithms that end with @ssh.com in
the Connection Broker configuration file.
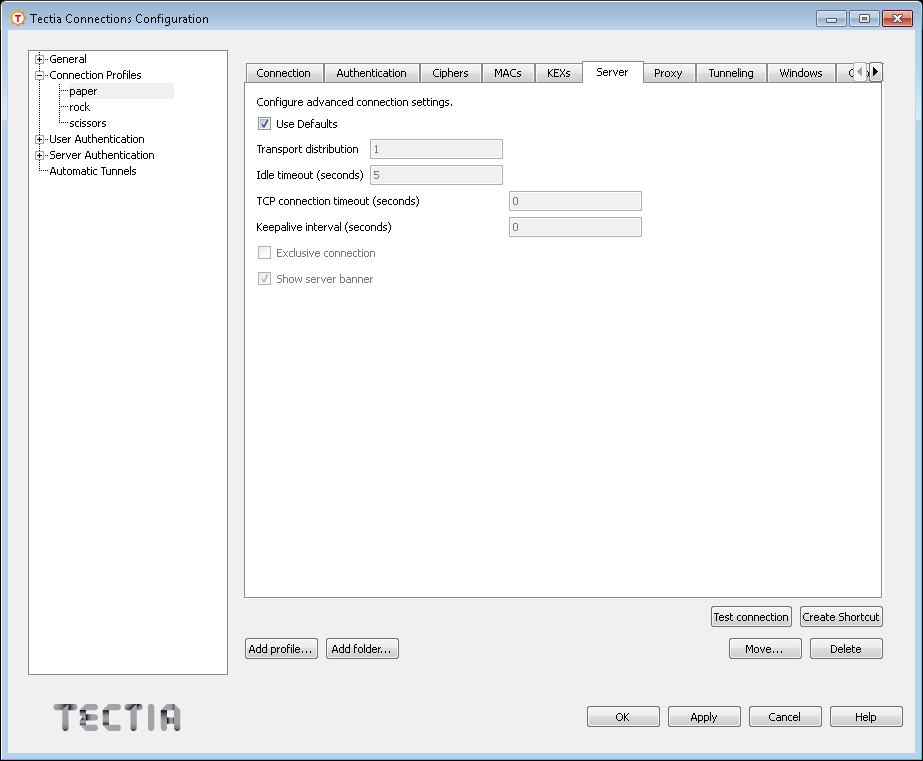
On the Server tab, you can define advanced server connection settings for the profile.
Select the check box to use the values defined on the Default Connection page (Defining Server Connections) for the server connection settings.
Specify how long idle time (after all connection channels are closed) is allowed for a connection before automatically closing the connection. The default is 5 seconds. Setting a longer time allows the connection to the server to remain open even after a session (for example, Tectia SSH Terminal GUI) is closed. During this time, a new session to the server can be initiated without re-authentication. Setting the time to 0 (zero) terminates the connection immediately when the last channel to the server is closed.
Specify for how long a TCP connection will be attempted to a Secure Shell server. Define the timeout in seconds. After the defined time the TCP connection will be released in case the remote server is down or unreachable. Setting the value as 0 (zero) means that the default system TCP timeout will be used.
Specify an interval (in seconds) for sending keepalive messages to a Secure Shell server. The default is 0, meaning that no keepalive messages are sent.
Select this check box if you want that the profile always opens a new connection, instead of reusing a currently open connection.
Select the check box if you want to have the server banner message file (if it exists) visible to users before login.
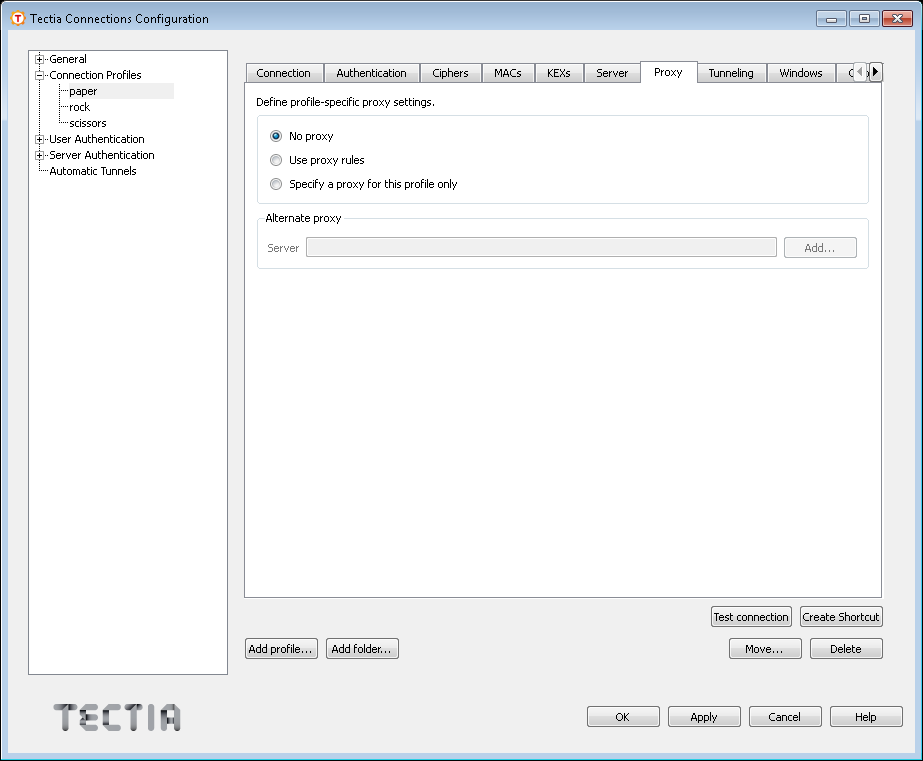
On the Proxy tab, you can select proxy settings for the profile.
Select this option if you do not want to use a proxy.
Select this option to use the proxy rules defined in the General settings Proxy Rules page (Defining Proxy Rules).
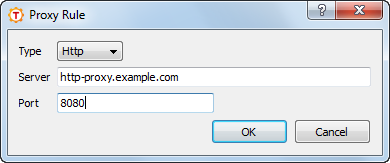
Click Add to add a new proxy definition for this profile.
Select the Type of the rule. The type can be Direct, Socks4, Socks5, or Http.
For other types than direct, enter the address of the proxy Server and Port.
Tunneling, or port forwarding, is a way of forwarding otherwise unsecured TCP traffic through an encrypted Secure Shell connection (tunnel). You can secure for example POP3, SMTP, and HTTP connections that would otherwise be unsecured.
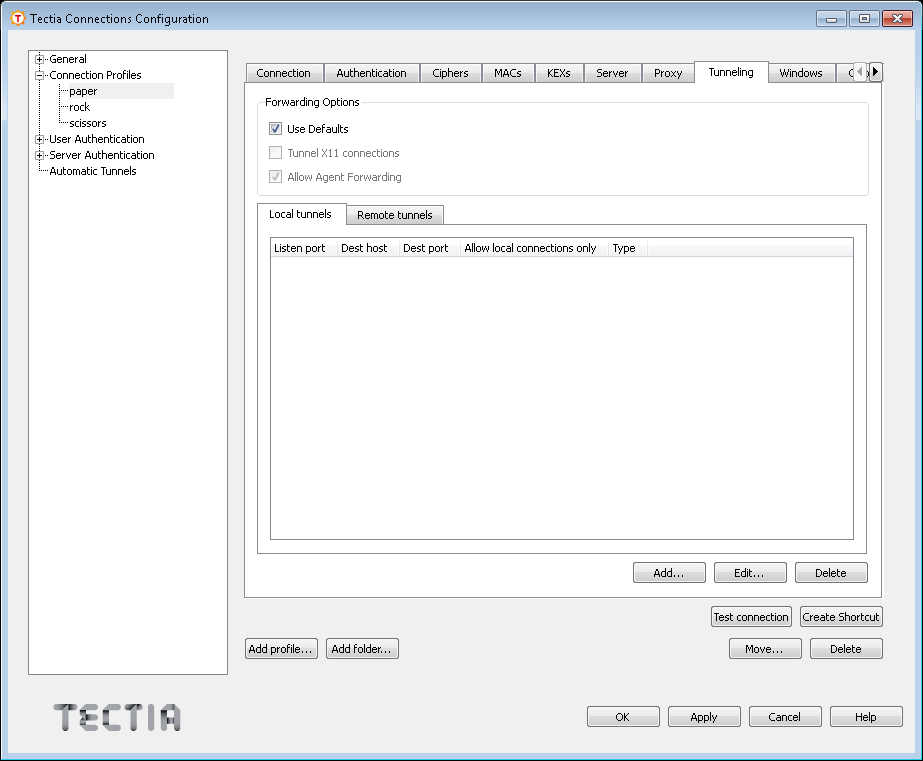
The tunneling settings for the connection profile are configured using the Tunneling tab. Any changed tunneling settings will take effect the next time you log in.
| Note |
|---|---|
The client-server applications using the tunnel will carry out their own authentication procedures (if any) the same way they would without the encrypted tunnel. |
You can also define transparent tunneling settings for TCP applications and for FTP connections. For instructions, see Defining Transparent Tunnels)
It is possible to define separately for each connection profile whether X11 and/or agent forwarding are enabled, or whether the general default forwarding settings are applied to the profile.
Select this option to make the profile follow the default settings for X11 and agent forwarding defined on the Defaults - Tunneling tab (Defining Default Tunneling Settings).
To allow X11 forwarding for this connection profile, select this check box.
Tectia ConnectSecure can securely tunnel (forward) X11 graphic connections from the remote host computer to an X Windows server running on the local computer.
| Note |
|---|---|
A prerequisite for X11 tunneling is that you have an X emulator (such as eXceed or Reflection X) running in passive mode on the Windows computer. |
To tunnel (forward) X11 traffic, do the following actions:
Install an X server (X emulation) program on Windows (eXceed, Reflection X, or the like).
Start Tectia ConnectSecure.
Select the Tunneling tab of the Connection Profiles page and make sure that the Tunnel X11 connections check box is selected.
Save your settings for Tectia ConnectSecure.
Restart Tectia ConnectSecure and log into the remote host.
Start the X server (X emulation) program.
To test the tunneling, run xterm or xclock from Tectia ConnectSecure.
For more information, see X11 Forwarding.
To allow agent forwarding on the client side for this connection profile, select this check box.
In agent forwarding, Secure Shell connections and public-key authentication data are forwarded from one server to another without the user having to authenticate separately for each server.
For more information, see Agent Forwarding.
There are two types of tunnels that can be defined for application tunneling, local (outgoing) tunnels and remote (incoming) tunnels.
Local tunnels protect TCP connections that your local computer forwards from a specified local port to a specified port on the remote host computer you are connected to. It is also possible to forward the connection beyond the remote host computer, but the connection is encrypted only between Tectia ConnectSecure and Tectia Server.
Remote tunnels protect TCP connections that a remote host forwards from a specified remote port to a specified port on your local computer.
To edit local tunnel definitions, click the Local tunnels tab.
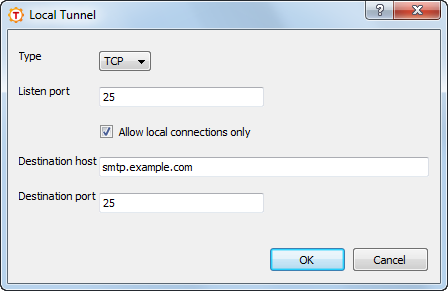
To add a new local tunnel, click Add. The Local Tunnel dialog box opens.
The following fields are used to define a local tunnel:
Type: Select the type of the tunnel from the drop-down list. Valid choices are TCP and FTP. If you are tunneling an FTP connection, set the tunnel type as FTP. For other protocols, set the tunnel type as TCP.
| Note |
|---|---|
If the Secure Shell server and the FTP server are located on different computers, FTP tunneling works only if FTP is set to run in passive mode. If the Secure Shell server and the FTP server are located on the same computer, tunneling works regardless of whether FTP is running in passive or active mode. For more information on FTP tunneling, see Non-Transparent FTP Tunneling. |
Listen port: This is the number of the local port which the tunnel listens to or captures.
| Note |
|---|---|
The protocol or application that you wish to create the tunnel for may have a fixed port number (for example 143 for IMAP) that it needs to use to connect successfully. Other protocols or applications may require an offset (for example 5900 for VNC) that you will have to take into an account. |
Allow local connections only: Select this option if you want to allow only local connections to be made. This means that other computers will not be able to use the tunnel created by you. By default, only local connections are allowed. This is the right choice for most situations.
Consider the security implications carefully if you decide to also allow outside connections.
Destination host: This field defines
the destination host for the tunneling. The default value is
localhost.
| Note |
|---|---|
The destination host is resolved by the Secure Shell server,
so here |
Destination port: The destination port defines the port that is used for the forwarded connection on the destination host.
To edit a tunnel definition, select a tunnel from the list and click Edit. The Local Tunnel dialog opens.
To delete a tunnel definition, select a tunnel from the list and click Delete to remove a tunnel. Note that the selected tunnel will be removed immediately, with no confirmation dialog.
For more information on local tunnels, see Local Tunnels.
Remote (incoming) tunnels protect TCP connections that the remote host forwards from a specified remote port to the specified port on your local computer.
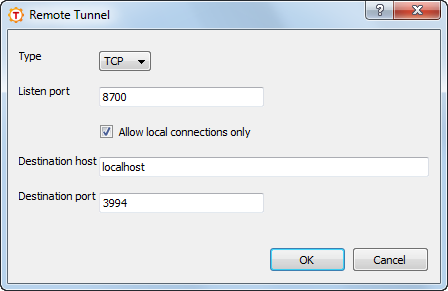
Click the Remote tunnels tab to edit incoming tunnel definitions. Click Add to open the Remote Tunnel dialog box.
The following fields are used to define a remote tunnel:
Type: Select the type of the tunnel from the drop-down list. Valid choices are TCP and FTP. For more information on FTP tunneling, see Non-Transparent FTP Tunneling.
Listen port: Enter the port that the tunnel listens to or captures from the remote host computer.
| Note |
|---|---|
Privileged ports (below 1024) can be forwarded only when logging in with root privileges on the remote host computer. |
Destination host: Define the destination host for the port forwarding. The default value is localhost.
| Note |
|---|---|
Here localhost refers to your local computer. Also note that if the connection from the remote host computer is forwarded beyond your local computer, that connection is unsecured. |
Destination port: Define the port that is used for the forwarded connection on the destination host.
To edit a tunnel definition, select a tunnel from the list and click Edit. The Remote Tunnel dialog opens.
To delete a tunnel definition, select a tunnel from the list and click Delete to remove a tunnel. Note that the selected tunnel will be removed immediately, with no confirmation dialog.
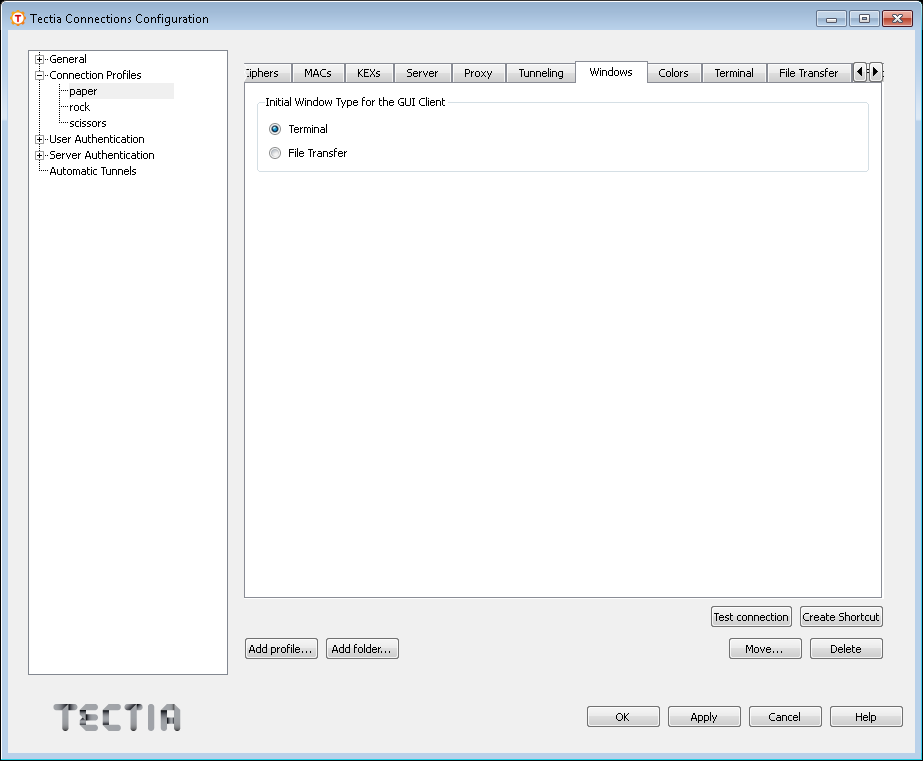
The type of the Tectia window that is opened initially is configured using the Windows tab. The selected GUI version, Tectia SSH Terminal GUI or Tectia Secure File Transfer GUI, will be opened first when this profile is accessed.
| Note |
|---|---|
When a profile is added from the Tectia Connections Configuration GUI using the Add Profile option, the initial window type of the new profile is automatically set to be the same as in the current GUI view. |
The colors used in the Tectia SSH Terminal GUI can be selected using the Colors page.
The color settings can be defined either globally or per profile. When colors are defined in Tectia terminal Global Settings, the Use Global Colors option is not available, but the color settings will affect all connection profiles. See Selecting Colors.
Use Global Colors: Select this check box if you want to apply the global color settings to this profile. When this check box is selected, you cannot modify the color settings.
The text colors affect the terminal window background color and the color of text in both a connected window and a disconnected window.
Foreground: Select the desired foreground color from the drop-down menu. Foreground color is used for text in a window that has a connection to a remote host computer. You can select from sixteen colors. Black is the default foreground color.
Background: Select the desired background color from the drop-down menu. You can select from sixteen colors. White is the default background color.
Selection: Select the desired background color for mouse-selected texts from the drop-down menu. You can select from sixteen colors. Aquamarine is the default selection color.
Disconnected: Select the desired foreground color for terminal windows that have no connection to a remote host computer. You can select from sixteen colors. Gray is the default foreground color for a disconnected terminal window.
Select the desired cursor color from the drop-down menu. You can select from sixteen colors. Navy is the default cursor color.
With ANSI control codes it is possible to change the color of text in a terminal window. With the ANSI Colors setting you can select to use this feature. Even if you disable ANSI colors, you can still select your favorite text and background colors to be used in the terminal window.
Select the Enable ANSI Colors check box to allow ANSI colors to be used in the terminal window. By default, ANSI colors are selected.
By reversing the display colors you can quickly change the display from positive (dark on light) to negative (light on dark) to improve visibility.
Select the Reverse Video check box to change the foreground color into background color and vice versa. This setting affects the whole terminal window when you click OK.
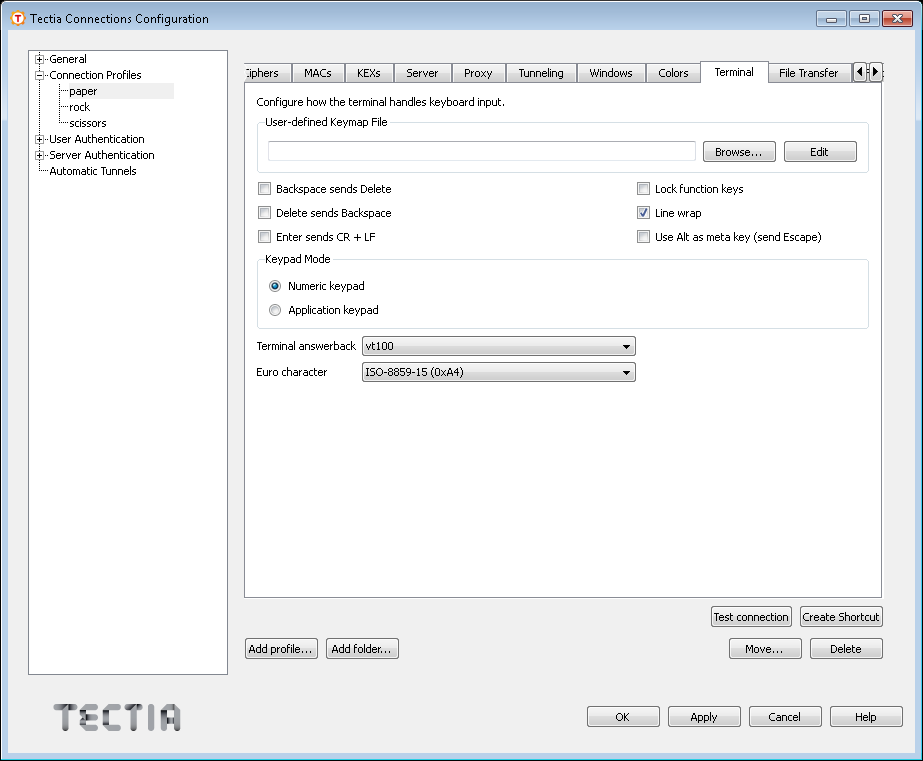
The settings used for the Tectia ConnectSecure terminal are configured using the Terminal tab. Keyboard mappings take effect when you start a new connection or reset the terminal.
Use this option to create additional keyboard shortcuts or to modify
the existing ones. The additional key mappings are saved into a separate
file with the .sshmap file extension. The current keymap file
is displayed in the text field.
You can modify the current key mappings by clicking Edit to open the Keymap Editor dialog.
If you have defined an alternative keymap settings file, you can load it by typing the path and file name in the text field, or by clicking on the button on the right-hand side of the text field. Clicking the button will open an Open dialog that allows you to locate an alternative keymap file.
Select the Backspace sends Delete check box if you want to map the Backspace key to the Delete operation.
Select the Delete Sends Backspace check box if you want to map the Delete key to the Backspace operation.
Select the Enter sends CR + LF check box if you want to map the Enter key to send the carriage return (CR) and line feed (LF) characters. Otherwise only the line feed character will be sent.
Select the Lock Function Keys check box if you want to lock the function keys.
Select the Line Wrap check box if you want the text lines to wrap at the terminal window edge. By default, line wrapping is on.
Select the Use Alt as meta key (send Escape) check box if you want the Alt key to function as the meta key in the same way as the Escape key. If this option is selected, you can for example press the Alt+X key combination to simulate the Escape followed by X.
Select how you want the numeric keypad on the right-hand side of the regular keyboard to function.
Select Numeric Keypad to use the keypad to enter numbers.
Select Application Keypad to use the keypad for application control (with the keypad keys functioning as cursor keys, Home, End, Page Up, Page Down, Insert and Delete).
Use the Terminal answerback drop-down list to select the same terminal answerback mode that is used by the Tectia Server related to the profile.
Use the Euro character drop-down list to select the support mode for the euro character (€).
The supported options are Windows (where euro is mapped as 0x80) and ISO 8859-15 (euro mapped as 0xA4). Select the same character set that is used by the Tectia Server related to the profile.
Note however that enabling the euro character support will disable the 8-bit terminal control codes.
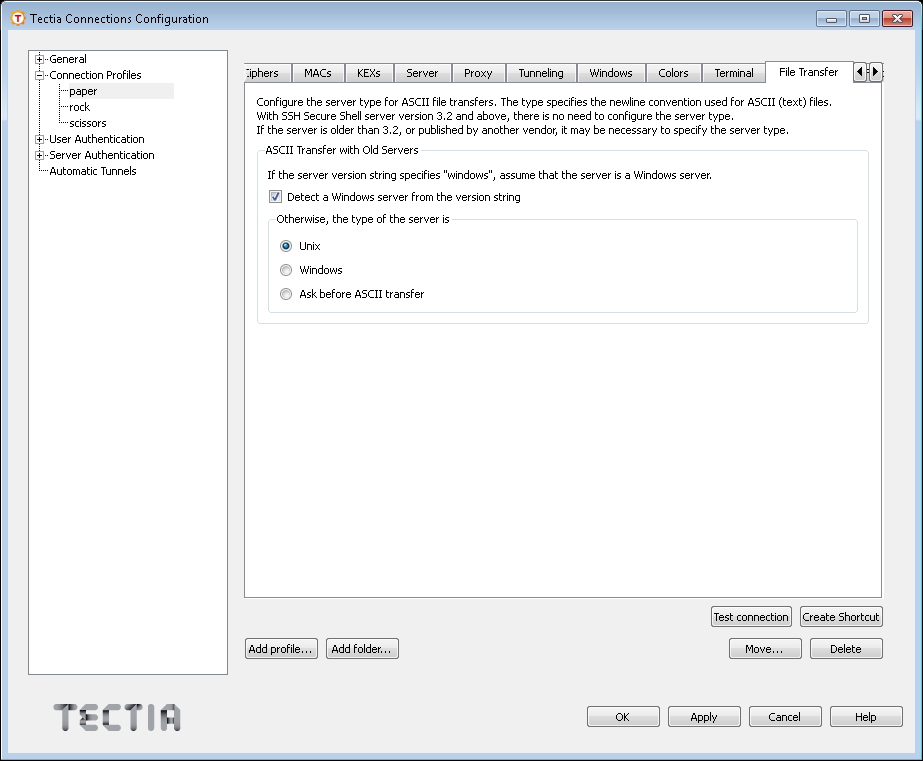
The File Transfer tab defines which files are transferred using ASCII mode and which newline conventions are applied.
Detect Windows server from the version string: Secure Shell client and server exchange version strings when setting up the connection. Select this check box to automatically detect Windows servers and use the correct setting for them. For this feature to work correctly, the Windows server has to specify "windows" in its version string.
Select the Unix check box to use Unix compatible line breaks (LF).
Select the Windows check box to use Windows compatible line breaks (CRLF).
Select the Ask before ASCII transfer check box to make Tectia ConnectSecure ask you to specify the server type before each ASCII file transfer.
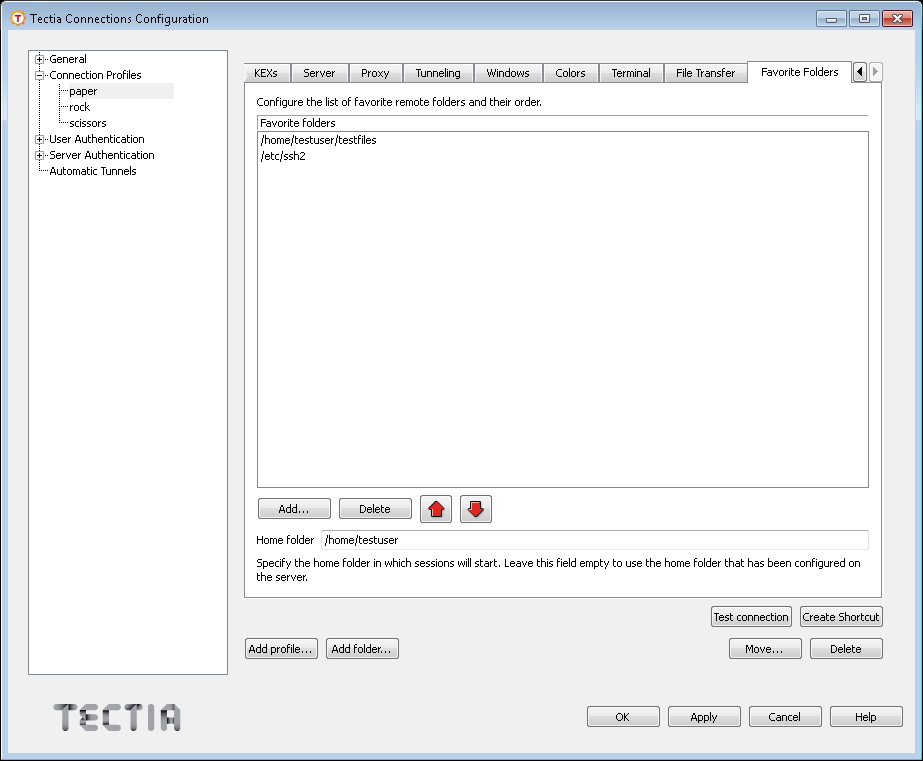
In the Favorites Folders tab, you can create a list of commonly used remote directories. These favorites can then be easily selected from a drop-down menu in the file transfer window.
This list contains the favorite folders you have defined for the current connection profile. You can add, remove, and sort the favorites by using Add, Delete, and the arrow buttons below the list.
If you are defining a remote favorite that is located on a Windows
Secure Shell server, the folder on the Windows server must be specified as
follows: /drive/folder/subfolder.
A valid favorite folder definition would be, for example:
/C/Documents and Settings/All Users/Desktop
In the Home Folder field you can enter the directory where any new SFTP connections associated with this profile will start. If you leave the field empty, new connections will use the remote home folder that has been specified for your user account on the remote host computer.
| |
Copyright  2012 Tectia Corporation
This software is protected by international copyright laws. All rights reserved.
Contact Information