|
     |
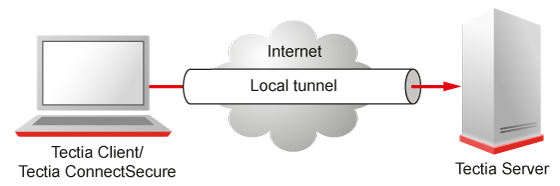
When non-transparent TCP tunneling is used, the application to be tunneled is set to connect to the local listener port instead of connecting to the server directly. Tectia client tools for z/OS forwards the connection securely to the remote server.
If you have three hosts, for example, sshclient,
sshserver, and imapserver, and you forward the
traffic coming to the sshclient's port 143 to
the imapserver's port 143, only the connection
between the sshclient and sshserver will be
secured. The command you use would be similar to the following one:
sshclient$ sshg3 -L 143:imapserver:143 username@sshserver
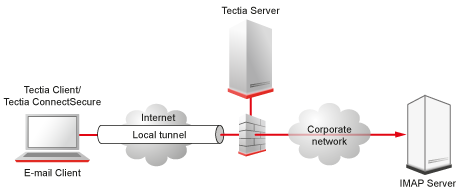
Figure 7.3 shows an example where the Secure Shell server resides in the DMZ network. Connection is encrypted from the Secure Shell client to the Secure Shell server and continues unencrypted in the corporate network to the IMAP server.
Tunnels can also be defined for connection profiles in the Connection Broker configuration file.
The defined tunnels are opened automatically when a connection with the profile is made.
The following is an example from a ssh-broker-config.xml file:
<profile id="id1" host="sshserver.example.com">
...
  <tunnels>
    <local-tunnel type="tcp"
                  listen-port="143"
                  dst-host="imap.example.com"
                  dst-port="143"
                  allow-relay="no" />
  ...
  </tunnels>
</profile>
By default, local tunnels originating only from the client host itself
are allowed. To allow also other machines to connect to the tunnel listener
port, set the allow-relay to yes.
Automatic tunnels are one way of creating non-transparent local tunnels for application connections.
Automatic tunnels always use a connection profile in the tunnel establishing. You can create listeners for local tunnels that will be activated automatically when the Connection Broker starts up. The actual tunnel will be formed the first time a connection is made to the listener port. If the connection to the server is not open at that time, it will be opened automatically as well.
In the Connection Broker configuration file, make the following kind of settings:
<static-tunnels>
  <tunnel type="tcp"
          listen-port="9874"
          dst-host="st.example.com"
          dst-port="9111"
          allow-relay = "no"
          profile="id1" />
</static-tunnels>
When sshg3 is used to create secure tunnels using local port forwarding, the TCP applications to be tunneled are configured to connect to a localhost port instead of the application server port.
Example application, clientapp1, by default connects to a Unix
server unix.example.com using TCP port 2345.
$ clientapp1 --username user1 --server unix.example.com --port 2345
For securing this TCP application using Secure Shell, use the following commands:
$ sshg3 -L 2345:localhost:2345 user1@unix.example.com -S -f &
$ clientapp1 --username user1 --server localhost --port 2345
The above sshg3 command connects to remote Secure Shell server
unix.example.com, creates a local listener on port 2345,
instructs the remote Secure Shell server to forward the incoming traffic
to localhost:2345, and goes to background in single-shot-mode.
| |
Copyright  2011 Tectia Corporation
This software is protected by international copyright laws. All rights reserved.
Contact Information