|
     |
On the Services page you can set restrictions on the services (e.g. terminal, tunneling, SFTP) that the server provides to users.
The selectors define which users a service rule applies to. The order of the rules is important. The first matching rule is used and the remaining rules are ignored.
If no selectors (or only empty selectors) are specified in a service rule, the rule
matches all users. The last rule should always be the (default) rule, with no
selectors. This rule is used for all users that do not match any previous rule. In the
simple GUI mode, there is only the default rule and it is used for all connections.
If the user was already put to a services group during authentication (using Set Services group), the selectors on the Services page are not checked but the corresponding service rule is automatically used.
To add a new service rule, click the Add button below the tree view. Each rule will have a sub-page with eight tabs. On the Selectors tab, you can edit the selectors of the rule, and on the other tabs, you can configure the allowed services for the rule.
To edit a service rule, select a services item on the tree view. For more information, see Editing Services Items.
To change the order of the rules, select a services item on the tree view and use the
Up and Down buttons. The rules are read in order,
and the first matching service rule on the list is used. The last rule should always be the
(default) rule, with no selectors.
To delete a service rule, select a services item and click Delete.
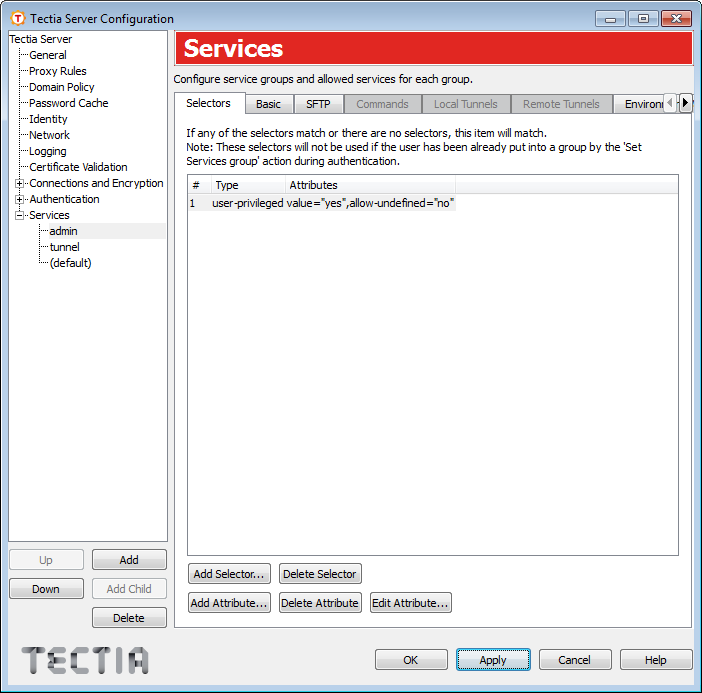
Each item under Services has eight tabs, Selectors, Basic, SFTP, Commands, Local Tunnels, Remote Tunnels, Environment Variables, and Subsystems. Depending on the settings made some of the tabs may be disabled.
On the Selectors tab, you can configure the selectors that apply to the service rule.
The selector list view shows the selectors that apply to the rule.
To add a new selector to the rule, click Add Selector. The new selector will contain automatically at least one attribute. The Add Selector dialog box opens allowing you to specify the selector type. For more information on the different selector attributes, see Editing Selectors.
To remove a selector, choose the selector from the list view on the Selectors tab and click Delete Selector. This will delete the selector and all its attributes.
To add a new attribute to a selector, choose a selector from the list and click Add Attribute. The Add Selector dialog box opens. For more information on the different selector attributes, see Editing Selectors.
To edit a selector attribute, choose the attribute from the list and click Edit Attribute. The relevant selector dialog box opens. For more information on the different selector attributes, see Editing Selectors.
To remove a selector attribute, choose the attribute from the list and click Delete Attribute. Note that a selector with no attributes will match everything.
On the Basic tab, you can control the basic settings of the service rule.
To make the rule the default rule, select the Default check box. Only one of the rules can be the default rule. The default rule does not have selectors or a name.
The initial default rule allows all users access to all services. The default rule should be kept as the last rule, so it will apply to users that are not matched by any other rule. You should edit the rule according to your security policy.
For other rules than the default, enter the Name of the rule.
The Idle timeout field sets the idle timeout limit in seconds. If
the connection (all channels) has been idle this long, the connection is closed. The
default is 0 (zero), which disables idle timeouts.
The Terminal setting defines whether terminal access is allowed or denied for the users.
To allow terminal in all situations, select Allow.
To allow terminal conditionally, select Allow, if forced command is not set. If this option is selected and a forced command is defined in the configuration file or in an authorization file, the forced command is run instead of giving the terminal. However, if no forced commands are defined, the user can get terminal normally. See Commands and the section called “Authorization File Options”.
To deny terminal in all situations, select Deny.
If terminal access is denied, also shell commands are denied, unless commands are explicitly allowed or set as forced under Commands.
This setting defines whether remote commands are allowed.
To allow all remote commands, select Allow all.
To deny all remote commands, select Deny all.
To customize remote commands, select Customize. You can specify the allowed or forced commands on the Commands tab. See Commands.
This setting defines whether local tunnels are allowed.
To allow all local tunnels, select Allow all.
To deny all local tunnels, select Deny all.
To customize local tunnels, select Customize. You can specify the allowed and denied tunnels on the Local Tunnels tab.
This setting defines whether remote tunnels are allowed.
To allow all remote tunnels, select Allow all.
To deny all remote tunnels, select Deny all.
To customize remote tunnels, select Customize. You can specify the allowed and denied tunnels on the Remote Tunnels tab.
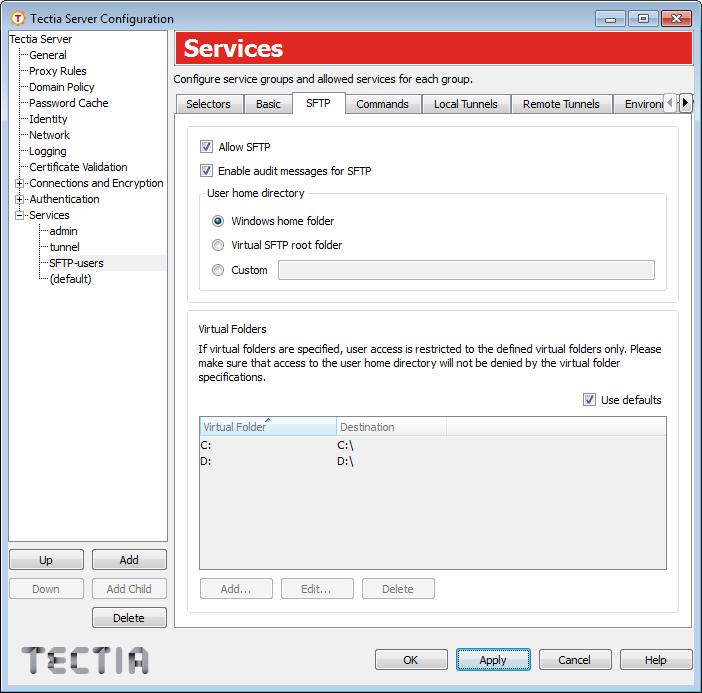
On the SFTP tab, you can allow and deny SFTP for users and set limitations on the folders accessible via SFTP and SCP2.
Select the Allow SFTP check box to allow SFTP for the users. Clear the check box to deny it.
![[Note]](images/note.gif) | Note |
|---|---|
Denying SFTP denies both SFTP and SCP2 operations to the server, but it does not deny OpenSSH-style SCP operations. To deny OpenSSH SCP, you should restrict remote commands. See Basic. |
This setting defines whether all SFTP server's audit messages are recorded in the system log. By default, all audit messages go to the system log.
On a busy Tectia Server, the system log can grow very rapidly if all audit messages are included in the system log; this configuration option makes it possible to reduce the system log growth rate.
If the check box is cleared, no audit messages from the SFTP server are recorded into the system log.
This setting defines the directory where the user's SFTP session starts and
which is the default target for the SCP2 operations (by default Windows
home folder, %USERPROFILE%). The location of the
home directory must be under one of the defined virtual folders.
If Virtual SFTP root folder is selected (or if a Custom directory that is denied by the virtual folder settings is specified), the session will start in the virtual SFTP root folder. See Defining SFTP Virtual Folders (Windows) for more information.
| Note |
|---|---|
The virtual SFTP root folder is not an actual directory on disk and no files can be written there. |
Virtual folders can be used to restrict the folders the user is able to access via SFTP and SCP2.
If the Use defaults check box is selected, all local drive letters are used as defaults. This means that the user can access all drives via SFTP and SCP2.
If any virtual folders are explicitly defined in the configuration, the default drive letters are not used. If you still want to use the drive letters, they need to be defined separately as virtual folders. For more information, see Defining SFTP Virtual Folders (Windows).
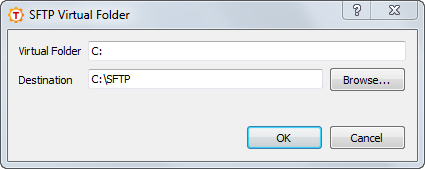
To define a custom virtual folder:
Clear the Use defaults check box.
Click Add. The SFTP Virtual Folder dialog box opens.
Enter the Virtual Folder name.
To browse for the Destination, click the Browse button. A Select Folder dialog appears, allowing you to specify the desired destination folder. You can also type the path directly into the text field.
Click OK.
| Note |
|---|---|
In case a trailing dollar sign $ is used in the path to the virtual
folder (for example \\server\share$$ |
Figure 4.33 shows an example of a virtual
folder setting. The user will see a virtual folder C: under the SFTP
root folder. When the user changes directory to C:, he is actually
directed to C:\SFTP.
To edit a virtual folder, select the folder from the list and click Edit.
To delete a virtual folder, select the folder from the list and click Delete.
| Note |
|---|---|
If you delete all virtual folders, the configuration will revert back to the default settings (drive letters are available as virtual folders). |
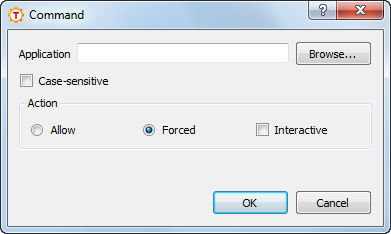
On the Commands tab, you can define specific shell commands as allowed or forced. To deny all commands, select Deny all on the Basic tab.
To add a command rule:
Click Add. The Command dialog box opens.
Select the Application and Action for the rule.
If the Allow action is set, running the specified application(s) is allowed. All other applications are implicitly denied.
If no application is given for the Allow action, all commands are allowed. This is equal to selecting Allow all on the Basic tab.
If the Forced action is set, the specified application is run automatically when the user logs in. All other applications are implicitly denied. When you set the Forced action, it is possible to set the Interactive option on. If the application that is run as forced requires user interaction, set the Interactive option on. If the application does not require user interaction, leave the option unchecked. The option is available on Windows only. If you set a forced command, you should also deny terminal. Otherwise, users can request terminal normally, in which case the forced command is not run.
Users can also define forced commands for public keys in their
authorization files. However, if a command is defined in the Tectia Server
configuration, it overrides any commands in the authorization files. For more
information, see the section called “Authorization File Options”.
Applications are normally matched case-insensitively. Select the Case-sensitive check box to match the application case-sensitively.
Click OK when finished.
To edit a command rule, select the rule from the list and click Edit.
To delete a command rule, select the rule from the list and click Delete.
| Note |
|---|---|
Support for legacy OpenSSH SCP in Tectia Server is implemented using a command called scp1-compat-srv. When a client uses OpenSSH SCP to connect to Tectia Server, the server invokes this command. Restrictions on remote commands apply also to OpenSSH-style SCP operations to the server. |
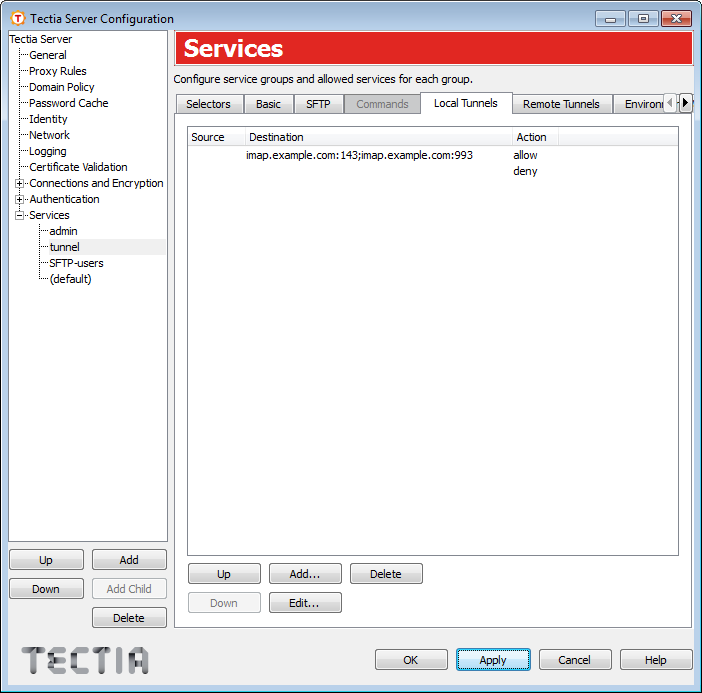
On the Local Tunnels tab, you can define rules for local TCP tunnels (port forwarding). You can add several allow and deny rules with different address and port attributes. When a user attempts tunneling, the rules are read in order and the first matching rule is used.
For more information on local tunnels, see Local Tunnels.
To add a tunneling rule:
Click Add. The Local Tunnel dialog box opens.
Select the tunneling Action (Allow or Deny).
If you define no other settings, the rule will match all tunneling requests.
To define additional source and destination restrictions for the rule, click Add. The Tunnel Definition dialog box opens.
Select whether the definition is for the Source or Destination.
The Address (IP or FQDN) can be given for the Source definition.
The Address (IP or FQDN) and the Port can be given for the Destination definition.
The Address can be in one of the following formats:
a single IP address x.x.x.x
an IP address range of the form x.x.x.x-y.y.y.y
an IP sub-network mask of the form x.x.x.x/y
The Fully Qualified Domain Name can include a comma-separated list of FQDN patterns (case-insensitive). These patterns may also contain "*" and "?" globbing characters. The form of the pattern is not checked.
The Port can be either a single port or a port range.
Click OK to create the definition and return to the Local Tunnel dialog box.
You can add several definitions to the rule.
To edit a definition, select the definition from the list and click Edit.
To delete a definition, select the definition from the list and click Delete.
Click OK to create the tunneling rule.
To edit a tunneling rule, select the rule from the list and click Edit.
To delete a tunneling rule, select the rule from the list and click Delete.
To change the order of the rules, select a rule from the list, and click Up and Down to move it. The rules are read in order and the first matching rule is used.
On the Remote Tunnels tab, you can define rules for remote TCP tunnels (port forwarding). You can add several allow and deny rules with different address and port attributes. When a user attempts tunneling, the rules are read in order and the first matching rule is used.
For more information on remote tunnels, see Remote Tunnels.
To add a tunneling rule:
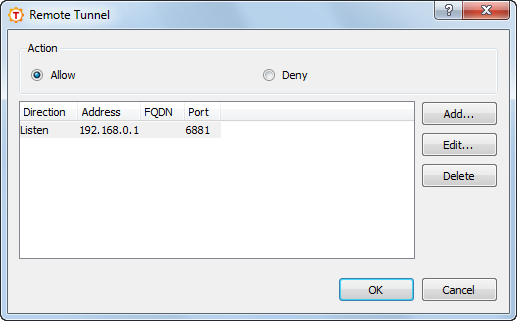
Click Add. The Remote Tunnel dialog box opens.
Select the tunneling Action (Allow or Deny).
If you define no other settings, the rule will match all tunneling requests.
To define additional source and listen restrictions for the rule, click Add. The Tunnel Definition dialog box opens.
Select whether the definition is for the Source or Listen.
The Address (IP or FQDN) can be given for the Source definition.
The Address (IP) and the Port can be given for the Listen definition.
The Address can be in one of the following formats:
a single IP address x.x.x.x
an IP address range of the form x.x.x.x-y.y.y.y
an IP sub-network mask of the form x.x.x.x/y
The Fully Qualified Domain Name can include a comma-separated list of FQDN patterns (case-insensitive). These patterns may also contain "*" and "?" globbing characters. The form of the pattern is not checked.
The Port can be either a single port or a port range.
Click OK to create the definition and return to the Remote Tunnel dialog box.
You can add several definitions to the rule.
To edit a definition, select the definition from the list and click Edit.
To delete a definition, select the definition from the list and click Delete.
Click OK to create the tunneling rule.
To edit a tunneling rule, select the rule from the list and click Edit.
To delete a tunneling rule, select the rule from the list and click Delete.
To change the order of the rules, select a rule from the list, and click Up and Down to move it. The rules are read in order and the first matching rule is used.
On the Environment Variables tab, you can define the environment variables the users can set on the client side.
To add variables as allowed, enter the variables in the Environment Variable field as a comma-separated list.
Allowed variables are normally matched case-insensitively. Enter the variables in the Environment Variable (case-sensitive) field to match the variables case-sensitively.
If any variables are set as allowed, all other variables are implicitly denied. Do
not use * (asterisk), as it will allow any and all
variables, and that can be a security risk.
On the Subsystems tab, you can define other subsystems (other than SFTP) as allowed or denied. The most commonly used subsystem, SFTP, can be allowed and denied directly from the SFTP tab.
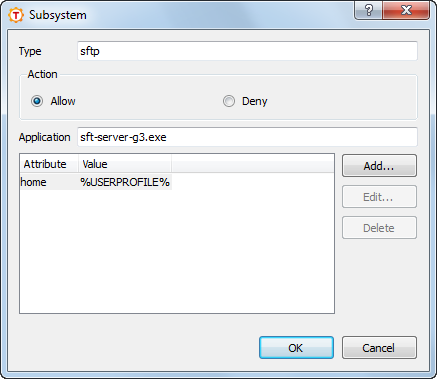
To add a subsystem, click Add. Enter the subsystem Type and select whether to Allow or Deny the subsystem. Define also the Application which is the the executable of the subsystem.
The subsystem can contain several attributes. To add an attribute, click Add. Enter the Attribute and its Value and click OK.
The attributes can be used, for example, on Windows platforms to set the user home directory and virtual folders for SFTP, as in the example screen above.
To edit an attribute, select an attribute and click Edit.
To remove an attribute, select an attribute and click Delete.
| |
Copyright  2016 SSH Communications Security Corporation
This software is protected by international copyright laws. All rights reserved.
Contact Information