|
     |
Automatic tunnels are pre-configured secure connections to servers and the connections are opened automatically when Tectia Client starts up (usually when the session is started). The actual tunnel is formed the first time an application connects to the listener port. If the connection to the server is not open at that time, it will be opened automatically as well.
Automatic tunneling requires settings on Tectia Client and on the application. For instructions on defining the automatic tunnels on Tectia Client, see Settings in Tectia Client.
For instructions on defining the automatic tunnels on the application to be tunneled, see Settings in the Tunneled Application.
Automatic tunnels are configured with the Tectia Connections Configuration GUI.
Open the tool from the Windows taskbar notification area by right-clicking the
Tectia icon  and selecting Configuration.
Select Automatic Tunnels in the tree menu and click Add to open the Automatic Tunnel dialog box.
Fill in the fields as follows:
Type: Select the type of the tunnel from the drop-down list. Available types are TCP and FTP.
Listen port: Define the number of a local port that Tectia Client listens to and that the applications connect to. Do not use a reserved port number.
![[Note]](images/note.gif) | Note |
|---|---|
The protocol or application for which you wish to create the tunnel may have a fixed port number (for example, 143 for IMAP and 25 for SMTP) that it needs to use to connect successfully. Other protocols or applications may require an offset (for example, 5900 for VNC) that you will have to take into account. |
Allow local connections only: Leave this option selected if you want to allow only local connections to be made. This means that other computers will not be able to use the tunnel you created. By default, only local connections are allowed. This is the right choice for most situations. You should carefully consider the security implications if you decide to also allow outside connections.
Destination host: This field defines the destination host for the tunnel.
| Note |
|---|---|
The destination host address is resolved after the Secure Shell connection has
been established, so here |
Destination port: The destination port defines the port to which the tunneled connection is made on the destination host.
Tunnel using profile: Select a connection profile through which the tunnel will be created. See Creating Connection Profiles for instructions on creating connection profiles.
To edit an automatic tunnel, select the tunnel from the list and click Edit.
To delete an automatic tunnel, select the tunnel from the list and click Delete.
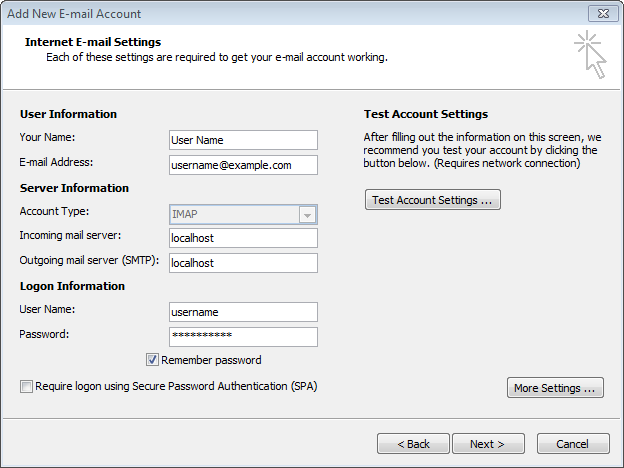
The application (for example, an IMAP and SMTP e-mail, such as Microsoft Outlook) must be configured to connect
to the localhost port instead of the application server port.
Figure 6.3 shows an example of e-mail account settings in Microsoft Outlook 2007.
When the tunneled application connects to the localhost port, the
connection is forwarded in encrypted format to Tectia Server, and from there unencrypted to the
application server.
| |