|
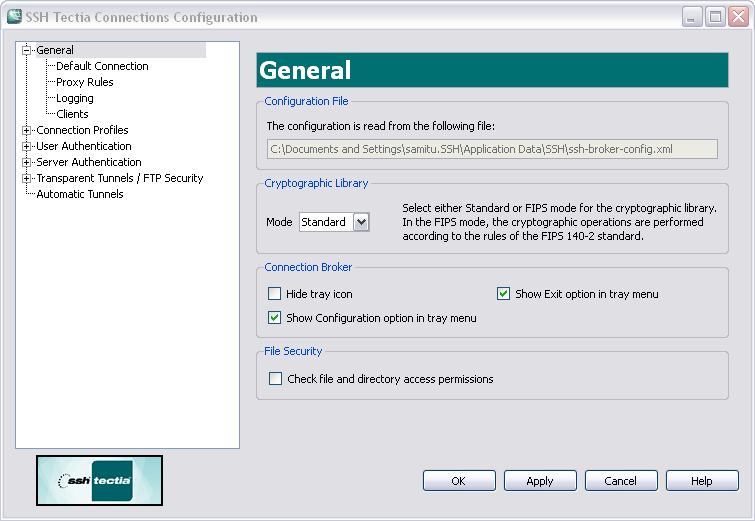
On the General page, you can select the cryptographic library to be used and define the SSH Tectia tray icon settings.
Shows the location of the user-specific Broker configuration file. The default location is
"%APPDATA%\SSH\ssh-broker-config.xml".
Each time the configuration file is saved, a backup of the old configuration is stored in
"%APPDATA%\SSH\ssh-broker-config-backup.xml".
SSH Tectia Client can be operated in FIPS mode, using a version of the cryptographic library that has been validated according to the Federal Information Processing Standard (FIPS) 140-2. In this mode, the cryptographic operations are performed according to the rules of the FIPS 140-2 standard.
Select whether to use the Standard or the FIPS 140-2 certified version of the cryptographic library.
![[Note]](images/note.gif) | Note |
|---|---|
Setting the FIPS mode does not prevent using algorithms from crypto plugins. For example, CryptiCore can be used even when the main crypto library is set in the FIPS mode. To enforce that only FIPS-compliant algorithms are used, disable the non-FIPS algorithms from the configuration. For the default settings, see Defining Ciphers, Defining MACs, and for the profile-specific settings, see Defining Ciphers, and Defining MACs. |
Select whether to hide the SSH Tectia tray icon from the Windows task bar, and whether to show the Exit and Configuration options in the shortcut menu.
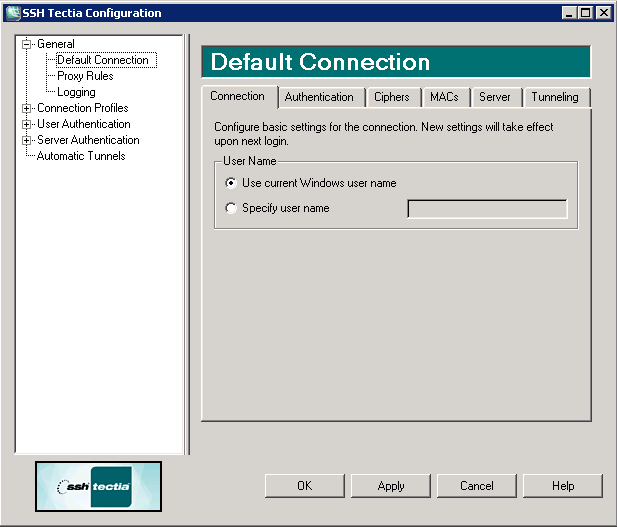
The Default Connection page allows you to edit the default settings for a user name (Defining Connection Settings), authentication (Defining Authentication), ciphers (Defining Ciphers), MACs (Defining MACs), server connections (Defining Server Connections), and tunneling (Defining Default Tunneling Settings). and
Newly created connection profiles will inherit the default settings defined here. The values can be customized on the profile-specific tabbed pages and they override the default settings. See Defining Authentication, Defining Ciphers, Defining MACs, and Defining Server Connections.
On the Connection tab, you can define a default user name to be used when connecting to remote servers. This connection is useful when several users will be using profiles jointly, either with their own system user names or with a common user account.
Select the Use current Windows user name option, to automatically apply the Windows user name of the currently logged in user to connections to remote servers.
Select the Specify user name option and enter a generic user name. Note that the name is case sensitive.
The given user name will be used in connections unless another user name is specified in a connection profile or connection attempt. In case you select this option but leave the user name field empty, the Connection Broker will prompt the user for a user name.
In principle, you can enter value "%USERNAME%", but
it has the same effect as selecting Use current Windows user
name.
Settings made in this tab take effect the next time a user logs in.
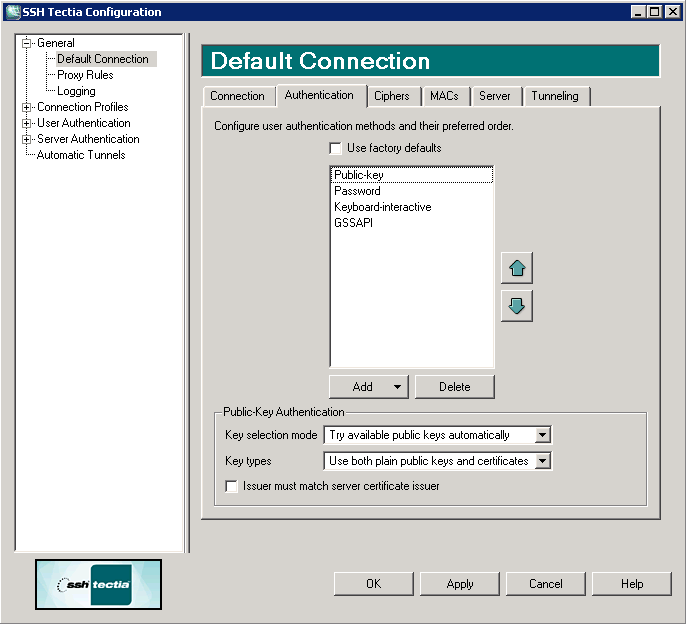
On the Authentication tab, you can define the default user authentication methods.
Select the Use factory defaults check box to use the factory default authentication methods, or clear the check box to define a custom list of authentication methods.
In SSH Tectia Client 6.1, the factory default authentication methods are, in order:
Public-key
Password
Keyboard-interactive
GSSAPI
To add a new authentication method to the list, click Add and select the method from the drop-down menu.
To remove an authentication method, select the method from the list and click Delete.
Use the arrow buttons to organize the preferred order of the authentication methods. The first method that is allowed by the Secure Shell server is used. Note that in some cases, the server may require several authentication methods to be passed before allowing login.
Possible methods for user authentication are:
Password: Users are requested to enter a password for authentication.
Public-key: Users are requested to use public-key authentication. See also Defining User Authentication.
In the Public-key Authentication field, with setting Key selection mode you can define whether the public key is selected automatically or by the user. With the Key types setting you can select whether only certificates or plain public keys or both will be used to authenticate the user. By default, SSH Tectia Client tries all public keys automatically.
To generate new public-key pairs and to upload the public part of the key to a server, click the Public-Key Authentication Wizard button.
Keyboard-interactive: Keyboard-interactive is designed to allow the Secure Shell client to support several different types of authentication methods, including RSA SecurID, and PAM. For more information on keyboard-interactive, see User Authentication with Keyboard-Interactive.
GSSAPI: GSSAPI (Generic Security Service Application Programming Interface) is a common security service interface that allows different security mechanisms to be used via one interface. For more information on GSSAPI, see User Authentication with GSSAPI.
When using public-key authentication, you can also define which key types are used and how the keys are selected.
Key selection mode defines the policy Connection Broker uses when proposing user public keys to the server. Select the mode from the dropdown list. The options are:
Try available public keys automatically (the default). With this policy, the client will try the keys in the following order:
Keys with public key available and private key without a passphrase (no user interaction)
Keys with public key available but private key behind a passphrase (require a passphrase query, provided the key is accepted by the server)
The rest of the keys, meaning keys that require a passphrase for the public key as well as the private key.
Prompt user to select the public key - with this policy, the Connection Broker prompts the user to select the key from a list of available keys. If authentication with the selected key fails, the client will prompt the user again to select another key.
Key types defines whether only plain public keys or only certificates are tried during public-key authentication. Select the key type from the dropdown list. The default is to try both plain public keys and certificates.
By selecting Issuer must match server certificate issuer, you can make the Connection Broker filter the user certificates that will be included in the list presented to the user. The client-side user certificates can be filtered according to their issuer name that is compared to the certificate issuers requested or accepted by the server. By default, the filtering is not done. This option is useful when a user has several certificates with different access rights to the same server, for example for a testing role and for an administrator role. The Connection Broker chooses the relevant certificates that are applicable on the remote host, and the user can choose the correct certificate from the short-listed ones.
On the Ciphers tab, you can define the encryption algorithms used.
Select the Use factory defaults check box to use the factory default algorithms, or define a cipher list using the arrow buttons. The ciphers are tried in the order they are specified.
The factory default ciphers are, in order:
CryptiCore
AES-128-CBC
AES-192-CBC
AES-256-CBC
AES-128-CTR
AES-192-CTR
AES-256-CTR
3DES
SEED
The ciphers that can operate in the FIPS mode are 3DES and the CBC-mode AES-128, AES-192, and AES-256. (The counter mode AES ciphers are not available in FIPS mode.)
On the MACs tab, you can configure the message integrity algorithms used.
Select the Use factory defaults check box to use the factory default algorithms, or define a MAC list using the arrow buttons. The MACs are tried in the order they are specified.
The factory default MACs are, in order:
CryptiCore
HMAC-MD5
HMAC-SHA1
The HMAC-SHA1 algorithm can operate in the FIPS mode.
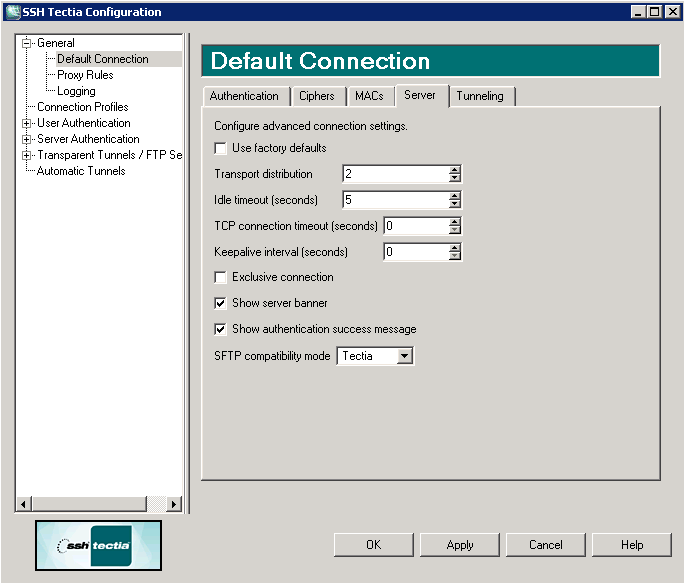
On the Server tab, you can define advanced server connection settings.
Select the check box to use the default values for the server connection settings.
Specify how long idle time (after all connection channels are closed) is allowed for a connection before automatically closing the connection. The default is 5 seconds. Setting a longer time allows the connection to the server to remain open even after a session (for example, SSH Tectia terminal GUI) is closed. During this time, a new session to the server can be initiated without re-authentication. Setting the time to 0 (zero) terminates the connection immediately when the last channel to the server is closed.
Specify for how long a TCP connection will be attempted to a Secure Shell server. Define the timeout in seconds, and after that time the TCP connection will be released in case the remote server is down or unreachable. Setting the value as 0 (zero) means this SSH Tectia setting is disabled and the system default TCP timeout will be used. By default, the system timeout is used.
Specify an interval (in seconds) for sending keepalive messages to a Secure Shell server. The default is 0, meaning that no keepalive messages are sent.
Select this check box if you want always a new connection opened, instead of reusing a currently open connection.
Select this check box if you want to have the server banner message file (if it exists) visible to users before login.
Unselect this check box if you do not want to have the
AuthenticationSuccessMsg messages output and logged.
By default the messages are enabled.
Select a suitable mode for transferring files with SFTP. This setting
affects the behaviour of the get/mget/sget and
put/mput/sput commands and the recursion level used by the
sftpg3 client. The following options are
available:
tectia (the default) -
sftpg3 transfers files recursively from the current
directory and all its subdirectories.
ftp - the get/put commands
are executed as sget/sput meaning that they transfer a
single file, and no subdirectories are copied.
openssh - copies only regular files and
symbolic links from the specified directory, and no subdirectories are copied.
Otherwise the semantics of the `get' command is unchanged.
The recursion depth can be overridden by using the sftpg3
client's commands get/put/mget/mput with command-line
option --max-depth="LEVEL". For more information, see
sftpg3(1).
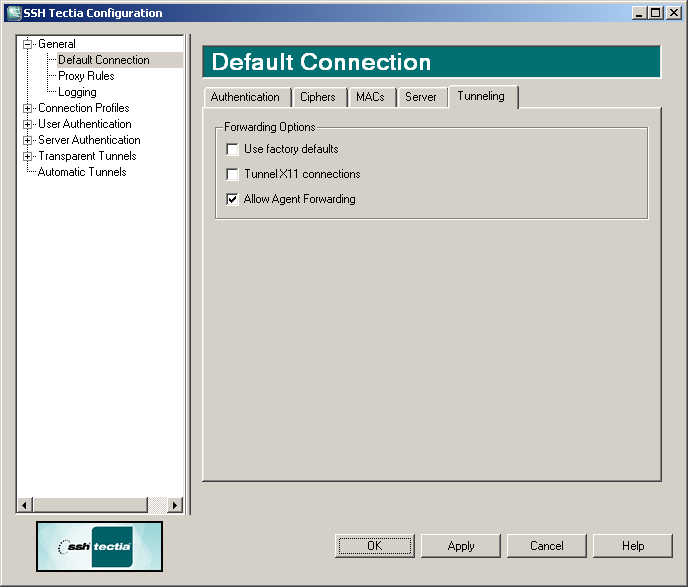
On the Tunneling tab, you can define the default settings for X11 connections and agent forwarding (tunneling). The defaults are applied to new connection profiles and to those connection profiles that do not have their own tunneling settings defined.
Select the Use factory defaults check box to apply the factory defaults for X11 and agent forwarding. According to the factory defaults, X11 forwarding is disabled (off) and agent forwarding is enabled (on).
To allow X11 forwarding on the client side, select the Tunnel X11 connections check box.
To disable agent forwarding on the client side, unselect the Allow Agent Forwarding check box.
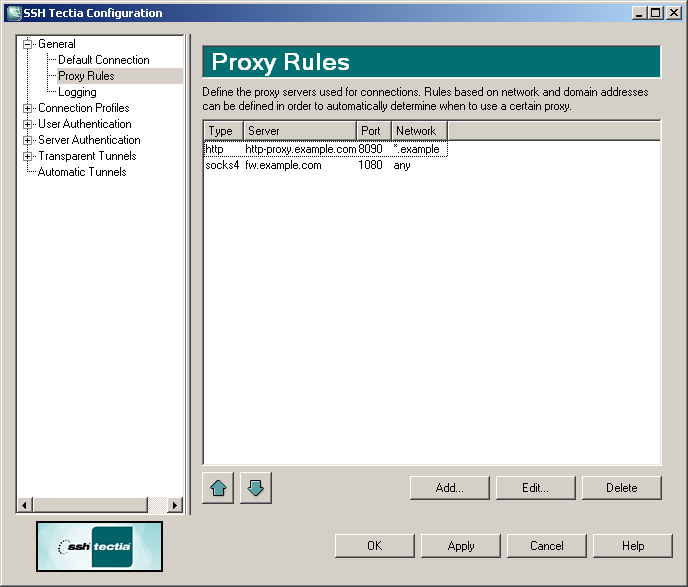
On the Proxy Rules page, you can define proxy rules to be used for connections.
To add a new proxy rule:
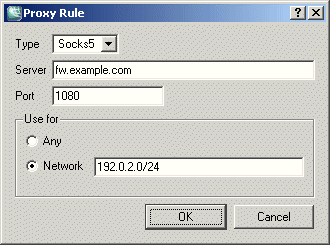
Click Add. The Proxy Rule dialog box opens.
Select the Type of the rule. The type can be Direct (no proxy), Socks4, Socks5, or Http.
For other types than direct, enter the proxy Server address and Port.
Select also whether the proxy rules applies to Any
connection or only to connections to the specified Network.
In the Network field, you can enter one or more
conditions delimited by commas (,). The conditions can specify
IP addresses or DNS names.
The IP address/port conditions have an address pattern and an optional
port range (ip_pattern[:port_range]).
The ip_pattern may have one of the following forms:
a single IP address x.x.x.x
an IP address range of the form x.x.x.x-y.y.y.y
an IP sub-network mask of the form x.x.x.x/y
The DNS name conditions consist of a hostname which may be a regular
expression containing the characters "*" and "?" and a port range
(name_pattern[:port_range]).
Click OK.
To edit a proxy rule, select a rule from the list and click Edit.
To delete a proxy rule, select a rule from the list and click Delete.
The rules are read from top down. Use the arrow button to change the order of the rules.
To use these general proxy rules with a connection profile, you must select to do so in the profile settings. See Defining Proxy Settings.
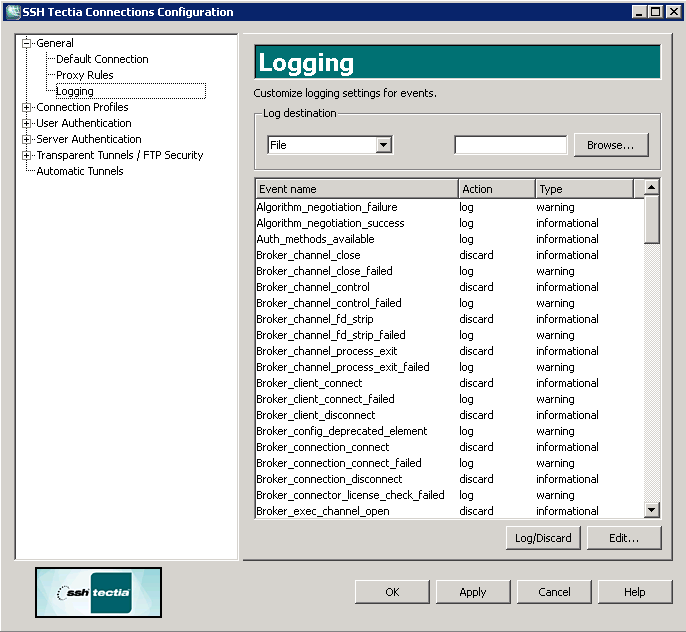
On the Logging page, you can enable logging and customize the information that will be logged in the event log. By default logging is disabled.
To enable logging of SSH Tectia Client internal events, select how the logs will be saved. In the Log Destination field, select File to have the log data saved in to a file named in the field on the right. Enter the exact file name or browse to an existing file. To have the SSH Tectia Client data stored in the hosts Event Log, select Event Log.
Each program-internal event has an associated Action and Type. They have reasonable default values, which are used if no explicit logging settings are made.
The action can be either log or discard.
The event type can be one of the following:
Informational
Warning
Error
Security success
Security failure
For a description of the log events, see Appendix E.
To change whether the event is logged or not, select an event from the list and click Log/Discard. You can select multiple events by holding down the SHIFT or CTRL key while clicking.
To customize the event action and type, select an event from the list
and click Edit. You can select multiple events by holding
down the SHIFT or CTRL key while clicking. The Edit Audit
dialog box opens. Select the Action (log or
discard) and the Type (informational,
warning, error, security-success or security-failure)
for the event and click OK.
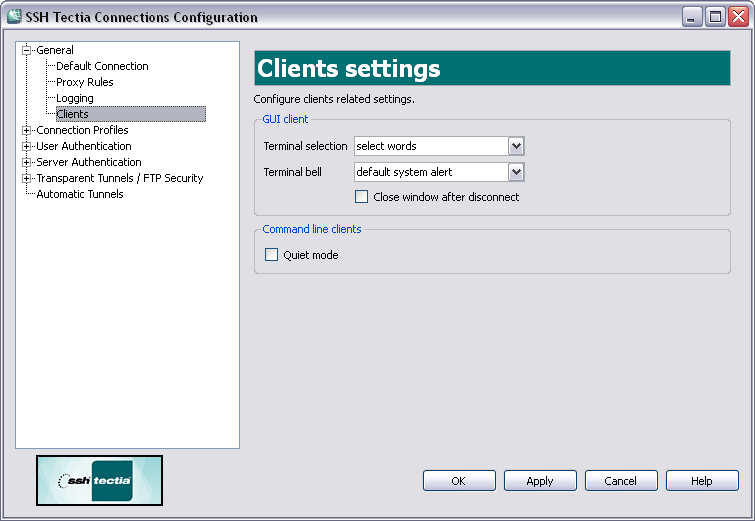
On the Clients settings page, you can define settings related to clients.
Use the Terminal selection option to define how the SSH Tectia terminal behaves when you select text with double-clicks. The options are:
select words (the default) - selects a word at time, and uses space and all punctuation characters as delimiters.
select paths - selects strings of
characters between spaces, meaning a selection is extended over
characters \/.-_ so that, for example, a path to a file can be
selected by double-clicking anywhere in the path.
Use the Terminal bell option to define whether SSH Tectia terminal repeats audible notifications from the destination server. This option is only applied to connections with Unix servers. The options are:
system default alert (the default), sounds the default alerts defined in the system on the destination server
using pc speaker beeps the user's PC speakers
disable mutes all audible notifications.
Select the Close window after disconnect option to
define that also the SSH Tectia terminal window is to be closed while
disconnecting from a server session by pressing CTRL+D. By
default the terminal remains open, and only the server connection is closed.
The Quiet mode setting defines whether the command line clients should suppress warnings, error messages and authentication success messages. The setting affects the command line tools scpg3, sshg3 and sftpg3.
| |
Copyright  2010 SSH Communications Security Corp.
This software is protected by international copyright laws. All rights reserved.
Contact Information