|
This section describes the basic toolbar buttons.
Select File → Save Settings (or Save Settings on the toolbar) to save any changes you have made to your current settings.
Select the Print option to output the contents of the current scrollback buffer to your printer. The standard Windows Print dialog ppears, allowing you to select the printer settings.
The print range can also be selected from this dialog. Selecting All will print the entire contents of the terminal scrollback buffer. If the whole scrollback buffer fills more than one page when printed, a range of pages to print can be selected. If any text is selected when you use the Print option, the default print range will be Selection, which only prints the currently selected text.
You can use the Print Preview option (see Print Preview) to help you to determine which pages to print and what the printout will look like.
![[Note]](images/note.gif) | Note |
|---|---|
If you use a network printer, the area selected for printing is sent unencrypted over the network to the printer. This is a security risk you should consider when printing confidential information. |
The Print option is available only in the terminal window.
Select the Print Preview option to display the entire contents of the terminal scrollback buffer, split into pages in the same way as the scrollback buffer will appear when printed.
The following buttons can be used to preview the print result:
This button opens the Print dialog, allowing you to specify the printer settings and print the result.
Click this button to preview the next page of output. The keyboard
shortcut for Next Page is the Page Down key.
Click this button to preview the previous page of output. The keyboard
shortcut for Prev Page is the Page Up key.
Click this button to display two pages of output side by side. Click the button again to return to the one-page view. This button cannot be used when you have zoomed the page.
Click this button to see a closeup of the currently displayed print preview page. You can use this button to zoom up to the natural size of the printout. You can zoom in also by clicking the left mouse button on the preview view.
Click this button to return from a zoomed-in view of the print preview page. You can zoom out until the whole page is displayed.
Click this button to close the Print Preview dialog. The
dialog can be closed also by pressing the Esc key.
The Print Preview option is available only in the terminal window.
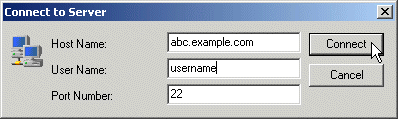
Select the Connect option to connect to a remote host computer. A Connect to Server dialog opens.
For more information on this dialog, see Connecting to a Remote Host.
Select the Disconnect option to quit the current connection. The Confirm Disconnect dialog is displayed, allowing you to confirm if you really want to disconnect. Select Cancel to keep the connection open, or OK to end the connection. If you do not want to answer the confirmation dialog again, select the Don't ask me again check box.
Note that one connection can have several windows open (such as a terminal window and a file transfer window). Disconnecting affects all windows associated with a single connection.
However, if you have started other, separate clients, they are not affected by disconnecting. Disconnecting quits the selected connection and all of its associated windows, but no other, separate connections.
Select the Copy option to create a temporary copy of the selected text or files.
If you are copying text (in the terminal window), the text is placed on the Windows clipboard and can be pasted in the terminal window or any Windows text window.
If you are copying files (in the file transfer window), a Download dialog is displayed, but the selected files are not yet copied to any specific location. This resembles using the Windows clipboard: You can copy files to a temporary storage and paste them later into another location.
You can copy also with the keyboard shortcut
Ctrl+Insert. This shortcut is available in both terminal and
file transfer windows.
Select the Paste option to add previously copied text or files or folders into a new location.
If you are pasting text (in the terminal window), the text that was copied earlier onto the clipboard will be inserted in the cursor location. You can paste text that was copied from the terminal window or any other Windows text window.
If you are pasting files (in the file transfer window), an Upload dialog is displayed when the files are pasted to the new location. This resembles using the Windows clipboard: You can copy files to a temporary storage and paste them later into another location. The file names of the pasted files and folders do not change during the operation. Therefore it is not possible to paste files or folders several times into one location.
You can paste files also by using the keyboard shortcut
Shift+Insert on the keyboard. This shortcut is available in
both terminal and file transfer windows.
Select the Paste Selection option to paste text into the terminal window without first copying anything onto the clipboard. The Paste Selection operation copies whatever is currently selected in the terminal window to the present cursor position. If no text is selected, Paste Selection pastes a single character in the current cursor position.
This function is almost like having two different clipboards available at the same time. The Paste Selection option is especially useful for copying text from the output of previous commands.
The Paste Selection toolbar button is available only in the terminal window.
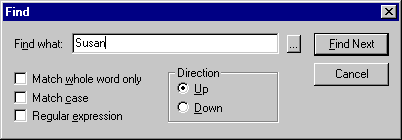
Select the Find option to locate text (or any other characters) from the scrollback buffer. Regular expressions can be used to select characters matching a specific pattern. The Find option is only available in the terminal window.
Up: This option specifies that the search should start backwards from the present position.
Down: This option specifies that the search should start forward from the present position.
Type in the characters that you want to search for in the Find
what field. If you want to use regular expressions to define the
search term, select the Regular expression option,
or select from a list of regular expressions by clicking the ellipsis
button (...) on the right-hand side of the Find what
field.
Click the ellipsis button (...) to select from a list of regular expressions. Using this option will turn on the Regular expression option.
The following regular expression types can be selected:
Any Character
Character in Range
Character not in Range
Beginning of Line
End of Line
Or
0 or More Matches
1 or More Matches
Optional Match
Match exactly n times
Match n or more times
Match at most n times
Match no less than n times and no more than m times
Select this option to limit the search to match only whole words (i.e. so that "wave" would not match "waves").
Select this option to specify that the search result should be case sensitive (i.e. so that "Wave" would not match "wave" or "waVe").
Select this option to specify the search term using regular expressions. This option is automatically selected if you click the ellipsis button (...) on the right-hand side of the Find what field.
Use this option to specify whether the search should start upwards on downwards from the present position in the scrollback buffer.
The direction of the search is relative to the last match found in the current search. If there have been no previous matches, Up will search from the bottom of the buffer upwards, and Down will search downwards from the very beginning of the buffer.
Click this button to find the next match for the search term. Note that the direction in which the search will continue is defined by the Direction option.
Click this button to close the Find dialog.
Select the New Terminal Window option to open a new SSH Tectia Client terminal window. The new window uses the same connections to the remote host computer as the current window, saving you the trouble of typing your password again.
Multiple windows to a single connection allow you to for example debug your code in one window, execute it in another, display reference information in a third one, and read your e-mail in a fourth window.
The sequence number of each window is displayed on the title bar of
the window, next to the remote host computer name. For example, a second
window associated with a connection to a host computer called
remote would be shown as 2:remote.
| Note |
|---|---|
To close any extra windows when you no longer need them, click on the X-shaped close button on the title bar of the window, in the upper right-hand corner of the window. Do not click the Disconnect button or select File → Disconnect, as this would close the connection in all windows associated with this particular connection. |
Select the New File Transfer Window option to open a file transfer window. To make file handling as easy as possible, you can open an unlimited number of file transfer windows.
The sequence number of each window is displayed on the title bar of
the window, next to the remote host computer name. For example, a third
window associated with a connection to a host computer called
remote would be shown as 3:remote.
| Note |
|---|---|
To close any extra windows when you no longer need them, click on the X-shaped close button on the title bar of the window, in the upper right-hand corner of the window. Do not click the Disconnect button or select File → Disconnect, as this would close the connection in all windows associated with this particular connection. |
Click the SSH Tectia Configuration button to edit the connection settings. For more information on the SSH Tectia Configuration dialog, see SSH Tectia Configuration Tool (Windows) .
Click the User Interface Settings button to edit the SSH Tectia Client user interface settings. For more information on the Settings dialog, see Chapter 5.
| |
Copyright  2008 SSH Communications Security Corp.
This software is protected by international copyright laws. All rights reserved.
Contact Information