Local Tunnels
A local (outgoing) tunnel forwards traffic coming to a local port
to a specified remote port.
With sshg3 on the command line, the syntax of the local
tunneling command is the following:
$ sshg3 -L [protocol/][listen-address:]listen-port:dst-host:dst-port server
Setting up local tunneling allocates a listener port on the local
client. Whenever a connection is made to this listener, the connection is
tunneled over Secure Shell to the remote server and another connection is
made from the server to a specified destination host and port. The
connection from the server onwards will not be secure, it is a normal TCP
connection.
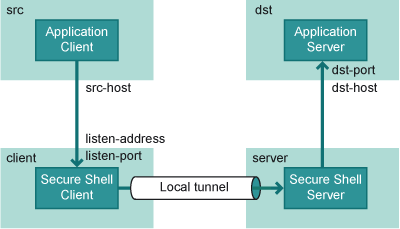
Figure Local tunneling terminology shows the different hosts and ports involved in local port
forwarding.

Figure : Local tunneling terminology
For example, when you issue the following command, all traffic coming to
port 1234 on the client will be forwarded to port 23 on the server. See
Figure Local tunnel.
$ sshg3 -L 1234:localhost:23 username@sshserver

Figure : Simple local (outgoing) tunnel
The forwarding address in the command is resolved at the (remote) end
point of the tunnel. In this case localhost refers to the
server host (sshserver).
If you have three hosts, for example, sshclient,
sshserver, and imapserver, and you forward the traffic
coming to the sshclient port 143 to the imapserver
port 143, only the connection between sshclient and
sshserver will be secured. The command you use would be similar
to the following:
$ sshg3 -L 143:imapserver:143 username@sshserver
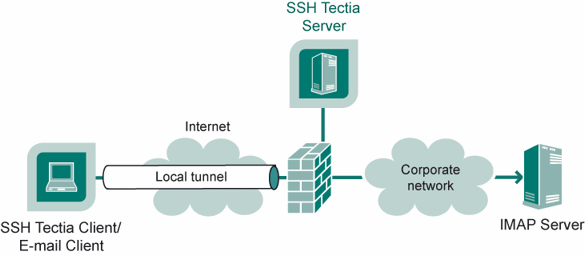
Figure Tunnel to an IMAP server shows an example where the Secure Shell server resides in the
DMZ network. The connection is encrypted from the Secure Shell client to
the Secure Shell server and continues unencrypted in the corporate
network to the IMAP server.

Figure : Local (outgoing) tunnel to an IMAP server
By default, the server allows local tunnels to all addresses for all users.
To restrict tunneling for all or for specified users, see Section Securing Tunneling.