|
     |
You can connect to a remote host by using PrivX Desktop as follows:
Open the Tectia Client GUI for example by clicking the PrivX Desktop icon on your desktop.
PrivX Desktop offers several ways to open a Secure Shell connection:
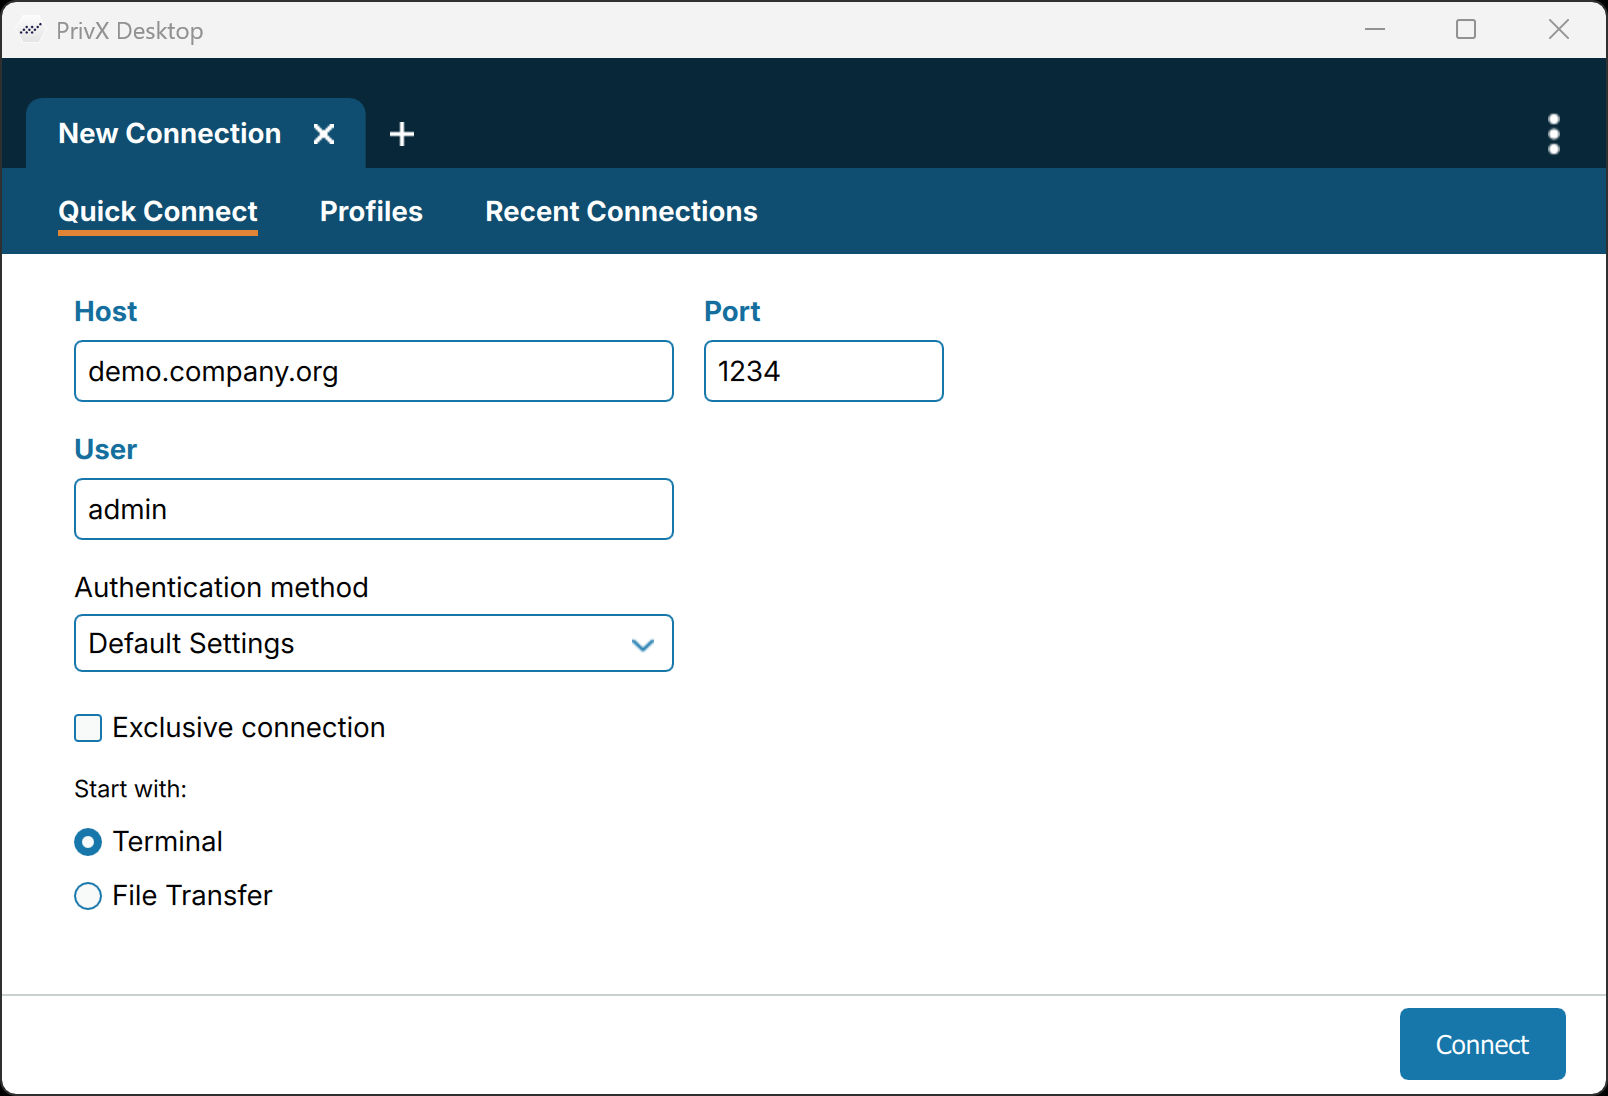
On Quick Connect page you can provide host name or profile name and change the most common connection settings for this connection without editing the profile.
If you already have an ongoing session, open a New Connection in a new tab by clicking the + button. You can connect to a new remote host computer and still keep the old connection to a different host open.
If earlier session has been disconnected, you can open a new session by pressing Enter or Space on the keyboard when the (still disconnected) terminal or file transfer window is active.
If you or the administrator has defined connection profiles, you can also connect from
Profiles page of the New Connection tab
by clicking the profile tile. From the alternate profile tile menu
you can choose to Open Terminal or Open File Transfer initially
instead of the default channel type.
In this case, the settings defined in the profile (hostname, port, user name etc.) are automatically used for the connection.
On Recent Connections page of the New Connection tab, you can quickly reopen connections to the remote hosts that have been disconnected and closed since the Connection Broker has been started or open additional connections to the host with ongoing connections.
On Quick Connect page of the New Connection tab you can define the server host you want to connect to:
Define at least the Host and click Connect:
Host – the FQDN, short host name, the IP address of
the remote host or the connection profile name.
(To test connecting to Tectia Server installed on the same machine, type in
"localhost".)
User – your user name on the remote host.
Port – specify alternate port number if the default Secure Shell listener port 22 is not used on the remote host.
Authentication Method –
by default enabled user authentication methods from Default Settings
are used unless you specify one of the Quick Connect user authentication methods. Password
will attempt methods used commonly for password-based methods like Password and Keyboard-interactive only,
and Public-Key will use available certificates and public keys only.
Exclusive connection – by default a new connection to the same remote host will open a new channel. To open an additional secure shell connection or prevent opening additional channels later within the connection, enable Exclusive connection checkbox.
Start with –
Terminal or File Transfer as the initial channel
in the secure shell connection. You can later open additional channels or new connections to the server.
Environment variables can be used to pre-fill the Quick Connect values. If undefined, the Default Settings will be used and the client prompts for required values if needed.
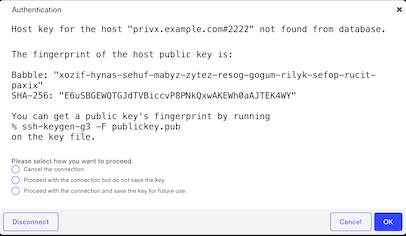
The server authentication phase starts. The remote server host will provide your local computer with its host public key. The host key identifies the server host.
Tectia Client checks if information on this key is already stored in your own host key directory. If not, the host key directory common to all users on your computer is checked next. If information on this host key is not found, you are asked to verify the new key.
When public-key authentication is used to authenticate the server, the first connection is very important. When Tectia Client receives a new server host key, it will display the host identification message.
The message displays the fingerprint of the host's public key in the SSH Babble format that is a series of pronounceable five-letter words in lower case and separated by dashes. By default also base64-encoded SHA-256 fingerprint is shown.
Verify the validity of the fingerprint, preferably by contacting the administrator of the remote host computer by telephone. After verifying the fingerprint, it is safe to save information on the host key for future use. You can also choose to cancel the connection, or to proceed with this connection without saving the host public key information.
![[Caution]](images/caution.gif) | Caution |
|---|---|
Never save a host public key without verifying its authenticity! |
Click OK to close the host identification dialog.
Information on the server public key will be stored on the client-side machine so that the client can later validate the key. On Tectia Client, the public key information is stored in the user's hostkeys directory:
%APPDATA%\SSH\HostKeys, where %APPDATA% corresponds to
C:\Users\<username>\AppData\Roaming
After the first connection, only the locally stored information about the server public key will be used in server authentication.
The user authentication phase starts. You will be prompted to authenticate yourself to the server with your password. The required authentication method depends on the server settings.
After the server has successfully authenticated you, the Secure Shell connection to the server is opened.
| |