 |
To enable ECDSA public-key algorithms for Tectia Client, do the following:
In the Tectia Connections Configuration GUI, go to General > Default Connection and select the Authentication tab.
Move ecdsa-sha2-nistp256, ecdsa-sha2-nistp384
and ecdsa-sha2-nistp521 to the Enabled
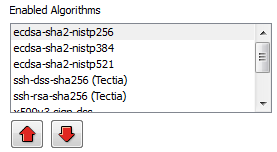
Algorithms list:
Once you have enabled the elliptic curve algorithms, you can change the order of the list using the red up and down arrow buttons. Tectia Client reads the list in the top-down order. The list will look like this if the ECDSA algorithms are ordered at the top:

![[Note]](images/note.gif) | Note |
|---|---|
To enable ECDSA keys for X.509, repeat the process above but select the keys named
|
In the Tectia Connections Configuration GUI, go to User Authentication > Keys and Certificates. Under Key and Certificate List, click New key....
Provide a file name for the key.
Click Advanced Options.
For Key type, select ECDSA.
Select the Key length. A 256-bit ECDSA key provides a level of security equivalent to a 3072-bit DSA or RSA key.
To generate the key, click Next.
The wizard takes you to the Upload Public Key page. If you do not wish to upload the key to a server, click Cancel.