|
Transparent TCP Tunneling is an optional feature. You need to select it on separately at the installation phase. For detailed information on the supported versions, see Product Specification in SSH Tectia Client/Server Solution Product Description.
The transparent TCP tunneling feature captures the TCP traffic of hosts defined in the SSH Tectia configuration and uses encrypted tunnels for sending the data. No changes are required to the configuration of the application software.
On Windows, transparent TCP tunneling captures also connections initiated by applications running at low integrity level on Windows Vista and newer platforms. This is mainly because Internet Explorer (version 7 and newer) runs at low integrity level when configured for protected mode, as by the default.
![[Note]](images/note.gif) | Note |
|---|---|
Connection sharing between SSH applications of one user running at low integrity level and those running at higher integrity levels is disabled for security reasons. |
For example, let us assume that the sshg3 client
has opened and authenticated a secure shell connection using a profile named
tunneling_profile (and sshg3 is
running at normal integrity level).
Then, Internet Explorer running in protected mode (and at low integrity
level) establishes a TCP connection which is tunneled using the same profile
tunneling_profile. Connection Broker behaves as follows in this
situation:
A new SSH connection is opened and authenticated for the Internet Explorer process.
Previously, the existing connection would have been shared between the two applications, only opening new channels as needed.
However, connections are still shared among all processes that run at low integrity level. Similarly, connections are shared also among processes running at medium and higher integrity levels.
The transparent TCP tunneling is activated in the Connection Broker configuration, where you can also specify the applications to be tunneled and define filter rules that control the setting up of the tunnels in detail. Once activated, the transparent TCP tunneling feature automatically captures the defined applications and the Connection Broker creates Secure Shell tunnels to the defined servers, that can be SSH Tectia Servers, SSH Tectia Server for IBM z/OS, or any SSH2-capable Secure Shell servers.
For information on the configuration settings in the XML file, see
the section called “The filter-engine Element”, and for settings in the GUI, see
Defining Transparent Tunnels.
When a global configuration file exists, (for example when
SSH Tectia Client is controlled by SSH Tectia Manager,) and it includes the filter-engine
element, those settings are applied. The global configuration file is located in
/etc/ssh2/ssh-broker-config.xml on Unix, and
"C:\Program Files\SSH Communications Security\SSH Tectia\SSH Tectia
Broker\ssh-broker-config.xml"
on Windows.
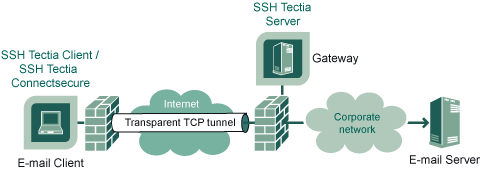
This section gives an example of configuring encrypted tunnels for an e-mail service on Windows. Transparent TCP tunneling is used for establishing tunnels that can be utilized as a secure transport between an e-mail client and an e-mail server communicating over the Internet.
This scenario describes a typical configuration for remote users for accessing the company's internal e-mail services transparently. In the test scenario, access from the client's private network to the Internet traverses through a SOCKS4 server, and the client-side has SSH Tectia Client installed. Access to the company's internal network, including the e-mail services, goes via a gateway host which has SSH Tectia Server running.
Before e-mail delivery, SSH Tectia Client automatically creates a transparent TCP tunnel between the client host and the SSH Tectia Server gateway for SMTP/IMAP/POP protocols. The encrypted tunnel ends at the gateway, and from there onwards the e-mail traffic is transmitted unencrypted in the company's internal network.
To create the configuration using the SSH Tectia Configuration tool, do the following:
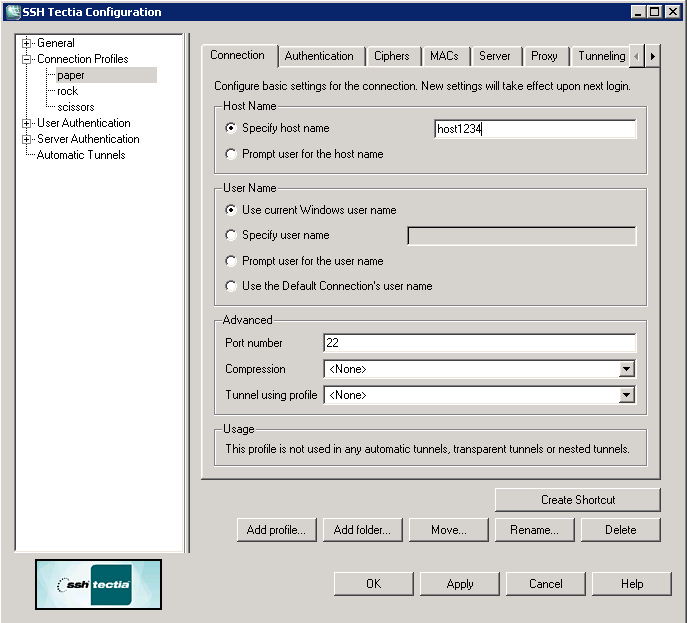
On the Connection Profiles page, click
Add profile to add a new connection profile for the
gateway server host. Enter the profile name and click OK.
In the example, the profile is named paper.
Select the created profile from the Connection Profiles list, and specify the connection details in the following view.
By default, the profile name is assumed to be the host name of the
destination server, but here we link the profile name to a server called
host1234. Click Apply when the settings are
ready.
On the Transparent Tunnels → Connection Capture page, select the Enable transparent tunneling at startup check box.
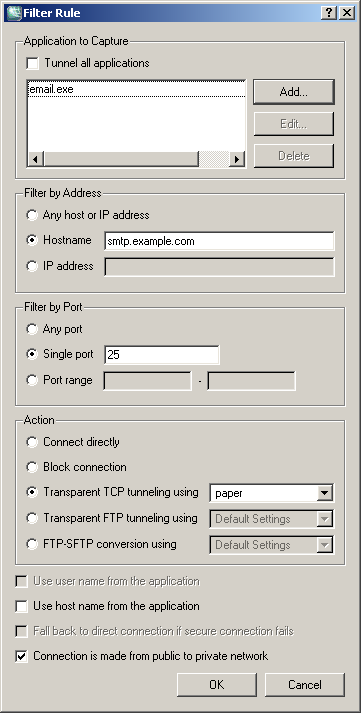
On the Transparent Tunnels → Filter
Rules page, click Add to add the filter rules
which define the applications and ports to be captured and tunneled. In this
example, only TCP ports related to e-mail delivery (IMAP, POP, SMTP) are
forwarded to the gateway server through profile paper.
Under Action, it is possible to select how the destination host is defined; either the host defined in the connection profile is used, or the host definition is received from the application. Now that we have a gateway server in this example, we will use the hostname defined in the profile, and the Use host name from the application is left unselected. In case we had a Secure Shell server running on each destination server, we could use the host names from the application.
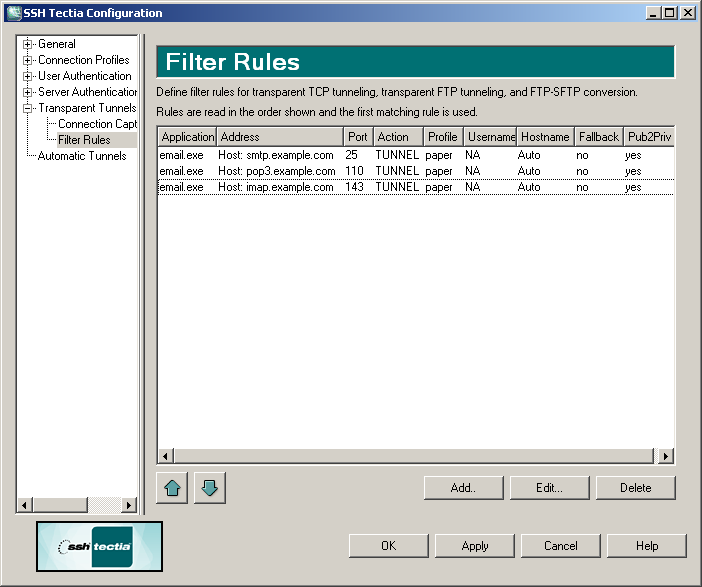
The created rules are listed in the Filter Rules view. You can return to editing a selected rule by clicking Edit, and you can arrange the order of the rules with the up and down arrows. Place the most specific rules first. In this example, the order is not significant.
Once transparent TCP tunneling has been activated, it captures the e-mail traffic to the hosts defined in the SSH Tectia configuration and uses encrypted tunnels for sending the data. No changes are required to the configuration of the e-mail application.
When the tunnel is opened, the user is prompted to authenticate to the gateway server. Setting up public-key authentication to the server is recommended. For instructions, see Managing Keys and Certificates.
| |
Copyright  2010 SSH Communications Security Corp.
This software is protected by international copyright laws. All rights reserved.
Contact Information